ایجاد، حذف و ذخیره ی پویا (Dynamic) سطرها در GridView
دوشنبه 4 خرداد 1394در این مقاله نحوه ایجاد، حذف و ذخیره اطلاعات را در GridView خواهیم آموخت. به این صورت که GridView به صورت اتوماتیک زمانی که یک سطر اضافه شود، یک سطر از TextBox و DropDownList ایجاد می کند.
 سطرها در GridView")
در این مقاله نحوه ایجاد، حذف و ذخیره اطلاعات را در GridView خواهیم آموخت.به این صورت که GridView به صورت اتوماتیک زمانی که یک سطر اضافه شود، یک سطر از TextBox و DropDownList ایجاد می کند.
سالها قبل مقاله هایی با موضوع چگونگی افزودن textboxe های داینامیک، dropdownlist های داینامیک و ترکیب نمودن کنترلرها در یک کنترلر GridView ارائه دادیم. در ادامه به نحوه حذف، درج و ذخیره سطرها میپردازیم. در اینجا می توانید مقاله هایی مرتبط با این موضوع ببینید:
1- اضافه نمودن سطرهای TextBox و DropDownList
2- حفظ کردن مقادیر TextBox و مقادیر انتخاب شده در DropDownList در تمام درخواستهایی که به سمت سرور ارسال میشود
3- نحوه حذف سطرها
4- ذخیره تمام مقادیر
برای شروع برنامه Visual Studio را اجرا نموده و یک پروژه WebForm جدید ایجاد می کنیم.سپس یک کنترلر GridView به صفحه اضافه می کنیم. در ادامه کدهای HTML برای GridView را مشاهده می نمایید:
<asp:gridview ID="Gridview1"  runat="server"  ShowFooter="true"
                             AutoGenerateColumns="false"
                             OnRowCreated="Gridview1_RowCreated">
            <Columns>
                <asp:BoundField DataField="RowNumber" HeaderText="شماره سطرها" />
                <asp:TemplateField HeaderText="ردیف 1">
                    <ItemTemplate>
                        <asp:TextBox ID="TextBox1" runat="server"></asp:TextBox>
                    </ItemTemplate>
                </asp:TemplateField>
                <asp:TemplateField HeaderText="ردیف 2">
                    <ItemTemplate>
                        <asp:TextBox ID="TextBox2" runat="server"></asp:TextBox>
                    </ItemTemplate>
                </asp:TemplateField>
                <asp:TemplateField  HeaderText="ردیف 3">
                    <ItemTemplate>
                        <asp:DropDownList ID="DropDownList1" runat="server"
                                          AppendDataBoundItems="true">
                             <asp:ListItem Value="-1">انتخاب کنید</asp:ListItem>
                        </asp:DropDownList>
                    </ItemTemplate>
                </asp:TemplateField>
                <asp:TemplateField HeaderText="ردیف 4">
                    <ItemTemplate>
                        <asp:DropDownList ID="DropDownList2" runat="server"
                                          AppendDataBoundItems="true">
                             <asp:ListItem Value="-1">انتخاب کنید</asp:ListItem>
                        </asp:DropDownList>
                    </ItemTemplate>
                    <FooterStyle HorizontalAlign="Right" />
                    <FooterTemplate>
                         <asp:Button ID="ButtonAdd" runat="server"
                                     Text="افزودن سطر جدید"
                                     onclick="ButtonAdd_Click" />
                    </FooterTemplate>
                </asp:TemplateField>
                <asp:TemplateField>
                    <ItemTemplate>
                        <asp:LinkButton ID="LinkButton1" runat="server"
                                        onclick="LinkButton1_Click">حذف</asp:LinkButton>
                    </ItemTemplate>
                </asp:TemplateField>
            </Columns>
        </asp:gridview>
همانطور که در کدهای بالا مشاهده می کنید، برای نمایش شماره خطوط و ستون های TemplateField یک BoundField نصب می کنیم، سپس GridView به صورت اتوماتیک زمانی که یک سطر اضافه شود، یک سطر از TextBox و DropDownList ایجاد می کند. مشاهده می کنید که یک دکمه کنترلی در زیر قالب فوتر در پایان ستون DropDownList و در پایان ستون LinkButton در قسمت GridView جهت حذف سطرها اضافه شده است.
نکته: از آنجاییکه ما یک کنترلر به GridView فوتر اضافه نمودیم، در نتیجه از تنظیم شدن ShowFooter در GridView اطمینان داشته باشید.
دستورات:
برای سادگی نسخه نمایشی، یک داده ساختگی(Dummy) با استفاده از ArrayList به عنوان منبع داده برای DropDownList ایجاد می کنیم. در واقع شما ممکن است که سوالاتی از پایگاه داده خود مطرح کنید و آن را در DropDownList ایجاد کنید. در زیر کد کامل مربوط به این مبحث را مشاهده میکنید:
using System;
using System.Collections;
using System.Data;
using System.Web.UI;
using System.Web.UI.WebControls;
using System.Collections.Specialized;
using System.Text;
using System.Data.SqlClient;

namespace WebFormsDemo
{
    public partial class DynamicGrid : System.Web.UI.Page
    {
        private ArrayList GetDummyData() {

            ArrayList arr = new ArrayList();

            arr.Add(new ListItem("آیتم1", "1"));
            arr.Add(new ListItem("آیتم2", "2"));
            arr.Add(new ListItem("آیتم3", "3"));
            arr.Add(new ListItem("آیتم4", "4"));
            arr.Add(new ListItem("آیتم5", "5"));

            return arr;
        }

        private void FillDropDownList(DropDownList ddl) {
            ArrayList arr = GetDummyData();

            foreach (ListItem item in arr) {
                ddl.Items.Add(item);
            }
        }

        private void SetInitialRow() {

            DataTable dt = new DataTable();
            DataRow dr = null;

            dt.Columns.Add(new DataColumn("RowNumber", typeof(string)));
            dt.Columns.Add(new DataColumn("Column1", typeof(string)));//for TextBox value
            dt.Columns.Add(new DataColumn("Column2", typeof(string)));//for TextBox value
            dt.Columns.Add(new DataColumn("Column3", typeof(string)));//for DropDownList selected item
            dt.Columns.Add(new DataColumn("Column4", typeof(string)));//for DropDownList selected item

            dr = dt.NewRow();
            dr["RowNumber"] = 1;
            dr["Column1"] = string.Empty;
            dr["Column2"] = string.Empty;
            dt.Rows.Add(dr);

            //Store the DataTable in ViewState for future reference
            ViewState["CurrentTable"] = dt;

            //Bind the Gridview
            Gridview1.DataSource = dt;
            Gridview1.DataBind();

            //After binding the gridview, we can then extract and fill the DropDownList with Data
            DropDownList ddl1 = (DropDownList)Gridview1.Rows[0].Cells[3].FindControl("DropDownList1");
            DropDownList ddl2 = (DropDownList)Gridview1.Rows[0].Cells[4].FindControl("DropDownList2");
            FillDropDownList(ddl1);
            FillDropDownList(ddl2);
        }

        private void AddNewRowToGrid() {

            if (ViewState["CurrentTable"] != null) {

                DataTable dtCurrentTable = (DataTable)ViewState["CurrentTable"];
                DataRow drCurrentRow = null;

                if (dtCurrentTable.Rows.Count > 0) {
                    drCurrentRow = dtCurrentTable.NewRow();
                    drCurrentRow["RowNumber"] = dtCurrentTable.Rows.Count + 1;

                    //add new row to DataTable
                    dtCurrentTable.Rows.Add(drCurrentRow);
                    //Store the current data to ViewState for future reference

                    ViewState["CurrentTable"] = dtCurrentTable;


                    for (int i = 0; i < dtCurrentTable.Rows.Count - 1; i++) {

                        //extract the TextBox values

                        TextBox box1 = (TextBox)Gridview1.Rows[i].Cells[1].FindControl("TextBox1");
                        TextBox box2 = (TextBox)Gridview1.Rows[i].Cells[2].FindControl("TextBox2");

                        dtCurrentTable.Rows[i]["Column1"] = box1.Text;
                        dtCurrentTable.Rows[i]["Column2"] = box2.Text;

                        //extract the DropDownList Selected Items

                        DropDownList ddl1 = (DropDownList)Gridview1.Rows[i].Cells[3].FindControl("DropDownList1");
                        DropDownList ddl2 = (DropDownList)Gridview1.Rows[i].Cells[4].FindControl("DropDownList2");

                        // Update the DataRow with the DDL Selected Items

                        dtCurrentTable.Rows[i]["Column3"] = ddl1.SelectedItem.Text;
                        dtCurrentTable.Rows[i]["Column4"] = ddl2.SelectedItem.Text;

                    }

                    //Rebind the Grid with the current data to reflect changes
                    Gridview1.DataSource = dtCurrentTable;
                    Gridview1.DataBind();
                }
            }
            else {
                Response.Write("ViewState is null");

            }
            //Set Previous Data on Postbacks
            SetPreviousData();
        }

        private void SetPreviousData() {

            int rowIndex = 0;
            if (ViewState["CurrentTable"] != null) {

                DataTable dt = (DataTable)ViewState["CurrentTable"];
                if (dt.Rows.Count > 0) {

                    for (int i = 0; i < dt.Rows.Count; i++) {

                        TextBox box1 = (TextBox)Gridview1.Rows[i].Cells[1].FindControl("TextBox1");
                        TextBox box2 = (TextBox)Gridview1.Rows[i].Cells[2].FindControl("TextBox2");

                        DropDownList ddl1 = (DropDownList)Gridview1.Rows[rowIndex].Cells[3].FindControl("DropDownList1");
                        DropDownList ddl2 = (DropDownList)Gridview1.Rows[rowIndex].Cells[4].FindControl("DropDownList2");

                        //Fill the DropDownList with Data
                        FillDropDownList(ddl1);
                        FillDropDownList(ddl2);

                        if (i < dt.Rows.Count - 1) {

                            //Assign the value from DataTable to the TextBox
                            box1.Text = dt.Rows[i]["Column1"].ToString();
                            box2.Text = dt.Rows[i]["Column2"].ToString();

                            //Set the Previous Selected Items on Each DropDownList  on Postbacks
                            ddl1.ClearSelection();
                            ddl1.Items.FindByText(dt.Rows[i]["Column3"].ToString()).Selected = true;

                            ddl2.ClearSelection();
                            ddl2.Items.FindByText(dt.Rows[i]["Column4"].ToString()).Selected = true;

                        }

                        rowIndex++;
                    }
                }
            }
        }

        protected void Page_Load(object sender, EventArgs e) {
            if (!Page.IsPostBack) {
                SetInitialRow();
            }
        }

        protected void ButtonAdd_Click(object sender, EventArgs e) {
            AddNewRowToGrid();
        }

        protected void Gridview1_RowCreated(object sender, GridViewRowEventArgs e) {
            if (e.Row.RowType == DataControlRowType.DataRow) {
                DataTable dt = (DataTable)ViewState["CurrentTable"];
                LinkButton lb = (LinkButton)e.Row.FindControl("LinkButton1");
                if (lb != null) {
                    if (dt.Rows.Count > 1) {
                        if (e.Row.RowIndex == dt.Rows.Count - 1) {
                            lb.Visible = false;
                        }
                    }
                    else {
                        lb.Visible = false;
                    }
                }
            }
        }

        protected void LinkButton1_Click(object sender, EventArgs e) {
            LinkButton lb = (LinkButton)sender;
            GridViewRow gvRow = (GridViewRow)lb.NamingContainer;
            int rowID = gvRow.RowIndex;
            if (ViewState["CurrentTable"] != null) {

                DataTable dt = (DataTable)ViewState["CurrentTable"];
                if (dt.Rows.Count > 1) {
                    if (gvRow.RowIndex < dt.Rows.Count - 1) {
                        //Remove the Selected Row data and reset row number
                        dt.Rows.Remove(dt.Rows[rowID]);
                        ResetRowID(dt);
                    }
                }

                //Store the current data in ViewState for future reference
                ViewState["CurrentTable"] = dt;

                //Re bind the GridView for the updated data
                Gridview1.DataSource = dt;
                Gridview1.DataBind();
            }

            //Set Previous Data on Postbacks
            SetPreviousData();
        }

        private void ResetRowID(DataTable dt) {
            int rowNumber = 1;
            if (dt.Rows.Count > 0) {
                foreach (DataRow row in dt.Rows) {
                    row[0] = rowNumber;
                    rowNumber++;
                }
            }
        }

        private string GetConnectionString() {
            return System.Configuration.ConfigurationManager.ConnectionStrings["DBConnection"].ConnectionString;
        }

        private void InsertRecords(StringCollection sc) {

            StringBuilder sb = new StringBuilder(string.Empty);
            string[] splitItems = null;
            const string sqlStatement = "INSERT INTO GridViewDynamicData (Field1,Field2,Field3,Field4) VALUES";
            foreach (string item in sc) {

                if (item.Contains(",")) {
                    splitItems = item.Split(",".ToCharArray());
                    sb.AppendFormat("{0}('{1}','{2}','{3}','{4}'); ", sqlStatement, splitItems[0], splitItems[1], splitItems[2], splitItems[3]);
                }
            }

            using (SqlConnection connection = new SqlConnection(GetConnectionString())) {
                connection.Open();
                using (SqlCommand cmd = new SqlCommand(sb.ToString(), connection)) {
                    cmd.CommandType = CommandType.Text;
                    cmd.ExecuteNonQuery();
                }
            }

            lblMessage.Text = "اطلاعات با موفقیت ثبت شد!";
        }
        protected void BtnSave_Click(object sender, EventArgs e) {
            int rowIndex = 0;

            StringCollection sc = new StringCollection();
            if (ViewState["CurrentTable"] != null) {

                DataTable dtCurrentTable = (DataTable)ViewState["CurrentTable"];
                if (dtCurrentTable.Rows.Count > 0) {
                    for (int i = 1; i <= dtCurrentTable.Rows.Count; i++) {
                        //extract the TextBox values
                        TextBox box1 = (TextBox)Gridview1.Rows[rowIndex].Cells[1].FindControl("TextBox1");
                        TextBox box2 = (TextBox)Gridview1.Rows[rowIndex].Cells[2].FindControl("TextBox2");
                        DropDownList ddl1 = (DropDownList)Gridview1.Rows[rowIndex].Cells[3].FindControl("DropDownList1");
                        DropDownList ddl2 = (DropDownList)Gridview1.Rows[rowIndex].Cells[4].FindControl("DropDownList2");


                        //get the values from TextBox and DropDownList
                        //then add it to the collections with a comma "," as the delimited values

                        sc.Add(string.Format("{0},{1},{2},{3}",box1.Text,box2.Text, ddl1.SelectedItem.Text, ddl2.SelectedItem.Text));
                        rowIndex++;
                    }

                    //Call the method for executing inserts

                    InsertRecords(sc);
                }
            }
        }
    }
}
تعاریف متد:
GetDummyData() -1: متدی است که یک ArrayList بازمی گرداند. درواقع این متد شامل یک داده ساختگی(Dummy) ایستا(static) برای پر کردن DropDownList است. شما ممکن است هنگام بخورد با حالات دنیای واقعی بخواهید از پایگاه داده استفاده کنید.
FillDropDownList(DropDownList ddl) -2 : متدی است که DropDownList را با داده ساختگی (Dummy) پر می کند.
SetInitialRow() -3: متدی که GridView را برای اولین بار به اولین خط از داده، پیوند می دهد. DataTable یی که در این متد تعریف شده است در یک ViewState ذخیره شده است، بنابراین می توان آن را به هر نقطه از کد در سراسر postback رجوع داد. اساسا این جدول DataSource اصلی را برای GridView مورد استفاده قرار می دهد. به خاطر داشته باشید که این فقط نسخه نمایشی است، بنابراین در هنگام استفاده از ViewState برای جلوگیری از مشکل عملکرد صفحه به آن توجه کنید. اگرچه ViewState محدود است و شما قادر نخواهید بود حجم بسیار بالایی از اطلاعات را ذخیره کنید.
AddNewRowToGrid() -4: متدی است که وقتی یک Button را کلیک میکنیم یک سطر را به GridView اضافه و مقدار جدید را به جدول اصلی که در متد SetInitialRow()تعریف شده است، اضافه مینماید.
SetPreviousData() -5: متدی است که تمام گزینه هایی که بعد از postback از DropDownList و TextBox انتخاب شده است را نگهداری می کند.
ResetRowID() -6: متدی است که سطرهای Grid را بعد از هر بار پاک کردن اطلاعات بروزرسانی می کند.
رویدادها:
ButtonAdd_Click -1: بعد از متد AddNewRowRoGrid() فراخوانی می شود.
LinkButto1_Click -2 : این متد باعث پاک شدن یک لینک از Grid می شود. در اینجا داده از data source پاک شده و شماره خطوط را بروزرسانی می کند و در پایان data source پایانی را در ViewState ذخیره و آنرا برای نشان دادن تغییرات به Grid منتقل می کند.
GridView1_RowCreated -3: در اینجا ما اعتبارسنجی اولیه را برای عدم مشاهده دکمه حذف در آخرین سطر توسط کاربر در Grid قرار می دهیم.
خروجی:
خروجی صفحه چیزی شبیه این را در مرورگر نمایش میدهد.
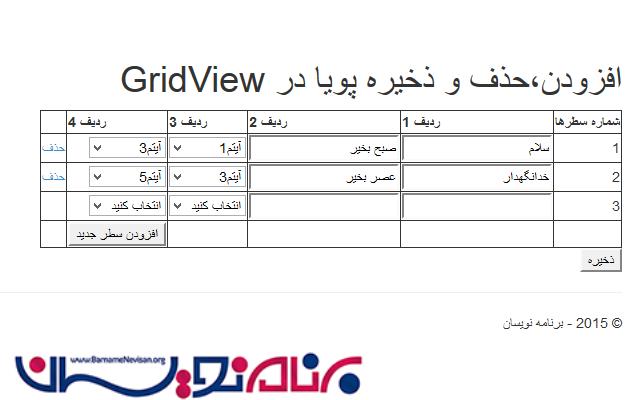
در اولین اجرا:

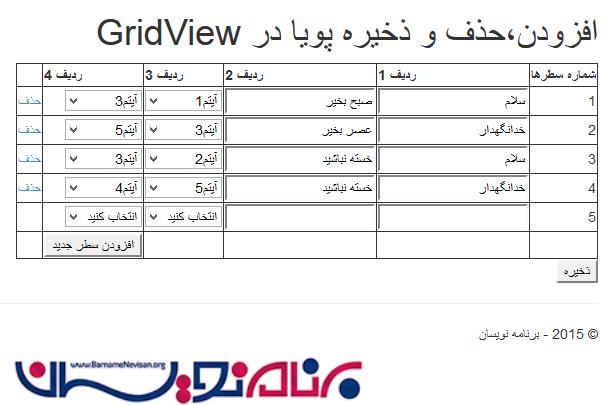
بعد از اضافه نمودن اولین سطر:
حذف نمودن سطر:
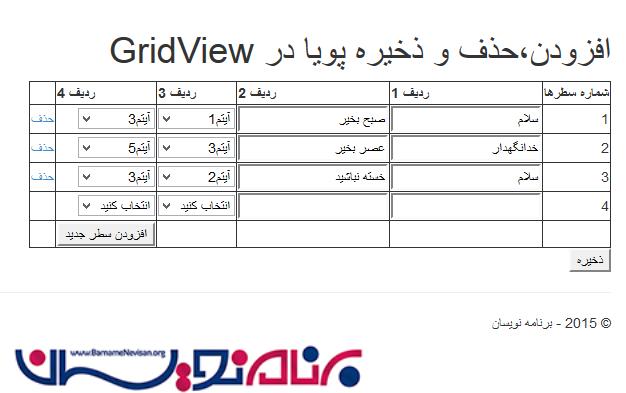
نتیجه بعد از حذف یک سطر:
کار تمام شد، حالا سوالی که برای شما پیش می آید این است که چگونه دادهها را در پایگاه داده ذخیره می کنیم. در قدم بعدی به این مبحث می پردازیم.
ذخیره تمام داده ها:
اولین قدمی که باید انجام دهید این است که شما نیاز به ایجاد یک پایگاه داده و جدولی برای ذخیره داده ها دارید. پس SQL Management Studio یا Express را ایجاد کرده و جدولی با فیلدهای زیر در آن ایجاد کنید. جدول را با هر نامی که میخواهید ذخیره کنید.در اینجا ما نام GridViewDynamicRow را انتخاب نموده ایم.
نکته: برای این جدول یک RowID درنظر گرفتیم، پس برای هر سطری که اضافه میشود یک ID ایجاد می شود. برای این منظور برای ستون RowID در قسمت Properties گزینه IdentitySpecification را به Yes تغییر دهید.
بعد از ایجاد جدول به VisualStodio بازگردید و یک کنترلر Button به فرم اضافه کنید.
برای مثال:
<asp:Button ID="BtnSave" runat="server" Text="ذخیره" OnClick="BtnSave_Click" />
حال میخواهیم یک متد برای ذخیره دادهها در پایگاه داده ایجاد کنیم. اولین چیزی در اینجا نیاز داریم ایجاد یک Connection String است که با این کار می توانیم ارتباطی بین پایگاه داده و کد برقرار کنیم. برای این مثال ما از web.config برای تنظیم connection String استفاده میکنیم. به کدهای زیر توجه کنید:
<connectionStrings>
    <add name="DBConnection" connectionString="Data Source=.;Initial Catalog=Dynamically;Integrated Security=True" providerName="System.Data.SqlClient" />
  </connectionStrings>
حال میخواهیم متدی برای ذخیره داده ها در پایگاه داده ایجاد کنیم.در ابتدا یک فضای نام به کدهای خود اضافه میکنیم.
using System.Collections.Specialized;
using System.Text;
using System.Data.SqlClient;
ما نیاز به بیان فضای نام بالا داریم پس برای این کار از SqlClient, StringCollections و متد داخلی StringBuilder در کدهای خود استفاده می کنیم.
در قدم دوم، یک متد برای فراخوانی Connection String که در web.Config تنظیم کرده ایم، داریم.
    private string GetConnectionString()
    {
       return ConfigurationManager.ConnectionStrings["DBConnection"].ConnectionString;
    }
کد زیر تمام سطرها را در پایگاه داده پر میکند.
private string GetConnectionString() {
            return System.Configuration.ConfigurationManager.ConnectionStrings["DBConnection"].ConnectionString;
        }

        private void InsertRecords(StringCollection sc) {

            StringBuilder sb = new StringBuilder(string.Empty);
            string[] splitItems = null;
            const string sqlStatement = "INSERT INTO GridViewDynamicData (Field1,Field2,Field3,Field4) VALUES";
            foreach (string item in sc) {

                if (item.Contains(",")) {
                    splitItems = item.Split(",".ToCharArray());
                    sb.AppendFormat("{0}('{1}','{2}','{3}','{4}'); ", sqlStatement, splitItems[0], splitItems[1], splitItems[2], splitItems[3]);
                }
            }

            using (SqlConnection connection = new SqlConnection(GetConnectionString())) {
                connection.Open();
                using (SqlCommand cmd = new SqlCommand(sb.ToString(), connection)) {
                    cmd.CommandType = CommandType.Text;
                    cmd.ExecuteNonQuery();
                }
            }

            lblMessage.Text = "اطلاعات با موفقیت ثبت شد!";
        }
متد InsertRecords() مقادیر StringCollection را به عنوان پارامتر در خود ذخیره می کند. StringCollection تمام مقدارهای Grid پویا (dynamic) را نگه می دارد. سپس ما مقادیر مجموعه را بخش بخش کرده و یک SQL query برای هر سطر ایجاد می کنیم. در پایان یک Connection به پایگاه داده ایجاد و سپس Query را برای پر کردن داده ها اجرا می کنیم .
در پایان، کد زیر برای عملیات رویداد کلیک Button است:
protected void BtnSave_Click(object sender, EventArgs e) {
            int rowIndex = 0;

            StringCollection sc = new StringCollection();
            if (ViewState["CurrentTable"] != null) {

                DataTable dtCurrentTable = (DataTable)ViewState["CurrentTable"];
                if (dtCurrentTable.Rows.Count > 0) {
                    for (int i = 1; i <= dtCurrentTable.Rows.Count; i++) {
                        //extract the TextBox values
                        TextBox box1 = (TextBox)Gridview1.Rows[rowIndex].Cells[1].FindControl("TextBox1");
                        TextBox box2 = (TextBox)Gridview1.Rows[rowIndex].Cells[2].FindControl("TextBox2");
                        DropDownList ddl1 = (DropDownList)Gridview1.Rows[rowIndex].Cells[3].FindControl("DropDownList1");
                        DropDownList ddl2 = (DropDownList)Gridview1.Rows[rowIndex].Cells[4].FindControl("DropDownList2");


                        //get the values from TextBox and DropDownList
                        //then add it to the collections with a comma "," as the delimited values

                        sc.Add(string.Format("{0},{1},{2},{3}",box1.Text,box2.Text, ddl1.SelectedItem.Text, ddl2.SelectedItem.Text));
                        rowIndex++;
                    }

                    //Call the method for executing inserts

                    InsertRecords(sc);
                }
            }
        }
کد بالا برای ارسال مستقیم بسیار مناسب است. این کد به سادگی حلقه هایی از DataTable در ViewState ذخیره و سپس مقادیر هر سطر را در StringCollection اضافه می کند.
پس از اینکه تمام مقادیر اضافه شد، ما متد InsertRecords() را برای اجرای عملیات درج در پایگاه داده فراخوانی می کنیم.
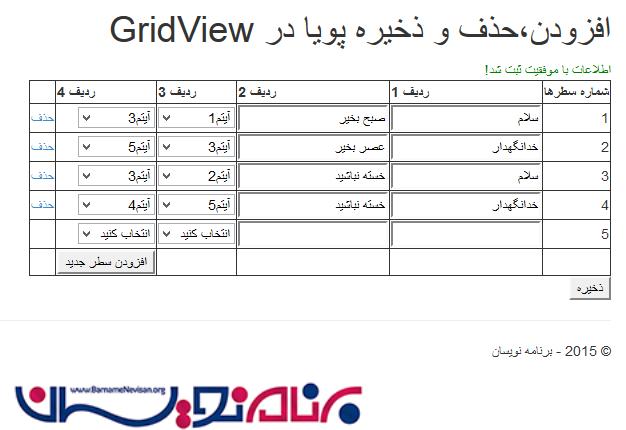
خروجی زیر بعد از کلیک بر دکمه ذخیره اتفاق می افتاد.
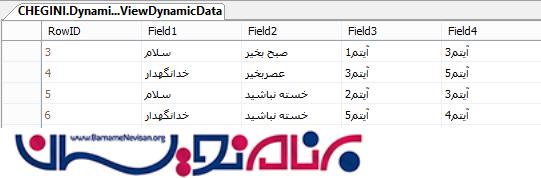
در زیر نتیجه داده های ذخیره شده در پایگاه داده را میبینیم:
در کنار این مقاله یک پروژه برای درک بهتر مطلب ضمیمه شده است.

- ASP.net
- 2k بازدید
- 8 تشکر