آپلود و نمایش تصویر در ادیتور TinyMce
دوشنبه 25 خرداد 1394در این مقاله قصد داریم نحوه آپلود تصویر از کامپیوتر کاربر به سرور و نمایش تصویر آپلود در ادیتور محبوب و پر قدرت TinyMce را به شما عزیزان آموزش دهیم .

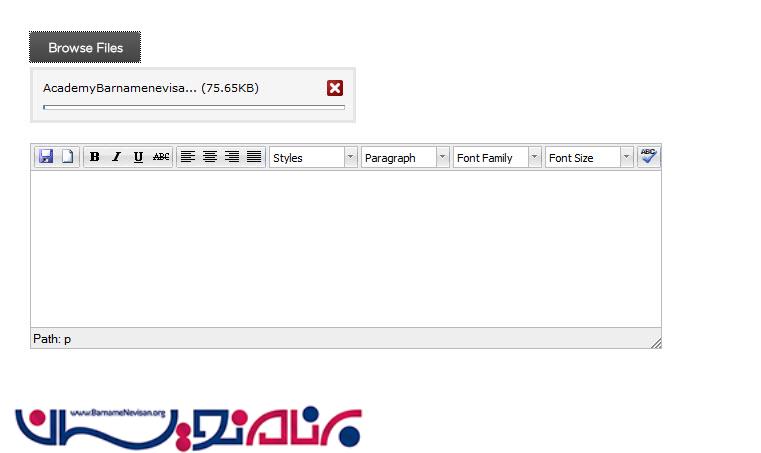
ابتدا ادیتور و اسکریپت های مورد نیاز را به صفحه اضافه میکنیم
<head runat="server">
    <title></title>
    <link rel="Stylesheet" type="text/css" href="CSS/uploadify.css" />
    <script type="text/javascript" src="http://ajax.googleapis.com/ajax/libs/jquery/1.8.3/jquery.min.js"></script>
    <script type="text/javascript" src="scripts/jquery.uploadify.js"></script>
    <script type="text/javascript" src="jscripts/tiny_mce/jquery.tinymce.js"></script>
    <script type="text/javascript">
        $(function () {
            $('textarea').tinymce({
                script_url: 'jscripts/tiny_mce/tiny_mce.js',
                theme: "advanced",
                plugins: "spellchecker,pagebreak,style,layer,table,save,advhr,advimage,advlink,emotions,iespell,inlinepopups,insertdatetime,preview,media,searchreplace,print,contextmenu,paste,directionality,fullscreen,noneditable,visualchars,nonbreaking,xhtmlxtras,template",
                theme_advanced_buttons1: "save,newdocument,|,bold,italic,underline,strikethrough,|,justifyleft,justifycenter,justifyright,justifyfull,styleselect,formatselect,fontselect,fontsizeselect,spellchecker",
                theme_advanced_buttons2: "",
                theme_advanced_buttons3: "",
                theme_advanced_buttons4: "",
                theme_advanced_toolbar_location: "top",
                theme_advanced_toolbar_align: "left",
                theme_advanced_statusbar_location: "bottom",
                theme_advanced_resizing: true,
                height: 200,
                skin: "o2k7",
                skin_variant: "silver"
            });
            $("[id*=FileUpload1]").fileUpload({
                'uploader': 'scripts/uploader.swf',
                'cancelImg': 'images/cancel.png',
                'buttonText': 'Browse Files',
                'script': 'Upload.ashx',
                'folder': 'uploads',
                'fileDesc': 'Image Files',
                'fileExt': '*.jpg;*.jpeg;*.gif;*.png',
                'multi': true,
                'auto': true,
                'onComplete': function (event, ID, fileObj, response, data) {
                    var img = "<img style = 'height:80px;width:80px' src = '" + fileObj.filePath + "' />";
                    tinyMCE.activeEditor.execCommand("mceInsertContent", true, img);
                }
            });
        });
    </script>
</head>
<body>
    <form id="form1" runat="server">
    <div style="padding: 40px">
        <asp:FileUpload ID="FileUpload1" runat="server" /><br />
        <asp:TextBox ID="TextBox1" runat="server" TextMode="MultiLine"></asp:TextBox>
    </div>
    </form>
</body>
</html>
در کد بالا رویداد onComplete که به FileUpload متصل شده وظیفه درج تصویر به ادیتور ، بعد از آپلود را بر عهده دارد .
نمونه ضمیمه شده

- ASP.net
- 3k بازدید
- 6 تشکر