انجام عملیات Crud (چهار عمل اصلی) توسط Business Layer (لایه بیزینس) و Scaffolding
شنبه 24 مرداد 1394در این مقاله نحوه انجام عملیات Crud (چهار عمل اصلی) توسط Business Layer (لایه بیزینس) و Scaffolding را خواهید آموخت.
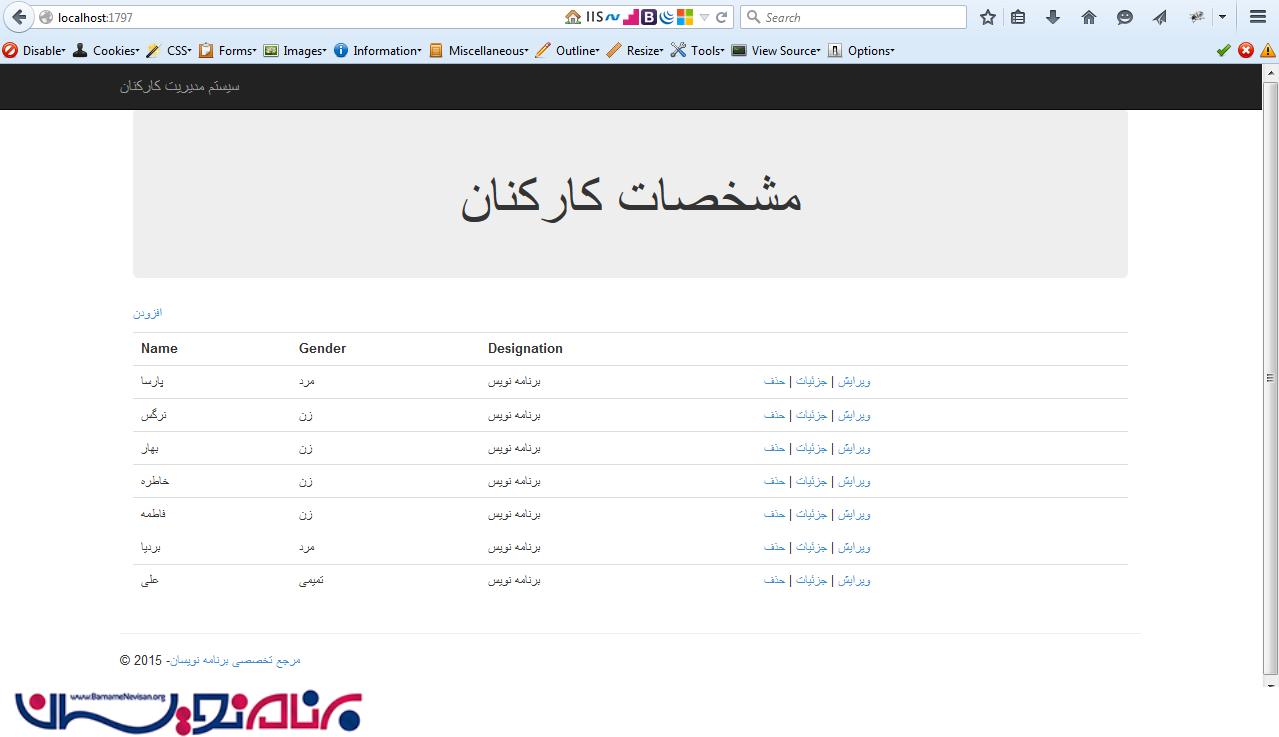
در این مقاله از کدهای ADO.NET برای برقراری ارتباط با بانک اطلاعاتی جهت انجام عملیات Crud استفاده شده است. کارهای انجام شده در این تمرین استفاده از لایه Business که شامل Logic (منطق) می باشد .
مرحله 1
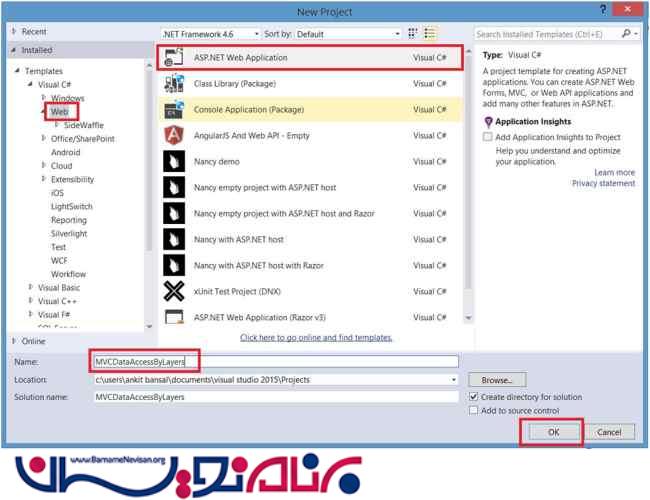
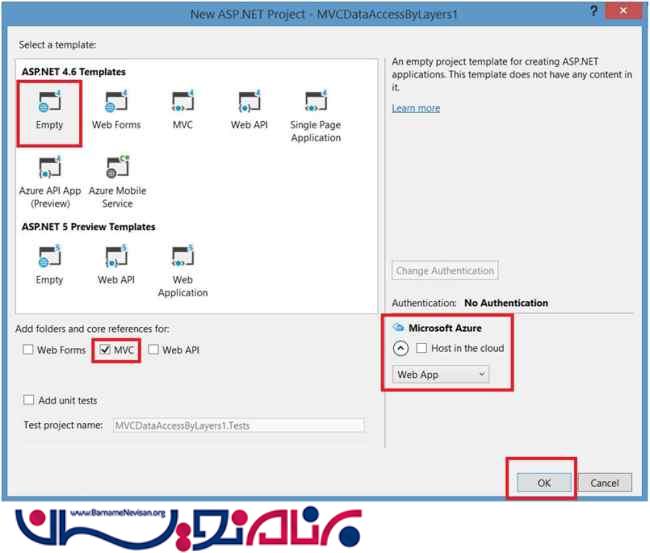
یک برنامه از نوع MVC ایجاد نمایید. دقت داشته باشید که فریم ورک Entity از قسمت Nuget باید به پروژه اضافه شده باشد.
مرحله 2
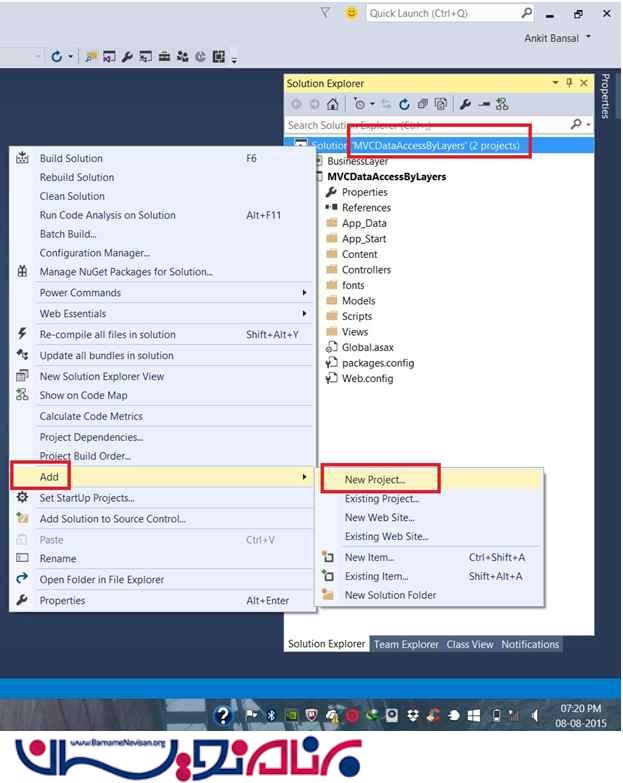
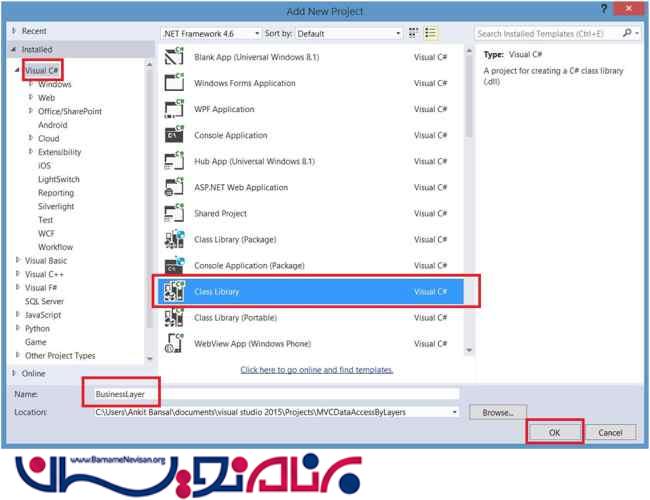
یک پروژه از نوع Class Library به Solution خود اضافه نمایید.
مرحله 3
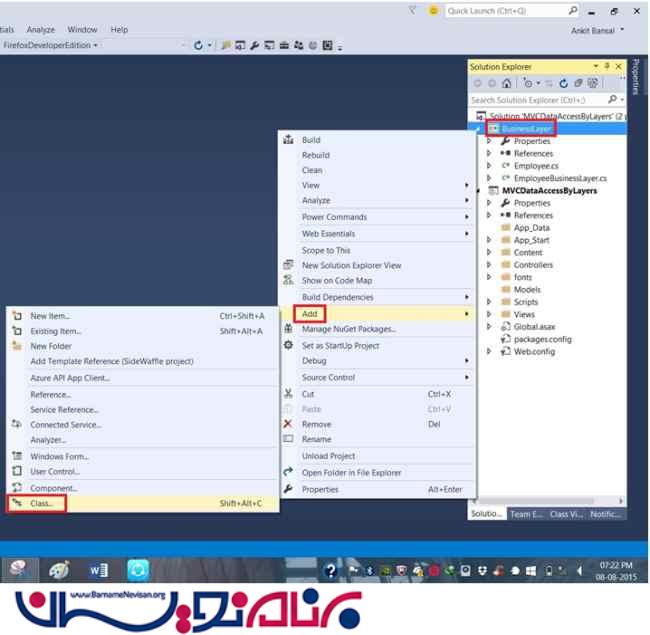
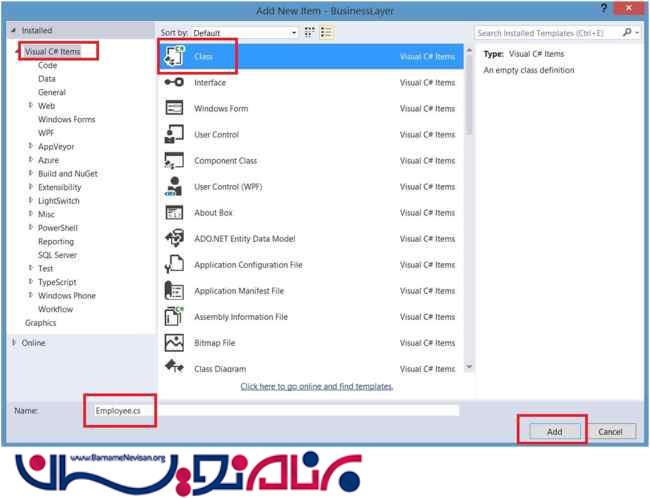
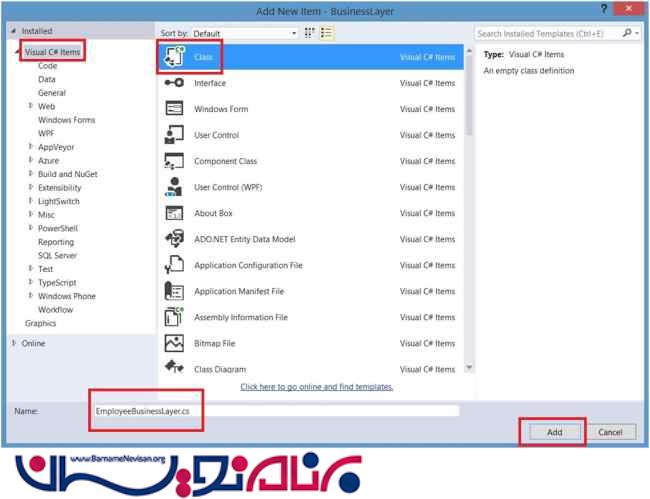
درون Class Library دو کلاس با نام های Employee و EmployeeBusinessLayer مانند زیر اضافه نمایید.
مرحله 4
SQL Server Management Studio را باز نموده و یک بانک اطلاعاتی با جدولی مانند زیر ایجاد نمایید همچنین می توانید از اسکریپت زیر استفاده نمایید.
USE [BusinesLayerDB]
GO
/****** Object:  Table [dbo].[Employee]    Script Date: 08/13/2015 16:20:39 ******/
SET ANSI_NULLS ON
GO
SET QUOTED_IDENTIFIER ON
GO
CREATE TABLE [dbo].[Employee](
	[EmployeeID] [int] NOT NULL,
	[EmployeeName] [nvarchar](50) NULL,
	[EmployeeGender] [nvarchar](10) NULL,
	[EmployeeDesignation] [nvarchar](50) NULL,
 CONSTRAINT [PK__Employee__7AD04FF17F60ED59] PRIMARY KEY CLUSTERED
(
	[EmployeeID] ASC
)WITH (PAD_INDEX  = OFF, STATISTICS_NORECOMPUTE  = OFF, IGNORE_DUP_KEY = OFF, ALLOW_ROW_LOCKS  = ON, ALLOW_PAGE_LOCKS  = ON) ON [PRIMARY]
) ON [PRIMARY]
GO
/****** Object:  StoredProcedure [dbo].[spUpdateEmployee]    Script Date: 08/13/2015 16:20:39 ******/
SET ANSI_NULLS ON
GO
SET QUOTED_IDENTIFIER ON
GO
CREATE PROCEDURE [dbo].[spUpdateEmployee]
@EmployeeID int,
@EmployeeName nvarchar(100),
    @EmployeeGender nvarchar(10),
    @EmployeeDesignation nvarchar(100)
AS
BEGIN
UPDATE dbo.Employee
SET
    --EmployeeID - this column value is auto-generated
    dbo.Employee.EmployeeName = @EmployeeName, -- nvarchar
    dbo.Employee.EmployeeGender = @EmployeeGender, -- nvarchar
    dbo.Employee.EmployeeDesignation = @EmployeeDesignation-- nvarchar
WHERE
dbo.Employee.EmployeeID = @EmployeeID
END
GO
/****** Object:  StoredProcedure [dbo].[spInsertEmployeeDetails]    Script Date: 08/13/2015 16:20:39 ******/
SET ANSI_NULLS ON
GO
SET QUOTED_IDENTIFIER ON
GO
CREATE PROCEDURE [dbo].[spInsertEmployeeDetails]
       @EmployeeName        NVARCHAR(50),
       @EmployeeGender      NVARCHAR(10),
       @EmployeeDesignation NVARCHAR(50)
AS
    BEGIN
                INSERT dbo.Employee
          (
             --EmployeeID - this column value is auto-generated
             EmployeeName,
             EmployeeGender,
             EmployeeDesignation
          )
          VALUES
          (
             -- EmployeeID - int
             N'', -- EmployeeName - nvarchar
             N'', -- EmployeeGender - nvarchar
             N'' -- EmployeeDesignation - nvarchar
          )
    END;
GO
/****** Object:  StoredProcedure [dbo].[spGetAllEmployees]    Script Date: 08/13/2015 16:20:39 ******/
SET ANSI_NULLS ON
GO
SET QUOTED_IDENTIFIER ON
GO
CREATE PROCEDURE [dbo].[spGetAllEmployees]
AS
    BEGIN
        SELECT emp.*
        FROM dbo.Employee emp;
    END;
GO
/****** Object:  StoredProcedure [dbo].[spDeleteEmployee]    Script Date: 08/13/2015 16:20:39 ******/
SET ANSI_NULLS ON
GO
SET QUOTED_IDENTIFIER ON
GO
CREATE PROCEDURE [dbo].[spDeleteEmployee]
       @EmployeeID INT
AS
    BEGIN
        DELETE dbo.Employee
        WHERE dbo.Employee.EmployeeID = @EmployeeID;
    END;
GO
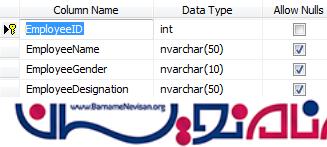
همچنین برای کسانی که وقت کافی برای ساخت بانک اطلاعاتی را ندارند فایل نصبی ساخت بانک اطلاعاتی درون فایل ضمیمه قرار داده شده است.
مرحله 5
کدهای زیر را درون کلاس هایی که در مرحله 3 ساختیم کپی نمایید.
Employee.cs
using System.ComponentModel.DataAnnotations;
namespace BusinessLayer
{
    public class Employee
    {
        public int EmployeeID { get; set; }
        [Required]
        public string EmployeeName { get; set; }
        [Required]
        public string EmployeeGender { get; set; }
        [Required]
        public string EmployeeDesignation { get; set; }
    }
}
EmployeeBusinessLayer.cs
using System;
using System.Collections.Generic;
using System.Configuration;
using System.Data;
using System.Data.SqlClient;

namespace BusinessLayer
{
    public class EmployeeBusinessLayer
    {
        public IEnumerable<Employee> Employees
        {
            get
            {
                string CS = ConfigurationManager.ConnectionStrings["DBCS"].ConnectionString;
                List<Employee> employees = new List<Employee>();
                using (SqlConnection con = new SqlConnection(CS))
                {
                    con.Open();
                    SqlCommand cmd = new SqlCommand("spGetAllEmployees", con);
                    cmd.CommandType = CommandType.StoredProcedure;
                    SqlDataReader dr = cmd.ExecuteReader();
                    while (dr.Read())
                    {
                        Employee employee = new Employee();
                        employee.EmployeeID = Convert.ToInt32(dr["EmployeeID"]);
                        employee.EmployeeName = dr["EmployeeName"].ToString();
                        employee.EmployeeGender = dr["EmployeeGender"].ToString();
                        employee.EmployeeDesignation = dr["EmployeeDesignation"].ToString();
                        employees.Add(employee);
                    }
                }
                return employees;
            }
        }

        public void AddEmployee(Employee employee)
        {
            string CS = ConfigurationManager.ConnectionStrings["DBCS"].ConnectionString;
            using (SqlConnection con = new SqlConnection(CS))
            {
                con.Open();
                SqlCommand cmd = new SqlCommand("spInsertEmployeeDetails", con);
                cmd.CommandType = CommandType.StoredProcedure;
                cmd.Parameters.AddWithValue("@EmployeeName", employee.EmployeeName);
                cmd.Parameters.AddWithValue("@EmployeeGender", employee.EmployeeGender);
                cmd.Parameters.AddWithValue("@EmployeeDesignation", employee.EmployeeDesignation);

                cmd.ExecuteNonQuery();
            }
        }

        public void UpdateEmployee(Employee employee)
        {
            string CS = ConfigurationManager.ConnectionStrings["DBCS"].ConnectionString;
            using (SqlConnection con = new SqlConnection(CS))
            {
                con.Open();
                SqlCommand cmd = new SqlCommand("spUpdateEmployee", con);
                cmd.CommandType = CommandType.StoredProcedure;
                cmd.Parameters.AddWithValue("@EmployeeID", employee.EmployeeID);
                cmd.Parameters.AddWithValue("@EmployeeName", employee.EmployeeName);
                cmd.Parameters.AddWithValue("@EmployeeGender", employee.EmployeeGender);
                cmd.Parameters.AddWithValue("@EmployeeDesignation", employee.EmployeeDesignation);

                cmd.ExecuteNonQuery();
            }
        }

        public void DeleteEmployee(int id)
        {
            string CS = ConfigurationManager.ConnectionStrings["DBCS"].ConnectionString;
            using (SqlConnection con = new SqlConnection(CS))
            {
                con.Open();
                SqlCommand cmd = new SqlCommand("spDeleteEmployee", con);
                cmd.CommandType = CommandType.StoredProcedure;
                cmd.Parameters.AddWithValue("@EmployeeID", id);
                cmd.ExecuteNonQuery();
            }
        }
    }
}
مرحله 7
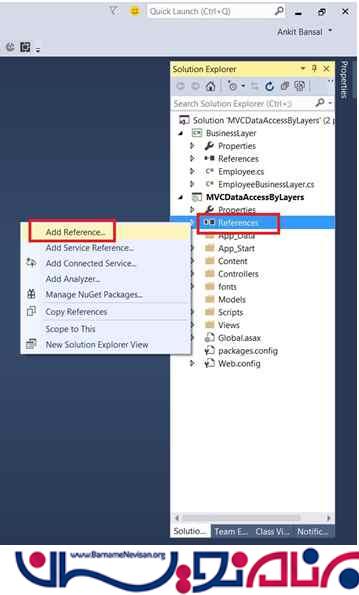
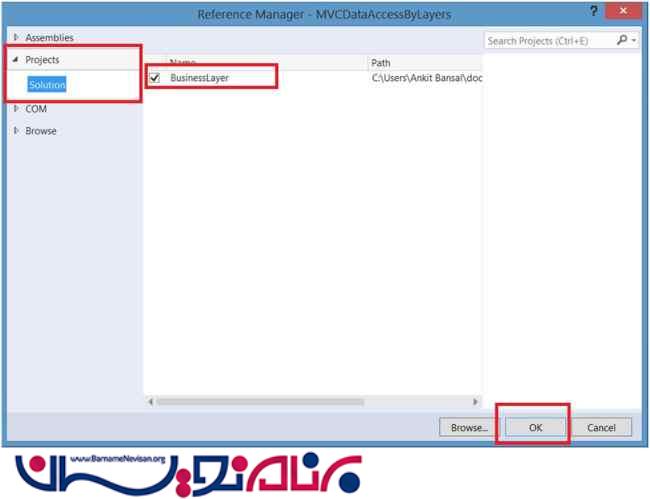
پروژه را Rebuild کرده (Ctrl + Shift + B) تا dll های Class Library ساخته شوند. حالا مانند زیر Business Layer را به پروژه MVC رفرنس می دهیم.
مرحله 8
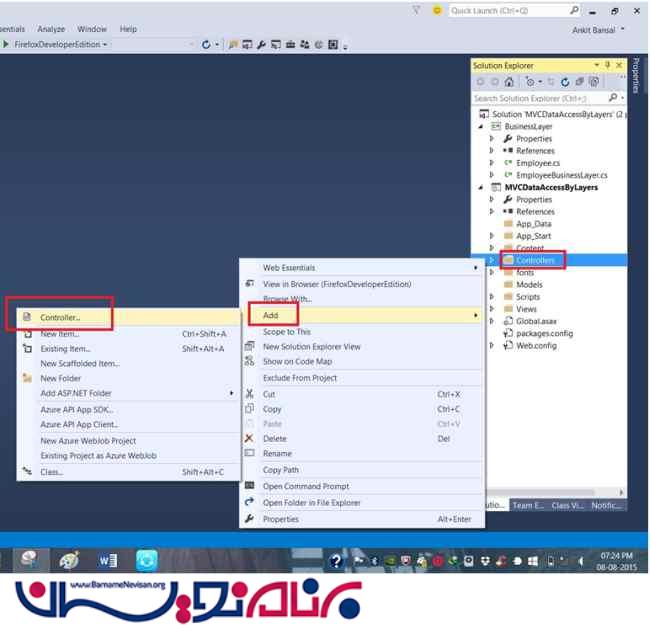
یک کنترلر با نام Employee ایجاد می نماییم.
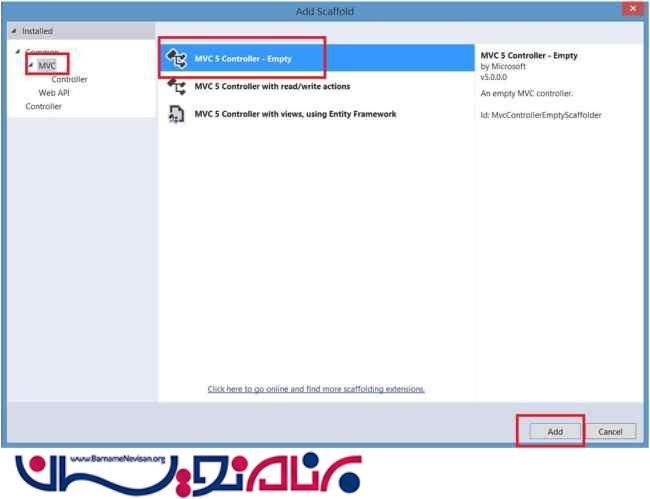

مرحله 9
کدهای زیر را درون کنترلر کپی نمایید.
using BusinessLayer;
using System.Collections.Generic;
using System.Linq;
using System.Web.Mvc;

namespace MVCDataAccessByLayers.Controllers
{
    public class EmployeeController : Controller
    {
        public ActionResult Index()
        {
            EmployeeBusinessLayer employeeBusinessLayer = new EmployeeBusinessLayer();
            List<Employee> employees = employeeBusinessLayer.Employees.ToList();
            return View(employees);
        }
        [HttpGet]
        public ActionResult Create()
        {
            return View();
        }
        [HttpPost]
        public ActionResult Create(Employee employee)
        {
            if (ModelState.IsValid)
            {
                EmployeeBusinessLayer employeeBusinessLayer = new EmployeeBusinessLayer();
                employeeBusinessLayer.AddEmployee(employee);
                return RedirectToAction("Index", "Employee");
            }
            return View();
        }
        [HttpGet]
        public ActionResult Edit(int id)
        {
            EmployeeBusinessLayer employeeBusinessLayer = new EmployeeBusinessLayer();
            Employee employee = employeeBusinessLayer.Employees.Single(emp => emp.EmployeeID == id);
            return View(employee);
        }
        [HttpPost]
        public ActionResult Edit(Employee employee)
        {
            if (ModelState.IsValid)
            {
                EmployeeBusinessLayer employeeBusinessLayer = new EmployeeBusinessLayer();
                employeeBusinessLayer.UpdateEmployee(employee);
                return RedirectToAction("Index", "Employee");
            }
            return View();
        }
        [HttpGet]
        public ActionResult Delete(int id)
        {
            EmployeeBusinessLayer employeeBusinessLayer = new EmployeeBusinessLayer();
            employeeBusinessLayer.DeleteEmployee(id);
            return RedirectToAction("Index", "Employee");
        }
        public ActionResult Details(int id)
        {
            EmployeeBusinessLayer employeeBusinessLayer = new EmployeeBusinessLayer();
            Employee employee = employeeBusinessLayer.Employees.Single(emp => emp.EmployeeID == id);
            return View(employee);
        }
    }
}
مرحله 10
ویوهای مورد نظر برای همه اکشن متدهای کنترلرمان را ایجاد می کنیم.
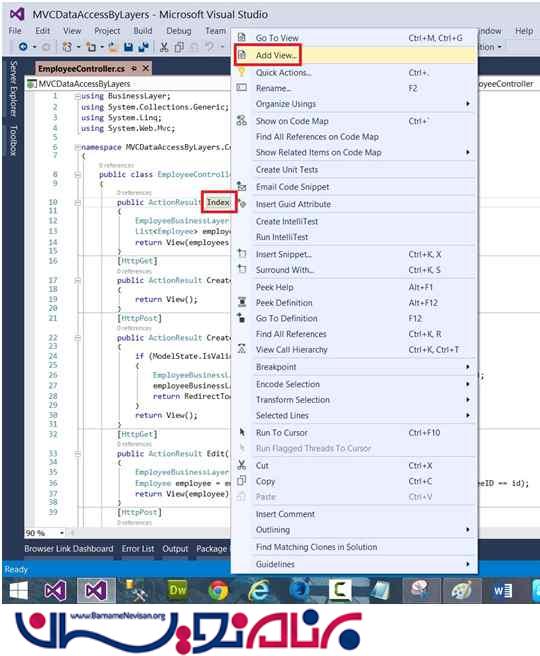
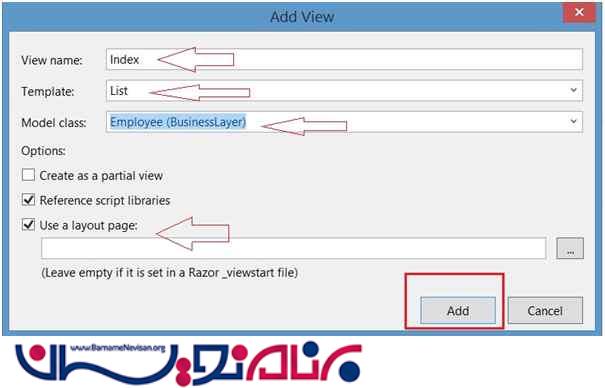
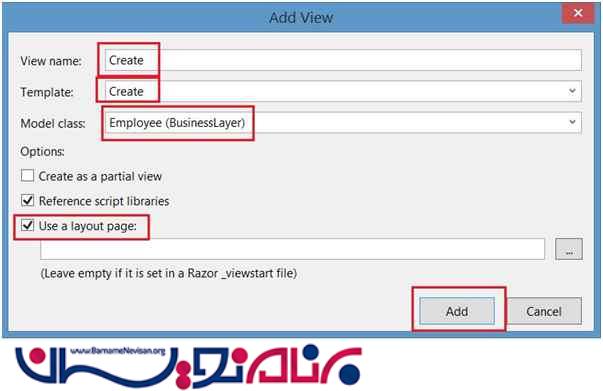
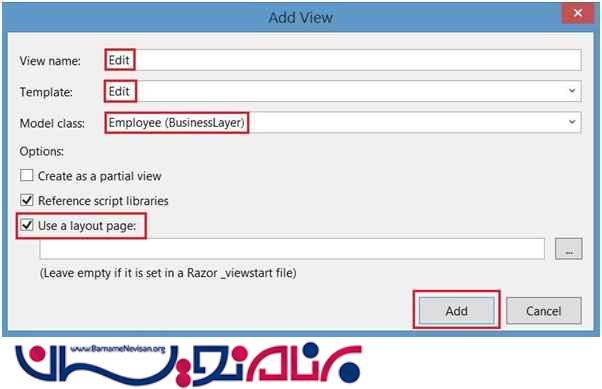
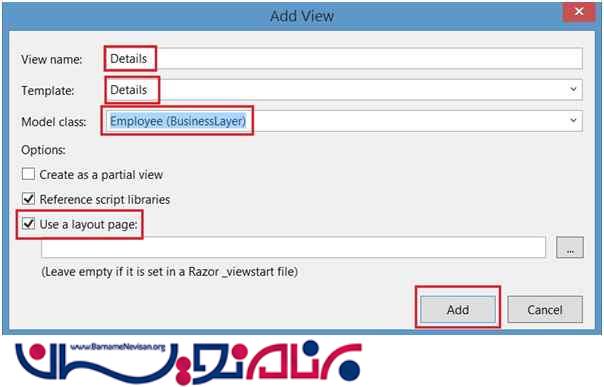
مرحله 11
کدهای زیر را جایگزین کدهای موجود در View هر صفحه نمایید.
Index.cshtml
@model IEnumerable<BusinessLayer.Employee>

@{
    ViewBag.Title = "Index";
}
<div class="container">
    <div class="jumbotron text-center"><h1>مشخصات کارکنان</h1></div>


    <p>
        @Html.ActionLink("افزودن", "Create")
    </p>
    <table class="table">
        <tr>
            <th>
                Name
            </th>
            <th>
                Gender
            </th>
            <th>
                Designation
            </th>
            <th></th>
        </tr>

        @foreach (var item in Model)
        {
            <tr>
                <td>
                    @Html.DisplayFor(modelItem => item.EmployeeName)
                </td>
                <td>
                    @Html.DisplayFor(modelItem => item.EmployeeGender)
                </td>
                <td>
                    @Html.DisplayFor(modelItem => item.EmployeeDesignation)
                </td>
                <td>
                    @Html.ActionLink("ویرایش", "Edit", new { id = item.EmployeeID }) |
                    @Html.ActionLink("جزئیات", "Details", new { id = item.EmployeeID }) |
                    @Html.ActionLink("حذف", "Delete", new { id = item.EmployeeID })
                </td>
            </tr>
        }

    </table>
</div>
Create.cshtml
@model BusinessLayer.Employee

@{
    ViewBag.Title = "Create";
}

<h2>Create</h2>


@using (Html.BeginForm())
{
    @Html.AntiForgeryToken()

    <div class="form-horizontal">
        <h4>Employee</h4>
        <hr />
        @Html.ValidationSummary(true, "", new { @class = "text-danger" })
        <div class="form-group">
            @Html.LabelFor(model => model.EmployeeName, htmlAttributes: new { @class = "control-label col-md-2" })
            <div class="col-md-10">
                @Html.EditorFor(model => model.EmployeeName, new { htmlAttributes = new { @class = "form-control" } })
                @Html.ValidationMessageFor(model => model.EmployeeName, "", new { @class = "text-danger" })
            </div>
        </div>

        <div class="form-group">
            @Html.LabelFor(model => model.EmployeeGender, htmlAttributes: new { @class = "control-label col-md-2" })
            <div class="col-md-10">
                @Html.EditorFor(model => model.EmployeeGender, new { htmlAttributes = new { @class = "form-control" } })
                @Html.ValidationMessageFor(model => model.EmployeeGender, "", new { @class = "text-danger" })
            </div>
        </div>

        <div class="form-group">
            @Html.LabelFor(model => model.EmployeeDesignation, htmlAttributes: new { @class = "control-label col-md-2" })
            <div class="col-md-10">
                @Html.EditorFor(model => model.EmployeeDesignation, new { htmlAttributes = new { @class = "form-control" } })
                @Html.ValidationMessageFor(model => model.EmployeeDesignation, "", new { @class = "text-danger" })
            </div>
        </div>

        <div class="form-group">
            <div class="col-md-offset-2 col-md-10">
                <input type="submit" value="Create" class="btn btn-default" />
            </div>
        </div>
    </div>
}

<div>
    @Html.ActionLink("Back to List", "Index")
</div>

<script src="~/Scripts/jquery-1.10.2.min.js"></script>
<script src="~/Scripts/jquery.validate.min.js"></script>
<script src="~/Scripts/jquery.validate.unobtrusive.min.js"></script>
Edit.cshtml
@model BusinessLayer.Employee

@{
    ViewBag.Title = "Edit";
}

<h2>Edit</h2>


@using (Html.BeginForm())
{
    @Html.AntiForgeryToken()

    <div class="form-horizontal">
        <h4>Employee</h4>
        <hr />
        @Html.ValidationSummary(true, "", new { @class = "text-danger" })
        @Html.HiddenFor(model => model.EmployeeID)

        <div class="form-group">
            @Html.LabelFor(model => model.EmployeeName, htmlAttributes: new { @class = "control-label col-md-2" })
            <div class="col-md-10">
                @Html.EditorFor(model => model.EmployeeName, new { htmlAttributes = new { @class = "form-control" } })
                @Html.ValidationMessageFor(model => model.EmployeeName, "", new { @class = "text-danger" })
            </div>
        </div>

        <div class="form-group">
            @Html.LabelFor(model => model.EmployeeGender, htmlAttributes: new { @class = "control-label col-md-2" })
            <div class="col-md-10">
                @Html.EditorFor(model => model.EmployeeGender, new { htmlAttributes = new { @class = "form-control" } })
                @Html.ValidationMessageFor(model => model.EmployeeGender, "", new { @class = "text-danger" })
            </div>
        </div>

        <div class="form-group">
            @Html.LabelFor(model => model.EmployeeDesignation, htmlAttributes: new { @class = "control-label col-md-2" })
            <div class="col-md-10">
                @Html.EditorFor(model => model.EmployeeDesignation, new { htmlAttributes = new { @class = "form-control" } })
                @Html.ValidationMessageFor(model => model.EmployeeDesignation, "", new { @class = "text-danger" })
            </div>
        </div>

        <div class="form-group">
            <div class="col-md-offset-2 col-md-10">
                <input type="submit" value="Save" class="btn btn-default" />
            </div>
        </div>
    </div>
}

<div>
    @Html.ActionLink("Back to List", "Index")
</div>

<script src="~/Scripts/jquery-1.10.2.min.js"></script>
<script src="~/Scripts/jquery.validate.min.js"></script>
<script src="~/Scripts/jquery.validate.unobtrusive.min.js"></script>
Detail.cshtml
@model BusinessLayer.Employee

@{
    ViewBag.Title = "Details";
}

<h2>Details</h2>

<div>
    <h4>Employee</h4>
    <hr />
    <dl class="dl-horizontal">
        <dt>
            @Html.DisplayNameFor(model => model.EmployeeName)
        </dt>

        <dd>
            @Html.DisplayFor(model => model.EmployeeName)
        </dd>

        <dt>
            @Html.DisplayNameFor(model => model.EmployeeGender)
        </dt>

        <dd>
            @Html.DisplayFor(model => model.EmployeeGender)
        </dd>

        <dt>
            @Html.DisplayNameFor(model => model.EmployeeDesignation)
        </dt>

        <dd>
            @Html.DisplayFor(model => model.EmployeeDesignation)
        </dd>

    </dl>
</div>
<p>
    @Html.ActionLink("Edit", "Edit", new { id = Model.EmployeeID }) |
    @Html.ActionLink("Back to List", "Index")
</p>
مرحله 12
همچنین کدهای زیر را جایگزین صفحه Layout.cshtml پروژه خود نمایید.
<!DOCTYPE html>
<html>
<head>
    <meta charset="utf-8" />
    <meta name="viewport" content="width=device-width, initial-scale=1.0">
    <title>@ViewBag.Title - E.M.S</title>
    <link href="~/Content/Site.css" rel="stylesheet" type="text/css" />
    <link href="~/Content/bootstrap.min.css" rel="stylesheet" type="text/css" />
    <script src="~/Scripts/modernizr-2.6.2.js"></script>
</head>
<body>
    <div class="navbar navbar-inverse navbar-fixed-top">
        <div class="container">
            <div class="navbar-header">
                <button type="button" class="navbar-toggle" data-toggle="collapse" data-target=".navbar-collapse">
                    <span class="icon-bar"></span>
                    <span class="icon-bar"></span>
                    <span class="icon-bar"></span>
                </button>
                @Html.ActionLink("سیستم مدیریت کارکنان", "Index", "Employee", new { area = "" }, new { @class = "navbar-brand" })
            </div>
            <div class="navbar-collapse collapse">
                <ul class="nav navbar-nav"></ul>
            </div>
        </div>
    </div>

    <div class="container body-content">
        @RenderBody()
        <hr />
        <footer>
            <p>© @DateTime.Now.Year -<a href="http://www.barnamenevisan.org">مرجع تخصصی برنامه نویسان</a></p>
        </footer>
    </div>

    <script src="~/Scripts/jquery-1.10.2.min.js"></script>
    <script src="~/Scripts/bootstrap.min.js"></script>
</body>
</html>
مرحله 13
رشته اتصال زیر را در Web.Config اضافه نمایید.
    <connectionStrings>
    <add connectionString="Data Source=.;Initial Catalog=BusinesLayerDB;Integrated Security=True" name="DBCS" providerName="System.Data.SqlClient"/>
  </connectionStrings>
مرحله 14
در این مرحله لازم است تا کدهای موجود در Route.Config پروژه خود را با کدهای زیر جایگزین نمایید.
    using System.Web.Mvc;
    using System.Web.Routing;

    namespace MVCDataAccessByLayers
    {
        public class RouteConfig
        {
            public static void RegisterRoutes(RouteCollection routes)
            {
                routes.IgnoreRoute("{resource}.axd/{*pathInfo}");

                routes.MapRoute(
                    name: "Default",
                    url: "{controller}/{action}/{id}",
                    defaults: new { controller = "Employee", action = "Index", id = UrlParameter.Optional }
                );
            }
        }
    }
نام کنترلر به Employee تغییر یافته است. این تغییر باعث می شود که کاربر به متد Index از کنترلر Employee هدایت شود.
مرحله 15
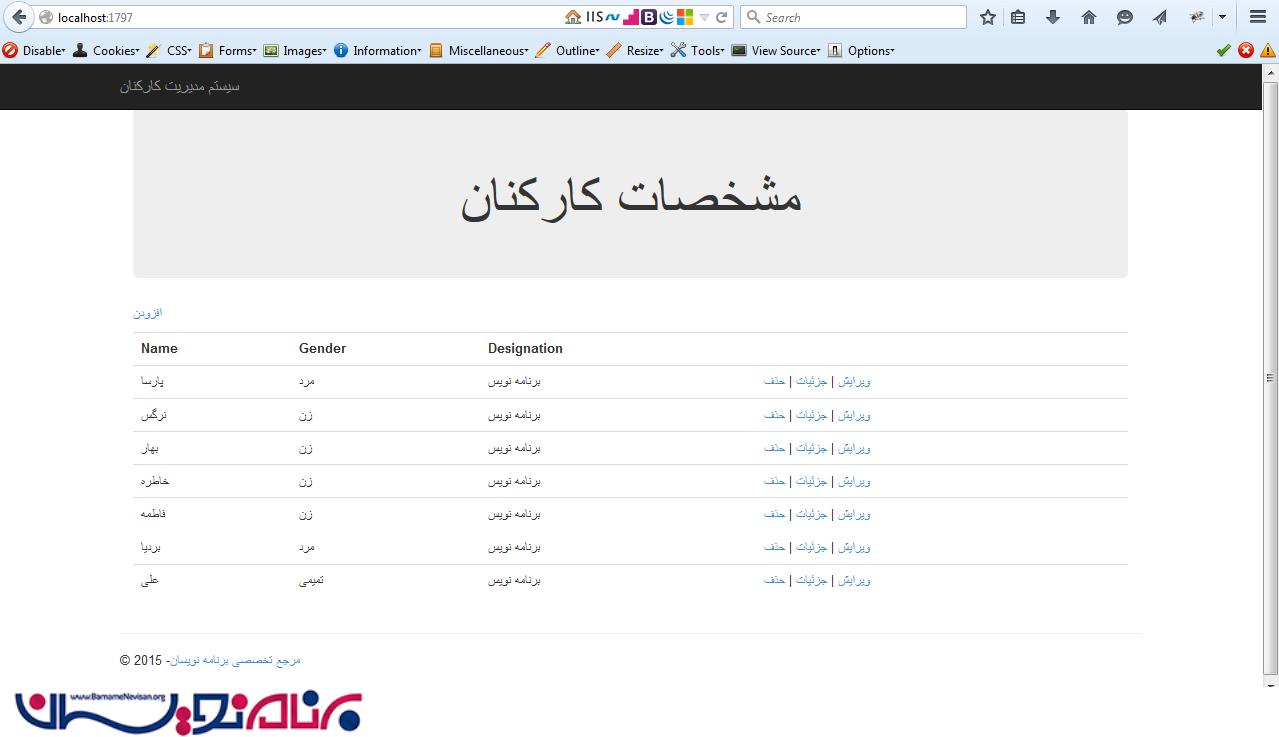
کلید F5 را فشرده و پروژه را اجرا نمایید و خروجی شما چنین خواهد بود :
- ASP.net MVC
- 2k بازدید
- 2 تشکر
