MongoDB در MVC - قسمت دوم
یکشنبه 10 آبان 1394در این مقاله ما در حال انجام عملیات CURD در Mvc با استفاده از نمونه اولیه توابع MongoDB هستیم.لطفا reference های زیر را مطالعه نمایید برای درک اینکه چگونه با Mongodb ارتباط برقرار میکنیم و یک DataBase برای برنامه Mvc ایجاد میکنیم.

در این مقاله ما در حال انجام عملیات CURD در Mvc با استفاده از نمونه اولیه توابع MongoDB هستیم.
لطفا reference های زیر را مطالعه نمایید برای درک اینکه چگونه با Mongodb ارتباط برقرار میکنیم و یک DataBase برای برنامه Mvc ایجاد میکنیم.
برای مطالعه قسمت اول کلیک نمایید
لطفا سرور MangoDB را در حال اجرا نگه دارید در حالی که برنامه Mvc را اجرا میکنید.
مرحله اول : ایجاد یک پایگاه داده
ObjectId id = new ObjectId();

MongoClient client = null;
MongoServer server = null;
MongoDatabase database = null;
MongoCollection UserDetailscollection = null;

string connectionString = "mongodb://localhost";
private List<UserModel> _UserList = new List<UserModel>();

public UserRepositary()
{
    try
    {
        client = new MongoClient(connectionString);

        server = client.GetServer();

        database = server.GetDatabase("MVCDBTest");

        UserDetailscollection = database.GetCollection<UserModel>("UserModel");
    }
    catch (Exception ex)
    {
        Console.WriteLine(ex.Message);
    }
}
در مرحله اول شی Mongodb را ایجاد نمایید. در این مثال، ما Mongodb را بر روی سیستم خود نصب میکنیم بنابراین کانکشن استرینگ ما localاست . connection string را با شی MongoClient به client منتقل میکنیم .
database = server.GetDatabase("MVCDBTest");
خط بالا ایجاد database در Mongodb است.
UserDetailscollection = database.GetCollection<UserModel>("UserModel");
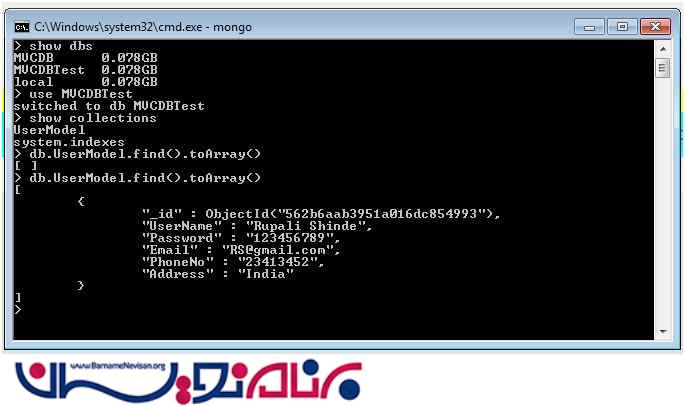
با استفاده از دستور Show dbs میتوانیم بررسی کنیم که بانک ما ایجاد شده است یا نه. همانطور که در شکل زیر میبینید بانک ما نمایش داده شده است.

Show dbs : لیست بانک های موجود در سرور را به ما نشان میدهد.
اگر پایگاه داده با موفقیت ایجاد شده باشد نام بانک را مشاهده خواهید کرد.
ما پایگاه داده MVctest را ایجاد کرده ایم و حالا میخواهیم از ان استفاده کنیم. ما میتوانیم به پایگاه داده ایجاد شده برویم و Collection های موجود در بانک را بررسی کنیم.
Show collections : همانطور که در عکس بالا مشاهده میکنید ما از این دستور استفاده کردیم و Collection های موجود را به ما نشان داده است.
مرحله دوم : کلاس UserModel
در این کلاس ما به تعریف Attributes ها میپردازیم. سورس کد زیر مربوط به کلاس UserModel می باشد.
using MongoDB.Bson;
using System;
using System.Collections.Generic;
using System.ComponentModel.DataAnnotations;
using System.Linq;
using System.Web;

namespace MvcRegistration.Models
{
    public class UserModel
    {
        public ObjectId _id { get; set; }

        [Required(ErrorMessage = "Please enter your name.")]
        public string UserName { get; set; }

        [Required(ErrorMessage = "Please enter your password.")]
        [DataType(DataType.Password)]
        public string Password { get; set; }

        [Required(ErrorMessage = "Please enter your Email.")]
        [DataType(DataType.EmailAddress)]
        public string Email { get; set; }

        [Required(ErrorMessage = "Please enter your PhoneNo.")]
        public string PhoneNo { get; set; }

        [Required(ErrorMessage = "Please enter your Address.")]
        public string Address { get; set; }
    }
}
هر رکورد از Mongodb دارای یک شناسه منحصر به فرد مانند کلید اصلی میباشد . بنابراین ما نیاز داریم که صفت id را داشته باشیم.
مرحله 3 : صفحه Index.html

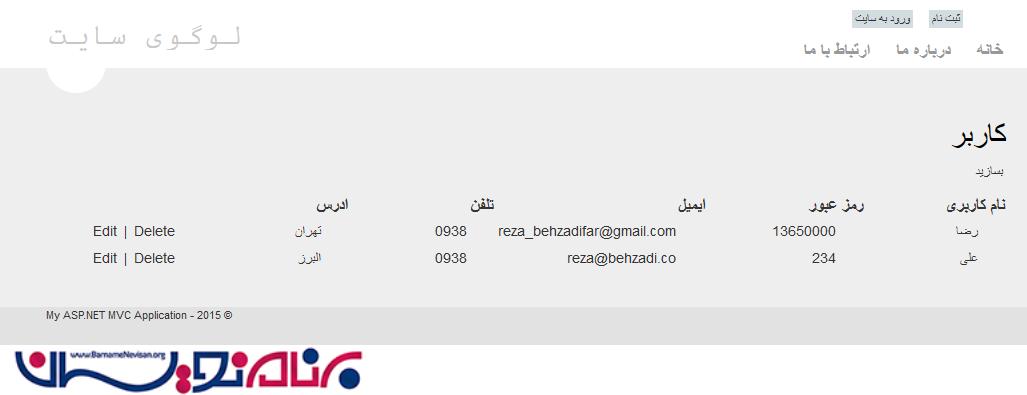
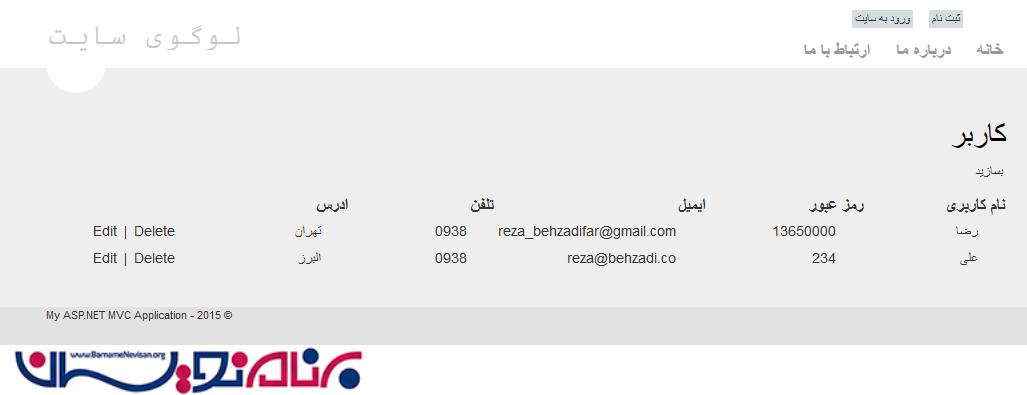
صفحه ما یک لینک برای افزودن کاربر جدید دارد. در زیر لینک ، جدولی برای نمایش اطلاعات موجود در بانک وجود دارد.
به تنظیمات RouteConfig میرویم و نقطه شروع برنامه را به صورت زیر تغییر میدهیم .
public class RouteConfig
{
    public static void RegisterRoutes(RouteCollection routes)
    {
        routes.IgnoreRoute("{resource}.axd/{*pathInfo}");

        routes.MapRoute(
            name: "Default",
            url: "{controller}/{action}/{id}",
            defaults: new { controller = "User", action = "Index", id = UrlParameter.Optional }
        );
    }
}
سورس زیر مربوط به صفحه Index.Html می باشد.
@model IEnumerable<MvcRegistration.Models.UserModel>

@{
    ViewBag.Title = "User DashBoard";
}

<style type="text/css">
    table, tr {
        width:100%;
    }

    th, td {
        width:20%;
    }
    th {
        background-color:yellow;
    }

    td {
        background-color:aqua;
    }
</style>

<h2>Index</h2>
<div>
    <div>
        @Html.ActionLink("Add User","Registration", "User")
    </div>
    <div>
        @if (Model != null)
        {
            <table>
                <thead>
                    <tr>
                        <th>User Name</th>
                        <th>Email</th>
                        <th>Address</th>
                        <th>PhoneNo</th>
                        <th>Object ID</th>
                        <th colspan="2">Action</th>
                    </tr>
                </thead>
                <tbody>

                    @if (Model != null)
                    {
                        foreach (var UM in Model)
                        {
                        <tr>
                            <td>@UM.UserName</td>
                            <td>@UM.Email</td>
                            <td>@UM.Address</td>
                            <td>@UM.PhoneNo</td>
                            <td>@UM._id</td>
                            <td>
                                <a href="@Url.Action("Edit", "User", new { ID = @UM.UserName})">Edit</a>
                                <a onclick="return confirm('Are you sure about record Deletion ??');" href="@Url.Action("Delete", "User", new { ID = @UM.UserName })">Delete</a>
                            </td>
                        </tr>
                        }
                    }

                </tbody>
            </table>
        }
    </div>
</div>
در زیر کد مربوط به کنترلر صفحه index قرار داده شده است.
مرحله 4: صفحه ثبت نام ( Registration.cshtml)
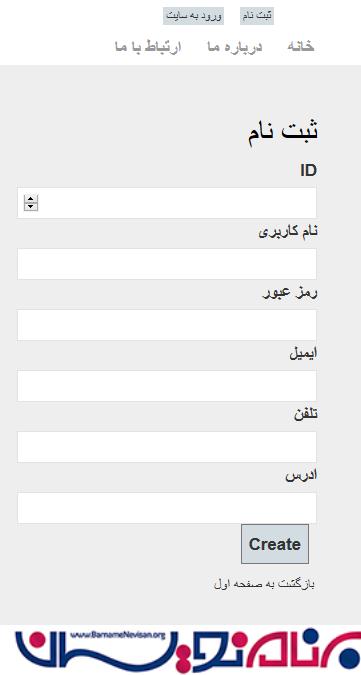
در زیر تصویر صفحه ثبت نام را مشاهده میکنید.

کلاس html helper برای اتصال به مدل استفاده می شود .
@Html.ValidationMessageFor(model => model.UserName)
سورس کد صفحه به صورت زیر است.
@model MvcRegistration.Models.UserModel

@{
    ViewBag.Title = "Registration";
}

<script src="/Scripts/jquery-1.7.1.min.js" type="text/javascript"></script>
<script src="/Scripts/jquery.validate.min.js" type="text/javascript"></script>
<script src="/Scripts/jquery.validate.unobtrusive.min.js" type="text/javascript"></script>

<h2>Registration</h2>

@using (Html.BeginForm("Registration", "User"))
{


    <table>
        <tr>
            <td>@Html.LabelFor(model => model.UserName)</td>
            <td>@Html.TextBoxFor(model => model.UserName)</td>
            <td>@Html.ValidationMessageFor(model => model.UserName)</td>
        </tr>
        <tr>
            <td colspan="2"></td>
        </tr>
        <tr>
            <td>@Html.LabelFor(model => model.Password)</td>
            <td>@Html.PasswordFor(model => model.Password)</td>
            <td>@Html.ValidationMessageFor(model => model.Password)</td>
        </tr>
        <tr>
            <td colspan="2"></td>
        </tr>
        <tr>
            <td>@Html.LabelFor(model => model.Address)</td>
            <td>@Html.TextBoxFor(model => model.Address)</td>
            <td>@Html.ValidationMessageFor(model => model.Address)</td>
        </tr>
        <tr>
            <td colspan="2"></td>
        </tr>
        <tr>
            <td>@Html.LabelFor(model => model.Email)</td>
            <td>@Html.TextBoxFor(model => model.Email)</td>
            <td>@Html.ValidationMessageFor(model => model.Email)</td>
        </tr>
        <tr>
            <td colspan="2"></td>
        </tr>
        <tr>
            <td>@Html.LabelFor(model => model.PhoneNo)</td>
            <td>@Html.TextBoxFor(model => model.PhoneNo)</td>
            <td>@Html.ValidationMessageFor(model => model.PhoneNo)</td>
        </tr>
        <tr>
            <td colspan="2"></td>
        </tr>
        <tr>
            <td colspan="2">
               <input type="submit" value="Add" class="submitButton" />
            </td>
        </tr>
    </table>
}
کد کنترلر صفحه ثبت نام به صورت زیر است.
public ActionResult Registration()
{
    return View();
}

[HttpPost]
public ActionResult Registration(UserModel UM)
{
    if (ModelState.IsValid)
    {
        var result = Context.Add(UM);

        return RedirectToAction("Index");
    }
    else
    {
        return RedirectToAction("Registration");
    }
}

مرحله 5: ویرایش اطلاعات کاربران

کد ویرایش اطلاعات در زیر نمایش داده شده است.
@model MvcRegistration.Models.UserModel

@{
    ViewBag.Title = "Edit";
}
<script src="/Scripts/jquery-1.7.1.min.js" type="text/javascript"></script>
<script src="/Scripts/jquery.validate.min.js" type="text/javascript"></script>
<script src="/Scripts/jquery.validate.unobtrusive.min.js" type="text/javascript"></script>
<h2>Edit</h2>
@using (Html.BeginForm("Edit", "User"))
{
    @Html.ValidationSummary(true)

    <table>
        <tr>
            <td>@Html.LabelFor(model => model.UserName)</td>
            <td>@Html.TextBoxFor(model => model.UserName, new { @readonly="readonly"})</td>
            <td>@Html.ValidationMessageFor(model => model.UserName)</td>
        </tr>
        <tr>
            <td colspan="2"></td>
        </tr>
         <tr>
            <td>@Html.LabelFor(model => model.Password)</td>
            <td>@Html.PasswordFor(model => model.Password, new { value= Model.Password })</td>
            <td>@Html.ValidationMessageFor(model => model.Password)</td>
        </tr>
        <tr>
            <td colspan="2"></td>
        </tr>
        <tr>
            <td>@Html.LabelFor(model => model.Address)</td>
            <td>@Html.TextBoxFor(model => model.Address)</td>
            <td>@Html.ValidationMessageFor(model => model.Address)</td>
        </tr>
        <tr>
            <td colspan="2"></td>
        </tr>
        <tr>
            <td>@Html.LabelFor(model => model.Email)</td>
            <td>@Html.TextBoxFor(model => model.Email)</td>
            <td>@Html.ValidationMessageFor(model => model.Email)</td>
        </tr>
        <tr>
            <td colspan="2"></td>
        </tr>
        <tr>
            <td>@Html.LabelFor(model => model.PhoneNo)</td>
            <td>@Html.TextBoxFor(model => model.PhoneNo)</td>
            <td>@Html.ValidationMessageFor(model => model.PhoneNo)</td>
        </tr>
        <tr>
            <td colspan="2"></td>
        </tr>
        <tr>
            <td colspan="2">
               <input type="submit" value="Save" class="submitButton" />
            </td>
        </tr>
    </table>
}
کنترلر مربوط به ویرایش به شکل زیر است.
public ActionResult Edit(string id)
{
    var User = Context.GetUserByID(id);

    return View(User);
}

[HttpPost]
public ActionResult Edit(UserModel UM)
{
    if (ModelState.IsValid)
    {
        Context.Update(UM.UserName, UM);

        return RedirectToAction("Index");
    }
    else
    {
        return RedirectToAction("Edit");
    }
}
مرحله 6: حذف اطلاعات کاربران
کد زیر پیغامی به شما میدهد که ایا از حذف این رکورد مطمئن هستید .
<a onclick="return confirm('Are you sure about record Deletion ??');"href="@Url.Action("Delete", "User", new { ID = @UM.UserName })">Delete</a>

کد کنترلر مربوط به حذف رکورد به صورت زیر است.
public ActionResult Delete(string id)
{
    Context.Delete(id);
    return RedirectToAction("Index");
}
خب دوستان در اینجا کنترلر register را مشاهده کنید.
using System;
using System.Collections.Generic;
using System.Linq;
using System.Web;
using System.Web.Mvc;
using System.Data.Entity;
using System.Data.SqlClient;

using MongoDB.Bson;
using MongoDB.Driver;
using MongoDB.Driver.Linq;
using MvcRegistration.Models;
using MongoDB.Driver.Builders;

namespace MvcRegistration.Controllers
{
    public class UserController : Controller
    {
        public UserRepositary Context = new UserRepositary();

        public ActionResult Index()
        {
            return View("Index", Context.GetAllUsers());
        }

        public ActionResult Registration()
        {
            return View();
        }

        [HttpPost]
        public ActionResult Registration(UserModel UM)
        {
            if (ModelState.IsValid)
            {
                var result = Context.Add(UM);

                return RedirectToAction("Index");
            }
            else
            {
                return RedirectToAction("Registration");
            }
        }

        public ActionResult Edit(string id)
        {
            var User = Context.GetUserByID(id);

            return View(User);
        }

        [HttpPost]
        public ActionResult Edit(UserModel UM)
        {
            if (ModelState.IsValid)
            {
                Context.Update(UM.UserName, UM);

                return RedirectToAction("Index");
            }
            else
            {
                return RedirectToAction("Edit");
            }
        }

        public ActionResult Delete(string id)
        {
            Context.Delete(id);
            return RedirectToAction("Index");
        }
    }
}
کلاس userRepository در زیر نشان داده شده است.
using MongoDB.Bson;
using MongoDB.Driver;
using MongoDB.Driver.Builders;
using System;
using System.Collections.Generic;
using System.Linq;
using System.Web;

namespace MvcRegistration.Models
{
    public class UserRepositary : IUserRepositary
    {
        ObjectId id = new ObjectId();

        MongoClient client = null;
        MongoServer server = null;
        MongoDatabase database = null;
        MongoCollection UserDetailscollection = null;

        string connectionString = "mongodb://localhost";
        private List<UserModel> _UserList = new List<UserModel>();

        public UserRepositary()
        {
            try
            {
                client = new MongoClient(connectionString);

                server = client.GetServer();

                database = server.GetDatabase("MVCDBTest");

                UserDetailscollection = database.GetCollection<UserModel>("UserModel");
            }
            catch (Exception ex)
            {
                Console.WriteLine(ex.Message);
            }
        }

        public IEnumerable<UserModel> GetAllUsers()
        {
            if (Convert.ToInt32(UserDetailscollection.Count()) > 0)
            {
                _UserList.Clear();

                var AllUsers = UserDetailscollection.FindAs(typeof(UserModel), Query.NE("UserName", "null"));

                if (AllUsers.Count() > 0)
                {
                    foreach (UserModel user in AllUsers)
                    {
                        _UserList.Add(user);
                    }
                }
            }

            var result = _UserList.AsQueryable();
            return result;
        }

        public UserModel Add(UserModel UM)
        {
            UserDetailscollection.Save(UM);

            return UM;
        }

        public UserModel GetUserByID(string id)
        {
            UserModel SearchUser = null;

            if (!string.IsNullOrEmpty(id))
            {
                SearchUser = (UserModel)UserDetailscollection.FindOneAs(typeof(UserModel), Query.EQ("UserName", id));
            }

            return SearchUser;
        }

        public bool Update(string objectid, UserModel UM)
        {
            UpdateBuilder upBuilder = MongoDB.Driver.Builders.Update
                .Set("UserName", UM.UserName)
                .Set("Password", UM.Password)
                .Set("Address", UM.Address)
                .Set("Email", UM.Email)
                .Set("PhoneNo", UM.PhoneNo);

            UserDetailscollection.Update(Query.EQ("UserName",objectid), upBuilder);

            return true;
        }

        public bool Delete(string objectid)
        {
            UserDetailscollection.Remove(Query.EQ("UserName", objectid));
            return true;
        }
    }
}

- ASP.net MVC
- 1k بازدید
- 5 تشکر
