ردیابی Session در زمان اجرا در Asp.Net
چهارشنبه 14 مرداد 1394در این مقاله به بررسی Session Real-Time Tracking یا ردیابی در زمان اجرای Session به منظور بررسی صفحات مشاهده شده توسط هر Session می پردازیم.

برای ردیابی و بررسی Session در زمان اجرا ما به یکسری اطلاعت برای آنالیز Session نیاز داریم که این اطلاعات عبارت اند از :
SessionID
Path
Username (در صورتی که وارد شده بود)
PageView
برای نگه داری این اطلاعات کلاسی Static به نام SessionTracker ایجاد میکنیم که وظیفه نگه داری از مقادیر فوق را بر عهده دارد.
using System;
using System.Data;
using System.Configuration;
using System.Linq;
using System.Web;
using System.Web.Security;
using System.Web.UI;
using System.Web.UI.HtmlControls;
using System.Web.UI.WebControls;
using System.Web.UI.WebControls.WebParts;
using System.Xml.Linq;
using System.Collections;
/// <summary>
/// Summary description for Tracker
/// Author: Sarin Na Wangkanai
/// Website: http://www.sarin.mobi/
/// License: GPL
/// </summary>
namespace Sathai.Net.Tracker
{
public static class SessionTrack
{
public static ArrayList States = new ArrayList();
static SessionTrack() { }
public static void Add(StateCollection state)
{
int StateIndex = Index(state);
if (StateIndex < 0)
States.Add(state);
else
{
int PageView = ((StateCollection)States[StateIndex]).PageView;
States[StateIndex] = state;
((StateCollection)States[StateIndex]).PageView = PageView + 1;
}
}
public static void Remove(StateCollection state)
{
int StateIndex = Index(state);
if (StateIndex >= 0)
States.RemoveAt(StateIndex);
}
private static int Index(StateCollection state)
{
for (int i = 0; i < States.Count; i++)
if (((StateCollection)States[i]).SessionID == state.SessionID)
return i;
return -1;
}
}
public class StateCollection
{
private string _sessionId;
private string _path;
private string _username;
private int _pageview = 1;
public string SessionID { get { return _sessionId; } set { _sessionId = value; } }
public string Path { get { return _path; } set { _path = value; } }
public string Username { get { return _username; } set { _username = value; } }
public int PageView { get { return _pageview; } set { _pageview = value; } }
}
}
سپس در مستر پیج ایجاد شده نیز در قسمت CodeBehind کد های زیر را وارد می کنیم.
<p>Here I use a Master Page to add each user session to the SessionTrack class</p>
[csharp]
using System;
using System.Collections;
using System.Configuration;
using System.Data;
using System.Linq;
using System.Web;
using System.Web.Security;
using System.Web.UI;
using System.Web.UI.WebControls;
using System.Web.UI.WebControls.WebParts;
using System.Web.UI.HtmlControls;
using System.Xml.Linq;
using Sathai.Net.Tracker;

public partial class Page : System.Web.UI.MasterPage
{
    protected void Page_Load(object sender, EventArgs e)
    {
        SessionTrack.Add(new StateCollection() { SessionID = Session.SessionID, Path = Request.CurrentExecutionFilePath, Username = Page.User.Identity.Name });
        LabelSession.Text = Session.SessionID;
    }
}
حال باید سراغ کد های Html در MasterPage بریم.
یک منو که از سایت مپ تغذیه می شود و یک قسمت برای ورود و Authenticate شدن در سایت...
<%@ Master Language="C#" AutoEventWireup="true" CodeFile="Page.master.cs" Inherits="Page" %>

<!DOCTYPE html PUBLIC "-//W3C//DTD XHTML 1.0 Transitional//EN" "http://www.w3.org/TR/xhtml1/DTD/xhtml1-transitional.dtd">

<html xmlns="http://www.w3.org/1999/xhtml">
<head runat="server">
    <title>Tracker MasterPage</title>
    <asp:ContentPlaceHolder id="head" runat="server">
    </asp:ContentPlaceHolder>
</head>
<body>
<form id="form1" runat="server">
<div>
        <asp:Menu ID="Menu1" runat="server" DataSourceID="SiteMapDataSource1"
            Orientation="Horizontal" StaticDisplayLevels="2" BackColor="#F7F6F3"
            DynamicHorizontalOffset="2" Font-Names="Verdana" Font-Size="0.8em"
            ForeColor="#7C6F57" StaticSubMenuIndent="10px">
            <StaticSelectedStyle BackColor="#5D7B9D" />
            <StaticMenuItemStyle HorizontalPadding="5px" VerticalPadding="2px" />
            <DynamicHoverStyle BackColor="#7C6F57" ForeColor="White" />
            <DynamicMenuStyle BackColor="#F7F6F3" />
            <DynamicSelectedStyle BackColor="#5D7B9D" />
            <DynamicMenuItemStyle HorizontalPadding="5px" VerticalPadding="2px" />
            <StaticHoverStyle BackColor="#7C6F57" ForeColor="White" />
        </asp:Menu>
        <asp:SiteMapDataSource ID="SiteMapDataSource1" runat="server" />
<hr />
        <asp:SiteMapPath ID="SiteMapPath1" runat="server" Font-Names="Verdana"
            Font-Size="0.8em" PathSeparator=" : ">
            <PathSeparatorStyle Font-Bold="True" ForeColor="#5D7B9D" />
            <CurrentNodeStyle ForeColor="#333333" />
            <NodeStyle Font-Bold="True" ForeColor="#7C6F57" />
            <RootNodeStyle Font-Bold="True" ForeColor="#5D7B9D" />
        </asp:SiteMapPath>
<hr />
        <asp:ContentPlaceHolder id="ContentPlaceHolder1" runat="server">

        </asp:ContentPlaceHolder>
<hr />
        <asp:Label ID="LabelSession" runat="server" Text="Session:"></asp:Label>

        <asp:LoginView ID="LoginView1" runat="server">
            <LoggedInTemplate>
                 Username:
                <asp:LoginName ID="LoginName1" runat="server" />
            </LoggedInTemplate>
        </asp:LoginView>

        <asp:LoginStatus ID="LoginStatus1" runat="server" />
    </div>
</form>

</body>
</html>
حالا باید تنظیمات مربوط به عمل احراز هویت را در Web.Config انجام دهیم.
    <authentication mode="Forms">
<forms defaultUrl="Default.aspx" loginUrl="Login.aspx">
        <credentials passwordFormat="Clear">
          <user name="admin" password="password" />
        </credentials>
      </forms>
    </authentication>
حالا شروع به ایجاد صفحه ای برای اجرای عملیات ورود به سایت ایجاد می کنیم.که از Master Page تغذیه می کند.
<%@ Page Language="C#" MasterPageFile="~/Page.master" AutoEventWireup="true" CodeFile="Login.aspx.cs" Inherits="Login" Title="Login" %><asp:Content ID="Content1" ContentPlaceHolderID="head" Runat="Server"></asp:Content><asp:Content ID="Content2" ContentPlaceHolderID="ContentPlaceHolder1" Runat="Server"> <asp:Login ID="Login1" runat="server" onauthenticate="Login1_Authenticate"> </asp:Login></asp:Content>
public partial class Login : System.Web.UI.Page
{
    protected void Page_Load(object sender, EventArgs e)
    {

    }
    protected void Login1_Authenticate(object sender, AuthenticateEventArgs e)
    {
        if (FormsAuthentication.Authenticate(Login1.UserName, Login1.Password))
            FormsAuthentication.RedirectFromLoginPage(Login1.UserName, Login1.RememberMeSet);
    }
}
حال اقدام به ایجاد فایل Global برای مدیریت Session ها می کنیم.
1
2
3
4
5
6
7
8
9
10
11
12
13
14
15
16
17
18
19
20
21
22
23
24
25
26
27
28
29
30
31
32
33
34
35
36
<%@ Application Language="C#" %>
<%@ Import Namespace="Sathai.Net.Tracker" %>

<script runat="server">

    void Application_Start(object sender, EventArgs e)
    {
        // Code that runs on application startup
    }

    void Application_End(object sender, EventArgs e)
    {
        //  Code that runs on application shutdown
    }

    void Application_Error(object sender, EventArgs e)
    {
        // Code that runs when an unhandled error occurs

    }

    void Session_Start(object sender, EventArgs e)
    {
        // Code that runs when a new session is started
    }

    void Session_End(object sender, EventArgs e)
    {
        // Code that runs when a session ends.
        // Note: The Session_End event is raised only when the sessionstate mode
        // is set to InProc in the Web.config file. If session mode is set to StateServer
        // or SQLServer, the event is not raised.
        SessionTrack.Remove(new StateCollection() { SessionID = Session.SessionID });
    }

</script>
سپس برای نشان دادن اطلاعات Session به صفحه Adminنیاز داریم.
<%@ Page Language="C#" AutoEventWireup="true" CodeFile="Admin.aspx.cs" Inherits="Admin" %>

<!DOCTYPE html PUBLIC "-//W3C//DTD XHTML 1.0 Transitional//EN" "http://www.w3.org/TR/xhtml1/DTD/xhtml1-transitional.dtd">

<html xmlns="http://www.w3.org/1999/xhtml">
<head runat="server">
    <title>Tracker Admin</title>
</head>
<body>
<form id="form1" runat="server">
<div>
<h3>Tracker Admin</h3>

        <a href="Default.aspx">Home</a>
        <asp:Label ID="LabelSessionTotal" runat="server" Text="Visitors: "></asp:Label>
<hr />
<table>
<tr>
<td style="width:200px;">SessionID</td>
<td style="width:100px;">Username</td>
<td style="width:100px;">PageView</td>
<td style="width:300px;">Path</td>
</tr>

        <asp:Repeater ID="Repeater1" runat="server">
            <ItemTemplate>
<tr>
<td><%# DataBinder.Eval(Container.DataItem,"SessionID") %></td>
<td><%# DataBinder.Eval(Container.DataItem, "Username")%></td>
<td><%# DataBinder.Eval(Container.DataItem, "PageView")%></td>
<td><%# DataBinder.Eval(Container.DataItem, "Path")%></td>
</tr>

            </ItemTemplate>
        </asp:Repeater>
        </table>
</div>
</form>

</body>
</html>
حالا در CodeBehind صفحه ادمین اقدام به پر کردن Repeater می کنیم.
public partial class Admin : System.Web.UI.Page
{
    protected void Page_Load(object sender, EventArgs e)
    {
        LabelSessionTotal.Text += Sathai.Net.Tracker.SessionTrack.States.Count;

        Repeater1.DataSource = Sathai.Net.Tracker.SessionTrack.States;
        Repeater1.DataBind();
    }
}
حالا در صفحه ادمین مشاهده می کنیم که چه Session هایی ، جه تعداد بازدید و در کجا در حال حاضر قرار دارند ، می توان ویژگی های دیگری از جمله تاریخ و زمان ورود و خروج Session را نیز قرار داد.
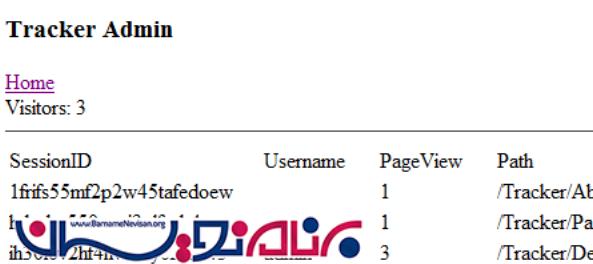
در Path مسیری که کاربر در حال در آن قرار دارد و درصورتی که UserName احراز هویت شده باشد نمایش داده می شود ، PageView نیز تعداد پیج هایی که کاربر در آن ها وارد شده است را نمایش می دهد.
ضمیمه این پروژه برای استفاده شما عزیزان در زیر قرار داده شده است.

- ASP.net
- 1k بازدید
- 1 تشکر