ایجاد لیست تو در تو در اندروید
پنجشنبه 26 آذر 1394در این مقاله قصد داریم در مورد ایجاد لیست تو در تو در اندروید صحبت نماییم ، و یک نمونه را برای شما مثال بزنیم.

ابتدا باید activity زیر را بسازید به صورت زیر:
<LinearLayout xmlns:android="http://schemas.android.com/apk/res/android"
              android:orientation="vertical"
              android:layout_width="fill_parent"
              android:layout_height="fill_parent"
        >
    <ExpandableListView android:id="@+id/expandable_list"
                        android:layout_width="fill_parent"
                        android:layout_height="fill_parent"
                        android:transcriptMode="alwaysScroll"
                        android:cacheColorHint="#00000000"
                        android:listSelector="@android:color/transparent"/>
</LinearLayout>
برایlistview باید از ویژگی android:transcriptMode استفاده کنیم که این ویژگی باعث می شود listview ما اسکرول بخورد و اگر تعداد لیست ها زیاد شد به لیست های پاین تر بتوانیم دسترسی پیدا کنیم.
اگر نخواهید اسکرول بخورد برای این ویژگی از disable استفاده می کنیم.
حالا list_item_parent باید قطعه کد های زیر را بنویسید:
<LinearLayout xmlns:android="http://schemas.android.com/apk/res/android"
android:orientation="horizontal"
android:layout_width="fill_parent"
android:layout_height="fill_parent"
android:descendantFocusability="blocksDescendants"
android:id="@+id/list_item">
<TextView
android:layout_width="0dp"
android:layout_height="wrap_content"
android:id="@+id/list_item_text_view"
android:textSize="20sp"
android:padding="10dp"
android:layout_weight="1"
android:layout_marginLeft="35dp" />
<Button
android:layout_width="wrap_content"
android:layout_height="wrap_content"
android:text="button"
android:focusable="false"
android:layout_gravity="right"
android:focusableInTouchMode="false"
android:id="@+id/button"/>
</LinearLayout>
حالا یک کلاس پدر ایجاد نمایید و لیست آرایه ای از فرزندان را در آن اضافه نمایید به صورت زیر:
import java.util.ArrayList;

public class Parent {
    private String mTitle;
    private ArrayList<String> mArrayChildren;

    public String getTitle() {
        return mTitle;
    }

    public void setTitle(String title) {
        mTitle = title;
    }

    public ArrayList<String> getArrayChildren() {
        return mArrayChildren;
    }

    public void setArrayChildren(ArrayList<String> arrayChildren) {
        mArrayChildren = arrayChildren;
    }
}
برای افزودن لیست داخل لیست های پدر باید از کلاس زیر استفاده نماییم:
import android.content.Context;
import android.database.DataSetObserver;
import android.view.LayoutInflater;
import android.view.View;
import android.view.ViewGroup;
import android.widget.BaseExpandableListAdapter;
import android.widget.Button;
import android.widget.TextView;

import java.util.ArrayList;

public class MyCustomAdapter extends BaseExpandableListAdapter {


    private LayoutInflater inflater;
    private ArrayList<Parent> mParent;

    public MyCustomAdapter(Context context, ArrayList<Parent> parent){
        mParent = parent;
        inflater = LayoutInflater.from(context);
    }


    @Override
    //counts the number of group/parent items so the list knows how many times calls getGroupView() method
    public int getGroupCount() {
        return mParent.size();
    }

    @Override
    //counts the number of children items so the list knows how many times calls getChildView() method
    public int getChildrenCount(int i) {
        return mParent.get(i).getArrayChildren().size();
    }

    @Override
    //gets the title of each parent/group
    public Object getGroup(int i) {
        return mParent.get(i).getTitle();
    }

    @Override
    //gets the name of each item
    public Object getChild(int i, int i1) {
        return mParent.get(i).getArrayChildren().get(i1);
    }

    @Override
    public long getGroupId(int i) {
        return i;
    }

    @Override
    public long getChildId(int i, int i1) {
        return i1;
    }

    @Override
    public boolean hasStableIds() {
        return true;
    }

    @Override
    //in this method you must set the text to see the parent/group on the list
    public View getGroupView(int groupPosition, boolean b, View view, ViewGroup viewGroup) {

        ViewHolder holder = new ViewHolder();
        holder.groupPosition = groupPosition;

        if (view == null) {
            view = inflater.inflate(R.layout.list_item_parent, viewGroup,false);
        }

        TextView textView = (TextView) view.findViewById(R.id.list_item_text_view);
        textView.setText(getGroup(groupPosition).toString());

        view.setTag(holder);

        //return the entire view
        return view;
    }

    @Override
    //in this method you must set the text to see the children on the list
    public View getChildView(int groupPosition, int childPosition, boolean isLastChild, View view, ViewGroup viewGroup) {

        ViewHolder holder = new ViewHolder();
        holder.childPosition = childPosition;
        holder.groupPosition = groupPosition;

        if (view == null) {
            view = inflater.inflate(R.layout.list_item_child, viewGroup,false);
        }

        TextView textView = (TextView) view.findViewById(R.id.list_item_text_child);
        textView.setText(mParent.get(groupPosition).getArrayChildren().get(childPosition));

        view.setTag(holder);

        //return the entire view
        return view;
    }

    @Override
    public boolean isChildSelectable(int i, int i1) {
        return true;
    }

    @Override
    public void registerDataSetObserver(DataSetObserver observer) {
        /* used to make the notifyDataSetChanged() method work */
        super.registerDataSetObserver(observer);
    }

// Intentionally put on comment, if you need on click deactivate it
/*  @Override
    public void onClick(View view) {
        ViewHolder holder = (ViewHolder)view.getTag();
        if (view.getId() == holder.button.getId()){

           // DO YOUR ACTION
        }
    }*/


    protected class ViewHolder {
        protected int childPosition;
        protected int groupPosition;
        protected Button button;
    }
حالا به کلاس MyActivity بروید و قطعه کد های زیر را قرار دهید:
import android.app.Activity;
import android.app.ExpandableListActivity;
import android.os.Bundle;
import android.widget.ExpandableListView;

import java.util.ArrayList;

public class MyActivity extends Activity {
    private ExpandableListView mExpandableList;

    @Override
    public void onCreate(Bundle savedInstanceState) {
        super.onCreate(savedInstanceState);
        setContentView(R.layout.main);


        mExpandableList = (ExpandableListView)findViewById(R.id.expandable_list);

        ArrayList<Parent> arrayParents = new ArrayList<Parent>();
        ArrayList<String> arrayChildren = new ArrayList<String>();

        //here we set the parents and the children
        for (int i = 0; i < 10; i++){
            //for each "i" create a new Parent object to set the title and the children
            Parent parent = new Parent();
            parent.setTitle("Parent " + i);

            arrayChildren = new ArrayList<String>();
            for (int j = 0; j < 10; j++) {
                arrayChildren.add("Child " + j);
            }
            parent.setArrayChildren(arrayChildren);

            //in this array we add the Parent object. We will use the arrayParents at the setAdapter
            arrayParents.add(parent);
        }

        //sets the adapter that provides data to the list.
        mExpandableList.setAdapter(new MyCustomAdapter(MyActivity.this,arrayParents));

    }
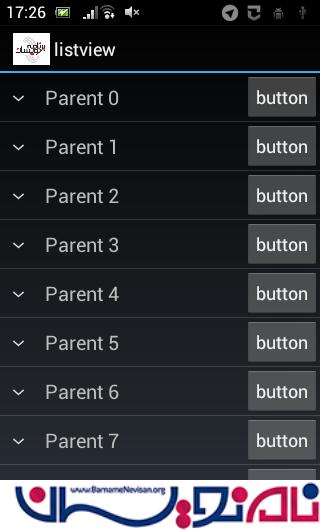
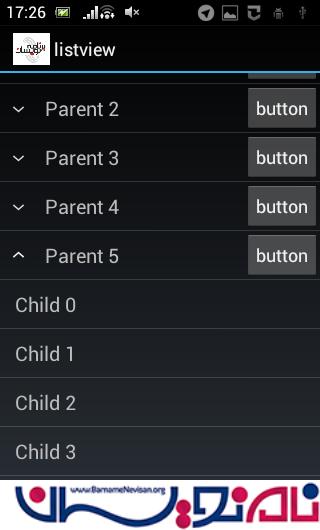
خروجی به صورت زیر خواهد بود:

- Android
- 2k بازدید
- 3 تشکر