امنیت براساس Claim درMVC
شنبه 16 اردیبهشت 1396برای ایجاد امنیت در ورودی ها راه های زیادی وجود دارد. Claim در ASP.NET MVC رویکردی است که سطح دسترسی و امنیت ورودی های را به خوبی بررسی می کند و در حقیقت یک ویژگی برای تشخیص هویت است که در ادامه به تعریف و کاربرد آن خواهیم پرداخت.

claim چیست و چه ارتباطی به سطح دسترسی امنیتی دارد؟
امروزه بنای امنیت براساس Claim در نرم افزارهای مبتنی بر وب دارای رویکرد بسیار خوبی است .اما همه درک نمی کنند که claim چیست و چرا باید در نرم افزارهای کاربردی مورد استفاده قرار گیرد. البته مهم تراز معماری و نیازسنجی برای طراحی یک اپلیکیشن، مکانیزم امنیت براساس دسترسی نقش مورد نظر یا براساس امنیت claim یا حتی بدون هیچ احراز هویت و بدون مکانیزم دسترسی است .
با این اوصاف claim یک ویژگی است که برای توصیف کردن یک موضوع استفاده میشود(از دید ما ،شناسایی هویت).
شناسایی تشخیص هویت یک روش متداول است که در برنامه های کاربردی برای بدست آوردن اطلاعات لازم در مورد هویت کاربران داخل سازمان خودمان ، سازمان های دیگر و در اینترنت مورد استفاده قرار میگیرد.
این اصطلاح همانند تفاوت در اختیارات در زمینه دسترسی ها روابط گسترده ای دارد. به عنوان مثال ، سن کاربران در تماشای یک فیلم ترسناک یک نوع سطح دسترسی است. بر اساس claim ، این یک مجوز تشخیص هویت است ، به عنوان مثال : همه افراد دارای سن بالاتر از 16 می توانند (بعضی کار ها را )انجام دهند. اما این امر برای شناسایی هویت ها در مورد ویژگی هایی همانند "سن" وقتی " همه افرادی که میتوانند فیلم ترسناک نگاه کنند باید ..... ساله باشند" آسان نیست.
بنابراین claim یک ویژگی از هویت است که مجوز ها را تعریف میکند ، زمانیکه مجوزهای درستی برای انجام دادن کاری هستند.
ASP.NET و امنیت در تشخیص هویت
از آنجا که اساس هویت ویندوز (WIF) بسوی دات نت فریم ورک 4.5 حرکت کرده ، بکار بردن امنیت در تشخیص هویت در برنامه های کاربردی مبتنی بر وب سایت های جهانی بسیار آسان است . اکثر مسائل مربوط به ساخت و برقراری امنیت تشخیص هویت در فضاهای نام System.Security.Claims و Microsoft.AspNet.Identity قرار گرفته است . به عنوان مثال در این مقاله از این فضاهای نام استفاده کرده ایم .
مثال امنیت تشخیص هویت با ASP.NET MVC
در ویژوال استدیو خود یک ASP.NET MVC Web application ساده با نام "Hello World" ایجاد کنید . اگر برای این کار نیاز به کمک دارید به لینک my previous article مراجعه کنید. در واقع کار اصلی انجام شد.
Visual Studio .NET Web Project به طور پیش فرض به پروژه ی تست ما همه ی فضاهای نام و مجموعه های مورد نیاز را اضافه کرده است. تنها چیزی که باقی مانده پیاده سازی توابع ساده ای برای اضافه کردن یک claim جدید در طول ثبت نام کاربران / روند اجباری و سپس محدود کردن اختیارات کاربران با claim تعریف شده می باشد .
اجازه دهید سریع تر به مهم ترین قسمت از قابلیت امنیتی کار بپردازیم .
کلاس App_Start/Startup.Auth.cs برای راه اندازی امنیت :
public void ConfigureAuth(IAppBuilder app)
   {
      // Configure the db context, user manager, and signin
      // manager to use a single instance per request
      app.CreatePerOwinContext(ApplicationDbContext.Create);
      app.CreatePerOwinContext<ApplicationUserManager>
         (ApplicationUserManager.Create);
      app.CreatePerOwinContext<ApplicationSignInManager>
         (ApplicationSignInManager.Create);

      // Enable the application to use a cookie to store
      // information for the signed-in user and to use
      // a cookie to temporarily store information about
      // a user logging in with a third-party login provider
      // Configure the sign-in cookie
      app.UseCookieAuthentication(new CookieAuthenticationOptions
      {
         AuthenticationType = DefaultAuthenticationTypes.
            ApplicationCookie,
         LoginPath = new PathString("/Account/Login"),
         Provider = new CookieAuthenticationProvider
         {
            // Enables the application to validate the security
            // stamp when the user logs in.
            // This is a security feature that is used when you
            // change a password or add an external login to
            // your account.
            OnValidateIdentity = SecurityStampValidator.
               OnValidateIdentity<ApplicationUserManager,
               ApplicationUser>(
               validateInterval: TimeSpan.FromMinutes(30),
               regenerateIdentity: (manager, user) =>
                 user.GenerateUserIdentityAsync(manager))
            }
      });
      app.UseExternalSignInCookie(DefaultAuthenticationTypes.
                                  ExternalCookie);

      // Enables the application to temporarily store user
      // information when they are verifying the second factor
      // in the two-factor authentication process.
      app.UseTwoFactorSignInCookie
         (DefaultAuthenticationTypes.TwoFactorCookie,
          TimeSpan.FromMinutes(5));

      // Enables the application to remember the second login
      // verification factor, such as phone or email.
      // Once you check this option, your second step of
      // verification during the login process will be
      // remembered on the device from where you logged in.
      // This is similar to the RememberMe option when you
      // log in.
      app.UseTwoFactorRememberBrowserCookie
         (DefaultAuthenticationTypes.
          TwoFactorRememberBrowserCookie);
   }
App_Start/IdentityConfig.cs پیکربندی وتوسعه هویت ASP.NET Class ApplicationUserManager در این لینک به طور مشخص توضیح داده شده است .
Models/IdentityModels.cs شامل کلاس ApplicationUser:
public class ApplicationUser : IdentityUser
   {
      public async Task<ClaimsIdentity> GenerateUserIdentityAsync
         (UserManager<ApplicationUser> manager)
      {
         // Note the authenticationType must match the one defined
         // in CookieAuthenticationOptions.AuthenticationType
         var userIdentity = await manager.CreateIdentityAsync(this,
            DefaultAuthenticationTypes.ApplicationCookie);
         // Add custom user claims here
         return userIdentity;
      }
این محل دقیقا برای اضافه کردن برخی claim ها برای کاربران نرم افزار است . بنابراین ، تغییراتی در کدها برای نشان دادن امنیت تشخیص هویت براساس claim در زندگی واقعی ایجاد کنیم :
1- فعال کردن Entity Framework Migrations
اگر هر گونه تغییراتی برای claim ها در نظر دارید، Entity Framework Migrations را فعال کنید. زیرا ASP.NET Identity از Code First استفاده می کند و auto-migration برای بروز رسانی پایگاه داده مفید است. برای اطلاعات بیشتر در این مورد به لینک Code First Migrations مراجعه کنید .
Visual Studio main menu -> Tools -> NuGet Package Manager -> Package Manager Console -> Type in "Enable-Migrations" and press Enter.
2-اضافه کردن خصوصیات مرتبط
تمام خصوصیات کلاس ApplicationUser را برای ذخیره claim ها (در فایل Models/IdentityModels.cs ) اضافه کنید. همانطور که ما مثالی با سن زدیم ، اجازه بدهید "تاریخ تولد " را بررسی کنیم و این ویژگی را روی ApplicationUser اضافه کنیم .
3-اضافه کردن EF Migration
برای اضافه کردن EF Migration جهت به روز رسانی پایگاه داده با یک رشته جدید در کنسول Package Manager ، مراحل زیر را انجام دهید:
Add-Migration "'Age' <press enter> to create an upgrade script for our modification
Update-Database <press enter> to run a database schema update
4- اضافه کردن مقدار Birthday
حالا ما برای اجرا گرفتن نیاز داریم مقادیر Birthday را پر کنیم . برای اینکه بهتر متوجه شوید ، پارامتر Birthdayروی فرم ثبت نام کاربران در کلاس Models\AccountViewModels.cs RegisterViewModel اضافه کنید.
public class RegisterViewModel
   {
      [Required]
      [EmailAddress]
      [Display(Name = "Email")]
      public string Email { get; set; }

      [Required]
      [StringLength(100, ErrorMessage = "The {0}
         must be at least {2} characters long.",
         MinimumLength = 6)]
      [DataType(DataType.Password)]
      [Display(Name = "Password")]
      public string Password { get; set; }

      [DataType(DataType.Password)]
      [Display(Name = "Confirm password")]
      [Compare("Password", ErrorMessage =
         "The password and confirmation password do
         not match.")]
      public string ConfirmPassword { get; set; }

      [Required]
      [Display(Name ="Date of Birth")]
      [DataType(DataType.Date)]
      public DateTime BirthDate { get; set; }
   }
قبل از تعریف کلاس using System را اضافه کنید .
5- بروز رسانی Views\Account\Register.cshtml
Views\Account\Register.cshtml را با یک رشته جدید بروز رسانی کنید:
...
   <div class="form-group">
      @Html.LabelFor(m => m.BirthDate, new
         { @class = "col-md-2 control-label" })
      <div class="col-md-10">
         @Html.TextBoxFor(m => m.BirthDate, new
            { @class = "form-control" })
      </div>
   </div>
...
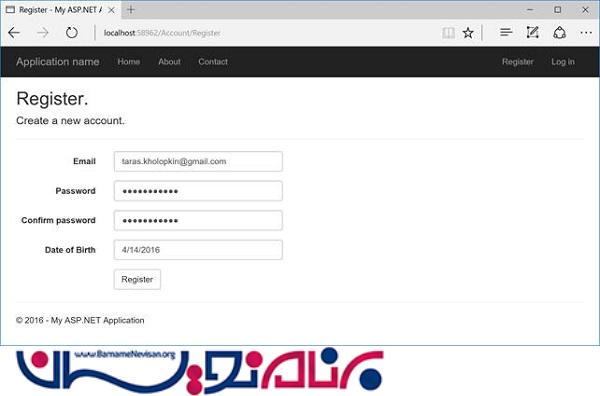
شکل 1 : ثبت نام یک حساب کاربری جدید
6- بروزرسانی متدهای Controllers\AccountController.cs
متد های Controllers\AccountController.cs را برای ثبت Birthday بروزرسانی کنید:
  // POST: /Account/Register
   [HttpPost]
   [AllowAnonymous]
   [ValidateAntiForgeryToken]
   public async Task<ActionResult> Register(RegisterViewModel model)
   {
      if (ModelState.IsValid)
      {
         var user = new ApplicationUser { UserName = model.Email,
            Email = model.Email, BirthDate = model.BirthDate };
         var result = await UserManager.CreateAsync(user,
             model.Password);
         if (result.Succeeded)
         {
            await SignInManager.SignInAsync(user, isPersistent:false,
               rememberBrowser:false);

            // For more information on how to enable account confirmation
            // and password reset, please visit
            // http://go.microsoft.com/fwlink/?LinkID=320771
            // Send an email with this link
            // string code = await
            // UserManager.GenerateEmailConfirmationTokenAsync(user.Id);
            // var callbackUrl = Url.Action("ConfirmEmail", "Account",
            // new { userId = user.Id, code = code },
            // protocol: Request.Url.Scheme);
            // await UserManager.SendEmailAsync(user.Id,
            // "Confirm your account",
            // "Please confirm your account by clicking <a href=\"" +
            // callbackUrl + "\">here</a>");

            return RedirectToAction("Index", "Home");
         }
         AddErrors(result);
      }

      // If we got this far, something failed, redisplay form
      return View(model);
   }
7- بروز رسانی کلاس ApplicationUser
کلاس ApplicationUserرا بوسیله DOB Claim بروزرسانی کنید:
public class ApplicationUser : IdentityUser
   {
      public DateTime BirthDate { get; set; }
      public async Task<ClaimsIdentity>
         GenerateUserIdentityAsync
         (UserManager<ApplicationUser> manager)
      {
         // Note the authenticationType must match the one defined
         // in CookieAuthenticationOptions.AuthenticationType
         var userIdentity = await manager.CreateIdentityAsync
            (this, DefaultAuthenticationTypes.ApplicationCookie);
         // Add custom user claims here
         userIdentity.AddClaim(new Claim(ClaimTypes.DateOfBirth,
            this.BirthDate.ToString()));

         return userIdentity;
      }
   }
8- بررسی Claim
تنها چیزی که باقی مانده بررسی Claim است . این یک روش متداول برای سفارشی سازی Authorize filters به منظور بررسی قابلیت دسترسی و به دست آوردن مقدار خاصی از یک Claim pair است ، پس از آن فیلتر را رو کنترلر ها روی اکشن ها قرار مید هیم و ... به عنوان مثال :
public class ClaimsAuthorizeAttribute : AuthorizeAttribute
   {
      private string claimType;
      private string claimValue;
      public ClaimsAuthorizeAttribute(string claimType,
         string claimValue)
      {
         this.claimType = claimType;
         this.claimValue = claimValue;
      }
      public override void OnAuthorization(AuthorizationContext
         filterContext)
      {
         var user = filterContext.HttpContext.User as
            ClaimsPrincipal;
         if (user.HasClaim(claimType, claimValue))
         {
            base.OnAuthorization(filterContext);
         }
         else
         {
            base.HandleUnauthorizedRequest(filterContext);
         }
      }
   }
Claim Birthday به بررسی بیشتری نیاز دارد ، بنابراین روشی که ما بررسی کردیم تنها به منظور نمایش claim در Controllers\HomeController.cs در متد About بود :
public class HomeController : Controller
   {
      public ActionResult Index()
      {
         return View();
      }

      public ActionResult About()
      {
         var user = HttpContext.User as ClaimsPrincipal;
         if (!user.HasClaim(c => c.Type ==
            ClaimTypes.DateOfBirth))
         {
            ViewBag.Message = "Cannot detect the Age -
               Claim is absent.";
            return View();
         }

         int minAge = 16;
         var dateOfBirth = Convert.ToDateTime(user.FindFirst(c =>
            c.Type == ClaimTypes.DateOfBirth).Value);

         if (calculateAge(dateOfBirth) >= minAge)
         {
            ViewBag.Message = "You can view this page.";
         }
         else
         {
            ViewBag.Message = "Your cannot view this page -
               your age is bellow permitted one.";
         }

         return View();
      }

      private int calculateAge(DateTime dateOfBirth)
      {
         int calculatedAge = DateTime.Today.Year -
            dateOfBirth.Year;
         if (dateOfBirth >
            DateTime.Today.AddYears(-calculatedAge))
         {
            calculatedAge--;
         }
         return calculatedAge;
      }

      public ActionResult Contact()
      {
         ViewBag.Message = "Your contact page.";

         return View();
      }
   }
همانطور که می بینید، claim ها میتوانند اطلاعات کاربران را از هر بخش پروژه استخراج کنند.
بنابراین اجازه دهید ببینیم کد چگونه کار می کند . ما یک حساب کاربری با DOB 04/14/2016 ساختیم ، حالا ببینیم نتیجه چی شد:
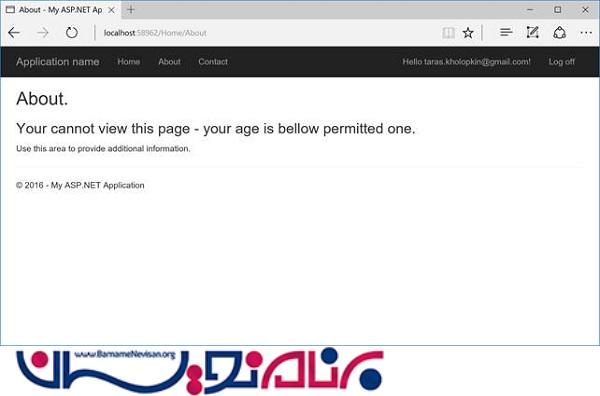
شکل 2: بررسی کد
امنیت در برنامه های مبتنی بر وب توسط بعضی claim های دیگر(در debug window )پیاده سازی شده :
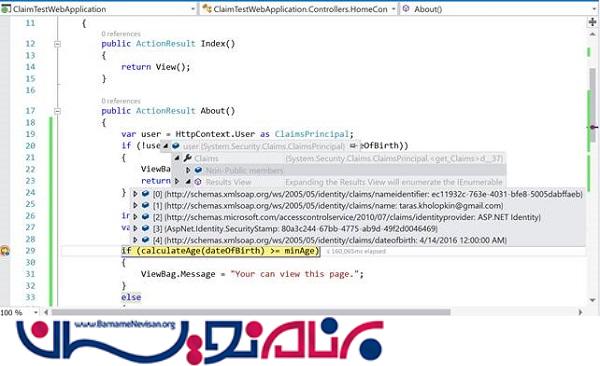
شکل 3: Claim های در حال تولید
این بود دستورالعمل گام به گام برای راه اندازی امنیت تشخیص هویت با کمک ASP.NET Identity
آموزش asp.net mvc

- ASP.net MVC
- 6k بازدید
- 10 تشکر