ایجاد یک فرم wizard در MVC
سه شنبه 2 تیر 1394در این مقاله قصد داریم به پیاده سازی یک فرم wizard ای در Asp.Net .MVC بپردازیم

سلام
دراین پارت از آموزش قصد پیاده سازی چند فرم در یک فرم را داریم که کاربر برای وارد کردن اطلاعات خود بایستی چند مرحله را سپری کند ودر نهایت در یک فرم دیگر تمام مراحلی که گذرانده است را نمایش دهدالبته بدون آنکه سرور فشاری را متحمل شود این مراحل را پیاده سازی میکنیم.
برای شروع به کار روی Model راست کلیک کرده و یک کلاس به نام simpleWizardFormModel ایجاد کنید.
 public class SimpleWizardFormModel : IValidatableObject
    {
        [Required]
        [Display(Name = "نام")]
        public string FirstName { get; set; }

        [Required]
        [Display(Name = "نام خانوادگی")]
        public string LastName { get; set; }

        [Display(Name = "آدرس")]
        public string Address { get; set; }

        [Required]
        [RegularExpression(@"^\d{4}$", ErrorMessage = "باستی حداقل 4 رقم باشد .")]
        [Display(Name = "کد پستی")]
        public string PostalCode { get; set; }

        [Required]
        [Display(Name = "شهر")]
        public string City { get; set; }

        [Display(Name = "تلفن ثابت")]
        public string Phone { get; set; }

        [Display(Name = "همراه")]
        public string Mobile { get; set; }

        [Display(Name = "سن من کمتر از 18 سال است ?")]
        public bool HasTurned18 { get; set; }

        public IEnumerable<ValidationResult> Validate(ValidationContext validationContext)
        {
            if (!HasTurned18)
                yield return new ValidationResult("سن شما  باید بالای 18 سال باشد .", new[] { "HasTurned18" });
        }
حال یک کنترلر ایجاد کنید و کد های زیر را داخل آن بنویسید.
 public ActionResult Index()
        {
            return View("SimpleWizardForm");
        }

        //
        // POST: /Home/
        [HttpPost]
        public ActionResult Index(SimpleWizardFormModel model)
        {
            if (ModelState.IsValid)
            {
                return View("SimpleWizardFormSuccess");
            }

            // Just for testing in order to know when it is the serverside validation that has failed
            ModelState.AddModelError("", "اعتبار سنجی سمت سرور نادرست است ");

            // If we got this far something failed, redisplay form
            return View("SimpleWizardForm", model);
        }
حال در این مرحله یک کنترلر به نام Home از نوع Empty ایجاد میکنیم و کد های زیر را داخل آن مینویسیم
  public class HomeController : Controller
    {
        //
        // GET: /Home/
        public ActionResult Index()
        {
            return View("SimpleWizardForm");
        }

        //
        // POST: /Home/
        [HttpPost]
        public ActionResult Index(SimpleWizardFormModel model)
        {
            if (ModelState.IsValid)
            {
                return View("SimpleWizardFormSuccess");
            }

            // Just for testing in order to know when it is the serverside validation that has failed
            ModelState.AddModelError("", "اعتبار سنجی سمت سرور نادرست است ");

            // If we got this far something failed, redisplay form
            return View("SimpleWizardForm", model);
        }
    }
حال یک View از کنترلر خود میسازیم
@model SimpleWizardFormModel
@section head
{
    <style type="text/css">
        .wizard-step { display: none; }
        .wizard-confirmation { display: none; }
        .wizard-nav {  }
        .wizard-nav input[type="button"] { width: 100px; }
    </style>
}
@section script
{
    <script type="text/javascript">
        //*SNIP*
    </script>
}
<h2>Simple Wizard Form</h2>
@using (Html.BeginForm())
{
    <fieldset>
        <legend></legend>
        <div class="wizard-step">
            <h4>Personal Details</h4>
            <ol>
                <li>
                    @Html.LabelFor(m => m.FirstName)
                    @Html.TextBoxFor(m => m.FirstName)
                    @Html.ValidationMessageFor(m => m.FirstName)
                </li>
                <li>
                    @Html.LabelFor(m => m.LastName)
                    @Html.TextBoxFor(m => m.LastName)
                    @Html.ValidationMessageFor(m => m.LastName)
                </li>
                <li>
                    @Html.LabelFor(m => m.HasTurned18)
                    @Html.CheckBoxFor(m => m.HasTurned18)
                    @Html.ValidationMessageFor(m => m.HasTurned18)
                </li>
            </ol>
        </div>
        <div class="wizard-step">
            @**SNIP**@
        </div>
        <div class="wizard-step wizard-confirmation">
            <h4>Confirm</h4>
            <div id="field-summary"></div>
            <div id="validation-summary">
                <span class="message-error">Please correct the following errors;</span>
                @Html.ValidationSummary(true)
            </div>
        </div>
        <div class="wizard-nav">
            <input type="button" id="wizard-prev" value="<< Previous" />
            <input type="button" id="wizard-next" value="Next >>" />
            <input type="button" id="wizard-submit" value="Submit" />
        </div>
    </fieldset>
}
در Section script میخواهیم Script های که در زیر میسازیم را به آن اضافه کنیم
در این مرحله میخواهیم توضیحی درباره ساخت Scrip های مورد نیاز برنامه بدهیم
حال یک صفحه Script ایجاد کرده و کد های زیر را در آن اضافه کنید
function DisplayStep() {
    var selectedStep = null;
    var firstInputError = $("input.input-validation-error:first"); // check for any invalid input fields
    if (firstInputError.length) {
        selectedStep = $(".wizard-confirmation");
        if (selectedStep && selectedStep.length) { // the confirmation step should be initialized and selected if it exists present
            UpdateConfirmation();
        }
        else {
            selectedStep = firstInputError.closest(".wizard-step"); // the first step with invalid fields should be displayed
        }
    }
    if (!selectedStep || !selectedStep.length) {
        selectedStep = $(".wizard-step:first"); // display first step if no step has invalid fields
    }

    $(".wizard-step:visible").hide(); // hide the step that currently is visible
    selectedStep.fadeIn(); // fade in the step that should become visible

    // enable/disable the prev/next/submit buttons
    if (selectedStep.prev().hasClass("wizard-step")) {
        $("#wizard-prev").show();
    }
    else {
        $("#wizard-prev").hide();
    }
    if (selectedStep.next().hasClass("wizard-step")) {
        $("#wizard-submit").hide();
        $("#wizard-next").show();
    }
    else {
        $("#wizard-next").hide();
        $("#wizard-submit").show();
    }
}
اولین متد Display Step است در واقع این متد برای موقعی به کار میرود که صفحه کاملا لود شده و باعث اعتبار سنجی فرم ما میشود یعنی در ابتدا چک میکند ورودی های هر TextBox درست وارد شده است یا نه؟و اگر ورودی هایی که در textbox وارد میکنیم دچار خطا باشد این متد باعث میشود تا ورودی ها را با اطلاعات صحیح وارد نکنید اجازه رفتن به صفحه بعدی را نمیدهد
function PrevStep() {
    var currentStep = $(".wizard-step:visible"); // get current step

    if (currentStep.prev().hasClass("wizard-step")) { // is there a previous step?

        currentStep.hide().prev().fadeIn();  // hide current step and display previous step

        $("#wizard-submit").hide(); // disable wizard-submit button
        $("#wizard-next").show(); // enable wizard-next button

        if (!currentStep.prev().prev().hasClass("wizard-step")) { // disable wizard-prev button?
            $("#wizard-prev").hide();
        }
    }
}
متد PrevStep : این متد برای رفتن به صفحه قبلی به کار میرود
function NextStep() {
    var currentStep = $(".wizard-step:visible"); // get current step

    var validator = $("form").validate(); // get validator
    var valid = true;
    currentStep.find("input:not(:blank)").each(function () { // ignore empty fields, i.e. allow the user to step through without filling in required fields
        if (!validator.element(this)) { // validate every input element inside this step
            valid = false;
        }
    });
    if (!valid)
        return; // exit if invalid

    if (currentStep.next().hasClass("wizard-step")) { // is there a next step?

        if (currentStep.next().hasClass("wizard-confirmation")) { // is the next step the confirmation?
            UpdateConfirmation();
        }

        currentStep.hide().next().fadeIn();  // hide current step and display next step

        $("#wizard-prev").show(); // enable wizard-prev button

        if (!currentStep.next().next().hasClass("wizard-step")) { // disable wizard-next button and enable wizard-submit?
            $("#wizard-next").hide();
            $("#wizard-submit").show();
        }
    }
}
متد Next Step:این متد همانند بالا عمل میکند با این تفاوت که اجاز ه رفتن به صفحه بعد را به کاربر میدهد فقط این نکته را یاد آوری کنیم که متد Next Step باعث میشود تا زمانی که کاربر اطلاعات درست در ورودی ها وارد نکند، اجازه رفتن به صفحه بعد را نمیدهد.
function Submit() {
    if ($("form").valid()) { // validate all fields, including blank required fields
        $("form").submit();
    }
    else {
        DisplayStep(); // validation failed, redisplay correct step
    }
}
Submit: برای ذخیره اطلاعات وارد شده طی مراحل مختلف کاربرد دارد.
function UpdateConfirmation() {
UpdateValidationSummary();
var fieldList = $("<ol/>");
$(".wizard-step:not(.wizard-confirmation)").find("input").each(function () {
var input = this;
var value;
switch (input.type) {
case "hidden":
return;
case "checkbox":
value = input.checked;
break;
default:
value = input.value;
}
var name = $('label[for="' + input.name + '"]').text();
fieldList.append("<li><label>" + name + "</label><span>" + value + " </span></li>");
});
$("#field-summary").children().remove();
$("#field-summary").append(fieldList);
}
function UpdateValidationSummary() {
var validationSummary = $("#validation-summary");
if (!validationSummary.find(".validation-summary-errors").length) { // check if validation errors container already exists, and if not create it
$('<div class="validation-summary-errors"><ul></ul></div>').appendTo(validationSummary);
}
var errorList = $(".validation-summary-errors ul");
errorList.find("li.field-error").remove(); // remove any field errors that might have been added earlier, leaving any server errors intact
$('.field-validation-error').each(function () {
var element = this;
$('<li class="field-error">' + element.innerText + '</li>').appendTo(errorList); // add the current field errors
});
if (errorList.find("li").length) {
$("#validation-summary span").show();
}
else {
$("#validation-summary span").hide();
}
}
متدUpdateValidateionSummary گزارشی از کارهایی که طی مراحل مختلف انجام داده ایم را به نمایش میگذارد
$(function () {
    // attach click handlers to the nav buttons
    $("#wizard-prev").click(function () { PrevStep(); });
    $("#wizard-next").click(function () { NextStep(); });
    $("#wizard-submit").click(function () { Submit(); });

    // display the first step (or the confirmation if returned from server with errors)
    DisplayStep();
});
قطعه کد های بالا برای مراحل "بعدی"، قلبی، و ذخیره به کار میرود
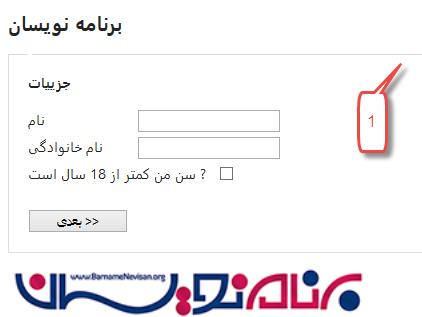
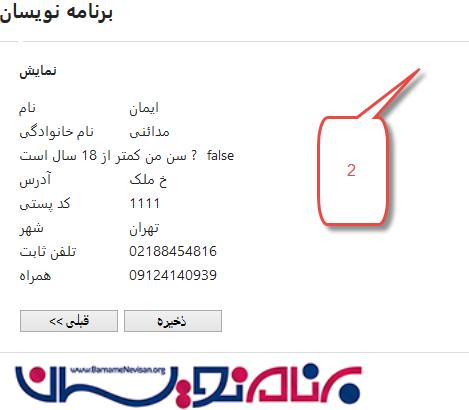
حال از برنامه اجرا بگیرید
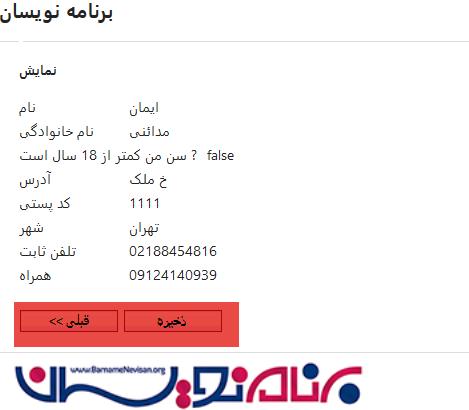
تصویر 1 یکی از مراحل است و تصویر 2 گزارشی از مراحل انجام شده است


- ASP.net MVC
- 3k بازدید
- 5 تشکر
