نحوه ایجاد مسیر پویا (Dynamically) و ذخیره تصویر در پوشه با استفاده از ASP.NET
شنبه 6 تیر 1394در این مقاله نحوه ایجاد مسیر پویا و ذخیره تصاویر در یک پوشه را با استفاده از ASP.NET را خواهید آموخت.
 و ذخیره تصویر در پوشه با استفاده از ASP.NET")
در این مقاله قصد داریم نحوه ایجاد یک مسیر برای ذخیره تصویر و همچنین ذخیره آدرس تصویر در بانک اطلاعاتی را آموزش دهیم.
پیش نیازها:
1- ایجاد یک مسیر برای ذخیره تصویر
2- ذخیره تصویر در پوشه
3- ذخیره آدرس تصویر در بانک اطلاعاتی
برای شروع کار ابتدا جدول زیر را در بانک اطلاعاتی ایجاد کنید.
create table ImageUpload
(
   Sr_No int identity,
   Pictures varchar(500)
)
در قدم بعدی یک پروژه تحت وب ایجاد کنید. یک WebForm به پروژه اضافه کنید. و کدهای زیر را به آن بیافزایید.
<%@ Page Language="C#" AutoEventWireup="true" CodeBehind="WebForm2.aspx.cs" Inherits="SaveImage.WebForm2" %>

<!DOCTYPE html>

<html xmlns="http://www.w3.org/1999/xhtml">
<head runat="server">
    <title></title>
    <style type="text/css">
            .Heading
            {
                font-family: Arial, Helvetica, sans-serif; font-size: 12px; font-weight: bold; font-style: normal;
                font-variant: normal; text-transform: capitalize; color: #808080;
                text-align:center;
                height:30px;
                padding-top:15px;
                margin:10px;
                background-color:Gray;
            }
            .Content
            {
                margin:10px;
                height:400px;

            }
        .style1
        {
            width: 545px;
        }
        .style2
        {
            width: 151px;
        }
        .style3
        {
            width: 126px;
        }
        </style>
</head>
<body dir="rtl">
    <form id="form1" runat="server">
    <div style="height: 783px">
            <div class="Heading">
                ذخیره تصویر در بانک اطلاعاتی</div>
                <div class="Content">
                <br />
                    <table style="width:100%;">
                        <tr>
                            <td class="style3">
                                 </td>
                            <td class="style1">
                                <asp:Image ID="Image1" runat="server" Height="293px" Width="584px" />
                            </td>
                            <td>
                                 </td>
                        </tr>
                        <tr>
                            <td class="style3">
                                 </td>
                            <td class="style1">
                                <asp:FileUpload ID="FileUpload1" runat="server" />
                                <asp:Button ID="btnUpload" runat="server" BackColor="#009933" Font-Bold="True"
                                    ForeColor="White" Height="30px" onclick="btnUpload_Click" Text="آپلود"
                                    Width="100px" />
                                <asp:Button ID="btnSave" runat="server" BackColor="#009900" Font-Bold="True"
                                    ForeColor="White" Height="30px" onclick="btnSave_Click" Text="ذخیره"
                                    Width="100px" />
                            </td>
                            <td>
                                 </td>
                        </tr>
                        <tr>
                            <td class="style3">
                                 </td>
                            <td class="style1">
                                <asp:Label ID="Label1" runat="server" Text="Label" Visible="False"></asp:Label>
                            </td>
                            <td>
                                 </td>
                        </tr>
                    </table>
                </div>

        </div>
    </form>
</body>
</html>
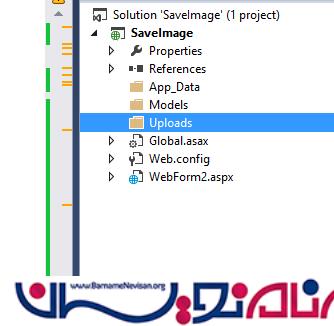
حال یک پوشه به پروژه اضافه کنید. در واقع این پوشه مسیر ذخیره تصاویر خواهد بود.
قدم سوم درج کدهای زیر در صفحه دستورات WebForm است.
using System;
using System.Collections.Generic;
using System.Configuration;
using System.Data.SqlClient;
using System.Drawing;
using System.IO;
using System.Linq;
using System.Web;
using System.Web.UI;
using System.Web.UI.WebControls;

namespace SaveImage
{
    public partial class WebForm2 : System.Web.UI.Page
    {
        SqlConnection con = new SqlConnection(ConfigurationManager.ConnectionStrings["CONN"].ConnectionString.ToString());

        string ImageStr;
        string OldImg;

        protected void Page_Load(object sender, EventArgs e)
        {

        }

        protected void btnUpload_Click(object sender, EventArgs e)
        {
            try
            {
                if (FileUpload1.HasFile)
                {
                    string dirUrl = "Uploads" + this.Page.User.Identity.Name;

                    string dirPath = Server.MapPath(dirUrl);

                    // ابتدا مسیر ذخیره تصویر را بررسی می کند که اگر مسیری وجود نداشت یک مسیر ایجاد کند.


                    if (!Directory.Exists(dirPath))
                    {
                        Directory.CreateDirectory(dirPath);
                    }

                    // ذخیره فایل در پوشه

                    string fileUrl = dirUrl + "/" + Path.GetFileName(FileUpload1.PostedFile.FileName);
                    FileUpload1.PostedFile.SaveAs(Server.MapPath(fileUrl));

                    //نمایش تصویر بعد از آپلود

                    Image1.ImageUrl = fileUrl;
                }
            }
            catch (Exception Exc)
            {
                Label1.ForeColor = Color.Red;
                Label1.Text = "Application Error : " + Exc.Message;
            }
        }

        protected void btnSave_Click(object sender, EventArgs e)
        {
            try
        {
            con.Open();

            SqlCommand cmd = new SqlCommand("select Pictures from ImageUpload where Pictures='"+Image1.ImageUrl+"' ", con);
            SqlDataReader dr = cmd.ExecuteReader();

            if (dr.Read())
            {

                // بررسی شود که آیا تصویر در در بانک اطلاعاتی موجود است یا خیر
                OldImg = dr["Pictures"].ToString();

                if (OldImg == Image1.ImageUrl)
                {
                    ScriptManager.RegisterStartupScript(this, this.GetType(), "msg", "alert('This Image Already Exist.')", true);
                }

            }

            else
            {
                // If not avaliable, then insert it path to the database
                //اگر تصویر در بانک اطلاعاتی موجود نبود مسیر تصویر کنونی را در بانک اطلاعاتی ذخیره می کند.
                dr.Close();
                SqlCommand cmd1 = new SqlCommand("insert into ImageUpload values('" + Image1.ImageUrl + "')", con);
                cmd1.ExecuteNonQuery();
            }

            con.Close();
        }
        catch (Exception Exc)
        {
            Label1.ForeColor = Color.Red;
            Label1.Text = "Application Error." + Exc.Message;
        }
    }
        }
    }
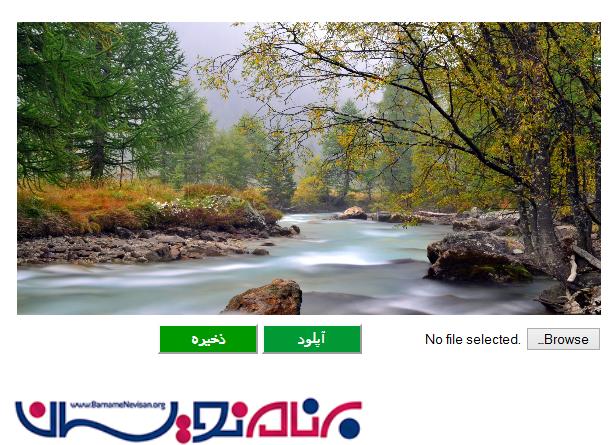
حال اجرای برنامه را خواهیم دید.
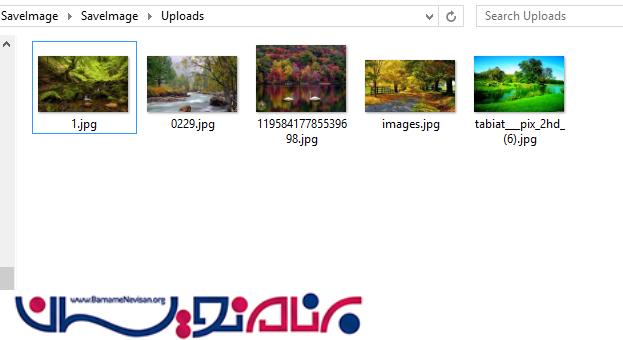
تعدادی تصویر را بعد از اجرای برنامه آپلود کنید و خروجی را ببینید.
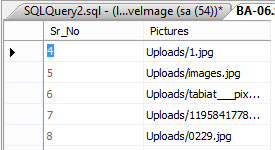
حال می بینید که آدرس تصاویر در بانک اطلاعاتی نیز ذخیره شده اند.

- ASP.net
- 2k بازدید
- 3 تشکر