لیست آبشاری توسط Web API درMVC
یکشنبه 5 مهر 1394در این مقاله نحوه ساخت لیست آبشاری در MVC توسط 2 Web API را خواهید آموخت که برای نمایش لیست آبشاری با مقادیر انتخابی می توان از DropDown List استفاده کرد.
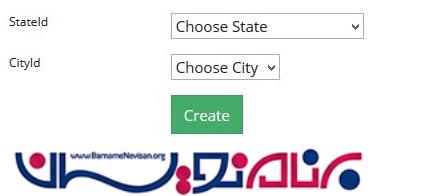
اگر ما نیاز به نمایش لیست آبشاری با مقادیر انتخابی را داشته باشیم می توان از DropDown List استفاده کنیم. برای مثال اگر بخواهیم در یک لیست کشورها را آورده و با انتخاب یک کشور در لیست دیگر شهرهای آن را در این لیست پر کنیم تا کاربر بتواند انتخاب کند می توانیم از WEB API استفاده نماییم.
در پروژه های MVC راه های زیادی برای کار با بانک اطلاعاتی وجود دارد. کارهایی از قبیل درج، بروزرسانی، حذف و غیره (Crud).
می توان از Entity Data Model در کنترلر برای نمایش در ویو استفاده نمود. می توان سرویسی برای انجام این عملیات بسازیم و برای صدا زدن آن از JavaScript هایی مانند Angular یا Knockout یا jQuery در برنامه ها استفاده کنیم.
در مقاله قبلی کار با API ها را در MVC بررسی کردیم. ما برای واکشی داده ها از بانک اطلاعاتی از API استفاده کردیم و از کنترلر برای صدا زدن API و نمایش آن در ویو استفاده کردیم. در این مقاله ما نحوه ساخت لیست شهر و کشور را خواهیم آموخت.
مراحل
کار با بانک اطلاعاتی
ساخت مدل
کار با لایه DAL
کار با پروژه API
کار با لایه UI
کار با بانک اطلاعاتی
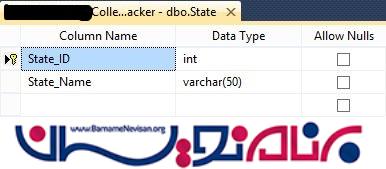
دو جدول با نام های State و City مانند تصاویر زیر می سازیم.
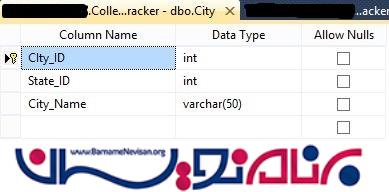
بین دو جدول رابطه ای مانند زیر برقرار است.

یک Stored Procedure برای انتخاب کشور توسط کد زیر می سازیم.
Create Proc [dbo].[CT_State_Select]
As
Begin
Set NOCOUNT ON
    Select State_ID, State_Name
    From State (NOLOCK)
    Order By State_Name ASC
End
یک Stored Procedure برای انتخاب شهر توسط کد زیر می سازیم.
CREATE PROCEDURE [dbo].[CT_City_Select] (
    @StateId Int)
AS
BEGIN
    SET NOCOUNT ON
    SELECT
    City_ID, State_ID, City_Name
    FROM  City  (NOLOCK)
    WHERE  State_ID=@StateId
    ORDER BY City_Name ASC
END
توسط کد زیر Stored Procedure که در مقاله قبلی ساختیم را Update می نماییم.
ALTER Proc [dbo].[CT_CollegeDetails_Select]
As
Begin
Select
    c.CollegeID,
    c.[CollegeName],
    c.[CollegeAddress],
    c.[CollegePhone],
    c.[CollegeEmailID],
    c.[ContactPerson],
    c.[State],
    c.[City],
    s.State_Name,
    ci.City_Name
From CollegeDetails c inner join State s on c.State = s.State_ID inner join City ci on c.City = ci.CIty_ID
End
ساخت مدل
روی پروژه "CollegeTrackerModels" که در مثال قبلی ساخته شد راست کلیک کرده و یک کلاس جدید با نام State مانند زیر می سازیم.
namespace CollegeTrackerModels
{
    /// <summary>
    /// class for state
    /// </summary>
    public class State
    {
        #region Properties
        /// <summary>
        /// get and set the State ID
        /// </summary>
        public int State_ID { get; set; }
        /// <summary>
        /// get and set the State Name
        /// </summary>
        public string State_Name { get; set; }
        #endregion
    }
}
یک کلاس دیگر با نام City مانند زیر می سازیم.
namespace CollegeTrackerModels
{
    /// <summary>
    /// class for City
    /// </summary>
    public partial class City
    {
        #region Properties
        /// <summary>
        /// get and set the city id
        /// </summary>
        public int City_ID { get; set; }
        /// <summary>
        /// get and set the state id
        /// </summary>
        public int State_ID { get; set; }
        /// <summary>
        /// get and set the city name
        /// </summary>
        public string City_Name { get; set; }
        /// <summary>
        /// get and set the value
        /// </summary>
        public int Value { get; set; }
        /// <summary>
        /// get and set the text
        /// </summary>
        public string Text { get; set; }
        #endregion
    }
}
کلاس CollegeDetails را با کدهای زیر تغییر می دهیم.
namespace CollegeTrackerModels
{
    /// <summary>
    /// class for College Details
    /// </summary>
    public class CollegeDetails
    {
        #region Constructor
        public CollegeDetails()
        {
            this.States = new List<State>();
            this.Cities = new List<City>();
        }
        #endregion

        #region Properties
        ///<summary>
        ///get and set the  College ID
        ///</summary>
        public int CollegeID { get; set; }
        ///<summary>
        ///get and set the  College Name
        ///</summary>
        [Display(Name = "College Name")]
        public string CollegeName { get; set; }
        ///<summary>
        ///get and set the  College Address
        ///</summary>
        [Display(Name = "College Address")]
        public string CollegeAddress { get; set; }
        ///<summary>
        ///get and set the  College Phone
        ///</summary>
        [Display(Name = "College Phone")]
        public string CollegePhone { get; set; }
        ///<summary>
        ///get and set the  College Email ID
        ///</summary>
        [Display(Name = "College EmailID")]
        public string CollegeEmailID { get; set; }
        ///<summary>
        ///get and set the  Contact Person
        ///</summary>
        [Display(Name = "Contact Person")]
        public string ContactPerson { get; set; }
        ///<summary>
        ///get and set the  State Id
        ///</summary>
        public Int16 StateId { get; set; }
        /// <summary>
        /// get and set the States
        /// </summary>
        public IList<State> States { get; set; }
        /// <summary>
        /// get and set the Cities
        /// </summary>
        public IList<City> Cities { get; set; }
        ///<summary>
        ///get and set the  City Id
        ///</summary>
        public Int16 CityId { get; set; }
        ///<summary>
        ///get and set the status
        ///</sumary>
        public int Status { get; set; }
        /// <summary>
        /// get and set the state name
        /// </summary>
        [Display(Name="State")]
        public string State_Name { get; set; }
        /// <summary>
        /// get and set the city name
        /// </summary>
        [Display(Name="City")]
        public string City_Name { get; set; }
        #endregion
    }
}
کار با لایه DAL
روی پوشه DAL راست کلیک کرده و یک کلاس جدید با نام "StateDAL" ساخته و کدهای زیر را برای آن می نویسیم.
using System;
using System.Collections.Generic;
using CollegeTrackerModels;
using System.Configuration;
using System.Data;
using System.Data.SqlClient;

namespace CollegeTrackerCore.DAL
{
    public class StateDAL
    {
        #region Variables
        SqlConnection con;
        SqlCommand cmd;
        SqlDataAdapter adap;
        DataTable dt;
        DataSet ds;
        string connectionstring = ConfigurationManager.ConnectionStrings["CollegeTrackerConnectionString"].ConnectionString;
        #endregion

        #region Constructor
        public StateDAL()
        {
            con = new SqlConnection(this.connectionstring);
        }
        #endregion

        #region Public Method
        /// <summary>
        /// This method is used to get all State.
        /// </summary>
        /// <returns></returns>
        public List<State> GetState()
        {
            List<State> objState = new List<State>();
            using (cmd = new SqlCommand("CT_State_Select", con))
            {
                try
                {
                    cmd.CommandType = CommandType.StoredProcedure;
                    con.Open();
                    adap = new SqlDataAdapter();
                    adap.SelectCommand = cmd;
                    dt = new DataTable();
                    adap.Fill(dt);

                    foreach (DataRow row in dt.Rows)
                    {
                        State state = new State();
                        state.State_ID = Convert.ToInt32(row["State_ID"]);
                        state.State_Name = row["State_Name"].ToString();
                        objState.Add(state);
                    }
                }
                catch (Exception ex)
                {
                    con.Close();
                }
                return objState;
            }
        }
        #endregion
    }
}
همچنین یک کلاس دیگر با نام "CityDAL" ساخته و کدهای زیر را برای آن می نویسیم.
using System;
using System.Collections.Generic;
using CollegeTrackerModels;
using System.Configuration;
using System.Data;
using System.Data.SqlClient;

namespace CollegeTrackerCore.DAL
{
    public class CityDAL
    {
        #region Variables
        SqlConnection con;
        SqlCommand cmd;
        SqlDataAdapter adap;
        DataTable dt;
        DataSet ds;
        string connectionstring = ConfigurationManager.ConnectionStrings["CollegeTrackerConnectionString"].ConnectionString;
        #endregion

        #region Constructor
        public CityDAL()
        {
            con = new SqlConnection(this.connectionstring);
        }
        #endregion

        #region Public Method
        /// <summary>
        /// This method is used to get all cities.
        /// </summary>
        /// <returns></returns>
        public List<City> GetCity(int stateId)
        {
            List<City> objCity = new List<City>();
            using (cmd = new SqlCommand("CT_City_Select", con))
            {
                cmd.CommandType = CommandType.StoredProcedure;
                dt = new DataTable();
                cmd.Parameters.AddWithValue("@StateId", stateId);
                adap = new SqlDataAdapter();
                adap.SelectCommand = cmd;
                try
                {
                    con.Open();
                    adap.Fill(dt);
                    foreach (DataRow row in dt.Rows)
                    {
                        City city = new City();
                        city.City_ID = Convert.ToInt32(row["City_ID"]);
                        city.State_ID = Convert.ToInt32(row["State_ID"]);
                        city.City_Name = row["City_Name"].ToString();
                        objCity.Add(city);
                    }
                }
                catch (Exception ex)
                {
                    throw ex;
                }
                finally
                {
                    con.Close();
                }
                return objCity;
            }
        }
        #endregion
    }
}
متد "GetAllCollegeDetails" موجود در "CollegeDAL" را با کدهای زیر تغییر می دهیم.
public List<CollegeDetails> GetAllCollegeDetails()
{
    List<CollegeDetails> objCollegeDetails = new List<CollegeDetails>();
    using (cmd = new SqlCommand("CT_CollegeDetails_Select", con))
    {
        try
        {
            cmd.CommandType = CommandType.StoredProcedure;
            con.Open();
            adap = new SqlDataAdapter();
            adap.SelectCommand = cmd;
            dt = new DataTable();
            adap.Fill(dt);

            foreach (DataRow row in dt.Rows)
            {
                CollegeDetails col = new CollegeDetails();
                col.CollegeID = Convert.ToInt32(row["CollegeID"]);
                col.CollegeName = row["CollegeName"].ToString();
                col.CollegeAddress = row["CollegeAddress"].ToString();
                col.CollegePhone = row["CollegePhone"].ToString();
                col.CollegeEmailID = row["CollegeEmailID"].ToString();
                col.ContactPerson = row["ContactPerson"].ToString();
                col.State_Name = row["State_Name"].ToString();
                col.City_Name = row["City_Name"].ToString();
                objCollegeDetails.Add(col);
            }
        }
        catch (Exception ex)
        {
            con.Close();
        }
        return objCollegeDetails;
    }
}
کلاسی با نام "StateBLCore" در پوشه BLL ایجاد می کنیم.
namespace CollegeTrackerCore.BLL
{
    public abstract class StateBLCore
    {
        #region public method
        /// <summary>
        /// This method is used to get the State Details
        /// </summary>
        /// <returns></returns>
        protected List<State> GetState()
        {
            List<State> objState = null;
            try
            {
                objState = new StateDAL().GetState();
            }
            catch (Exception ex)
            {
                throw ex;
            }
            return objState;
        }
        #endregion
    }
}
کلاسی با نام "CityBLCore" در پوشه BLL ایجاد می کنیم.
namespace CollegeTrackerCore.BLL
{
    public abstract class CityBLCore
    {
        #region public method
        /// <summary>
        /// This method is used to get the City Details
        /// </summary>
        /// <returns></returns>
        protected List<City> GetCity(int stateId)
        {
            List<City> objCity = null;
            try
            {
                objCity = new CityDAL().GetCity(stateId);
            }
            catch (Exception ex)
            {
                throw ex;
            }
            return objCity;
        }
        #endregion
    }
}
کار با پروژه API
در پروژه "CollegeTrackerAPI" به فولد Area رفته و روی پوشه BLL راست کلیک کرده و دو کلاس با نام های "CityBL" و "StateBL" ایجاد نمایید. کدهای زیر را برای آنها می نویسیم.
CityBL Class
using CollegeTrackerCore.BLL;
using CollegeTrackerModels;
using System.Collections.Generic;

namespace CollegeTrackerAPI.Areas.BLL
{
    internal sealed class CityBL : CityBLCore
    {
        /// <summary>
        /// This method is used to get the CityDetails
        /// </summary>
        /// <return></return>
        internal new List<City> GetCity(int stateId)
        {
            return base.GetCity(stateId);
        }
    }
}
StateBL Class
using CollegeTrackerCore.BLL;
using CollegeTrackerModels;
using System.Collections.Generic;

namespace CollegeTrackerAPI.Areas.BLL
{
    internal sealed class StateBL : StateBLCore
    {
        /// <summary>
        /// This method is used to get the states
        /// </summary>
        /// <return></return>
        internal new List<State> GetState()
        {
            return base.GetState();
        }
    }
}
روی پوشه Controller راست کلیک کرده و یک Web API 2 Controller با نام "StateDetails" ایجاد می کنیم. کدهای زیر را برای آن می نویسیم.
using CollegeTrackerAPI.Areas.BLL;
using CollegeTrackerModels;
using System;
using System.Collections.Generic;
using System.Net;
using System.Net.Http;
using System.Web.Http;

namespace CollegeTrackerAPI.Areas.Controller
{
    public class StateDetailsController : ApiController
    {
        #region variable
        ///<summary>
        ///variable for StateBL
        ///</summary>
        private StateBL objStateBL;
        ///<summary>
        /// variable for httpResponseMessage
        /// </summary>
        HttpResponseMessage response;
        # endregion

        #region Response Method
        ///summary
        /// This method is used to fetch StateDetails
        /// <summary>
        /// <return></return>
        [HttpGet, ActionName("GetAllStateDetails")]
        public HttpResponseMessage GetAllStatesDetails()
        {
            objStateBL = new StateBL();
            HttpResponseMessage response;
            try
            {
                var detailsResponse = objStateBL.GetState();
                if (detailsResponse != null)
                    response = Request.CreateResponse<List<State>>(HttpStatusCode.OK, detailsResponse);
                else

                    response = new HttpResponseMessage(HttpStatusCode.NotFound);
            }
            catch (Exception ex)
            {
                response = Request.CreateErrorResponse(HttpStatusCode.InternalServerError, ex.Message);

            }
            return response;
        }
        #endregion
    }
}
یک کنترلر با نام "CityDetails" با کدهای زیر می سازیم.
using CollegeTrackerAPI.Areas.BLL;
using CollegeTrackerModels;
using System;
using System.Collections.Generic;
using System.Net;
using System.Net.Http;
using System.Web.Http;

namespace CollegeTrackerAPI.Areas.Controller
{
    public class CityDetailsController : ApiController
    {
        #region variable
        ///<summary>
        ///variable for CityBL
        ///</summary>
        private CityBL objCityBL;
        ///<summary>
        /// variable for httpResponseMessage
        /// </summary>
        HttpResponseMessage response;
        #endregion

        #region Response Method
        ///summary
        /// This method is used to fetch CityDetails
        /// <summary>
        /// <return></return>
        [HttpGet, ActionName("GetAllCityDetails")]
        public HttpResponseMessage GetAllCityDetails(int stateId)
        {
            objCityBL = new CityBL();
            HttpResponseMessage response;
            try
            {
                var detailsResponse = objCityBL.GetCity(stateId);
                if (detailsResponse != null)
                    response = Request.CreateResponse<List<City>>(HttpStatusCode.OK, detailsResponse);
                else

                    response = new HttpResponseMessage(HttpStatusCode.NotFound);
            }
            catch (Exception ex)
            {
                response = Request.CreateErrorResponse(HttpStatusCode.InternalServerError, ex.Message);

            }
            return response;
        }
        #endregion
    }
}
کار با لایه UI
کنترلر "CollegeDetails" را با کدهای زیر تغییر می دهیم.
public ActionResult CreateCollegeDetails()
{
    CollegeDetails objcollege = new CollegeDetails();
    objcollege.States = GetAllStates();
    return View("~/Views/CollegeDetails/CreateCollegeDetails.cshtml", objcollege);
}

public List<State> GetAllStates()
{
    var list = new List<CollegeTrackerModels.State>();
    var httpClient = new HttpClient();
    httpClient.DefaultRequestHeaders.Accept.Add(new MediaTypeWithQualityHeaderValue("application/json"));
    HttpResponseMessage response;
    response = httpClient.GetAsync("http://localhost:59866/api/" + "StateDetails/GetAllStateDetails/").Result;
    response.EnsureSuccessStatusCode();
    List<State> stateList = response.Content.ReadAsAsync<List<State>>().Result;
    if (!object.Equals(stateList, null))
    {
        var states = stateList.ToList();
        return states;
    }
    else
    {
        return null;
    }
}

[HttpGet]
public JsonResult GetJsonCity(int stateId)
{
    var list = new List<CollegeTrackerModels.City>();
    try
    {
        var httpClient = new HttpClient();
        httpClient.DefaultRequestHeaders.Accept.Add(new MediaTypeWithQualityHeaderValue("application/json"));
        HttpResponseMessage response;
        response = httpClient.GetAsync("http://localhost:59866/api/" + "cityDetails/GetAllCityDetails?stateId="+stateId+"").Result;
        response.EnsureSuccessStatusCode();
        List<City> cityList = response.Content.ReadAsAsync<List<City>>().Result;
        if (!object.Equals(cityList, null))
        {
            var cities = cityList.ToList();
            foreach (var item in cities)
            {
                list.Add(new City
                {
                    Value = item.City_ID,
                    Text = item.City_Name
                });
            }
        }
    }
    catch (HttpException ex)
    {
        throw new HttpException(ex.Message);
    }
    catch (Exception ex)
    {
        throw new Exception(ex.Message);
    }
    return Json(new SelectList(list, "Value", "Text"), JsonRequestBehavior.AllowGet);
}
تکه کد زیر را در صفحه Views/CollegeDetails/CollegeDetails می نویسیم.
<p>
    @Html.ActionLink("Create New", "CreateCollegeDetails", "CollegeDetails")
</p>
در Views/CollegeDetails یک ویو جدید با نام "CreateCollegeDetails" ساخته و کدهای زیر را برای آن می نویسیم.
@model CollegeTrackerModels.CollegeDetails
@{
    ViewBag.Title = "Create CollegeDetails";
}

<h2>Create</h2>

<script type="text/javascript">
    function getCities() {
        var stateID = $('#DropDownListStates').val();
        if (stateID > 0)
        {
            $.ajax({
                url: "@Url.Action("GetJsonCity","CollegeDetails")",
                data: { stateId: stateID },
                dataType: "json",
                type: "GET",
                success: function (data) {
                    var items = "";
                    items = "<option value=''>--Choose City--</option>";
                    $.each(data, function (i, item) {
                        items += "<option value=\"" + item.Value + "\">" + item.Text + "</option>";
                    });
                    $('#DropDownListCities').html(items);
                }
            });
        }
    }
</script>

@using (Ajax.BeginForm("CreateUpdateCollegeDetails","CollegeDetails",null))
{
    @Html.AntiForgeryToken()

    <div class="form-horizontal">
        <hr />
        @Html.ValidationSummary(true)

        <div class="form-group">
            @Html.LabelFor(model => model.CollegeName, new { @class = "control=label col-md-2" })
            <div class="col-md-10">
                @Html.EditorFor(model => model.CollegeName)
                @Html.ValidationMessageFor(model => model.CollegeName)
            </div>
        </div>

        <div class="form-group">
            @Html.LabelFor(model => model.CollegeAddress, new { @class = "control=label col-md-2" })
            <div class="col-md-10">
                @Html.EditorFor(model => model.CollegeAddress)
                @Html.ValidationMessageFor(model => model.CollegeAddress)
            </div>
        </div>

        <div class="form-group">
            @Html.LabelFor(model => model.CollegePhone, new { @class = "control=label col-md-2" })
            <div class="col-md-10">
                @Html.TextBoxFor(model => model.CollegePhone)
                @Html.ValidationMessageFor(model => model.CollegePhone)
            </div>
        </div>

        <div class="form-group">
            @Html.LabelFor(model => model.CollegeEmailID, new { @class = "control=label col-md-2" })
            <div class="col-md-10">
                @Html.EditorFor(model => model.CollegeEmailID)
                @Html.ValidationMessageFor(model => model.CollegeEmailID)
            </div>
        </div>

        <div class="form-group">
            @Html.LabelFor(model => model.ContactPerson, new { @class = "control=label col-md-2" })
            <div class="col-md-10">
                @Html.EditorFor(model => model.ContactPerson)
                @Html.ValidationMessageFor(model => model.ContactPerson)
            </div>
        </div>

        <div class="form-group">
            @Html.LabelFor(model => model.StateId, new { @class = "control=label col-md-2" })
            <div class="col-md-10">
                @Html.DropDownListFor(model => model.StateId, new SelectList(Model.States, "State_ID", "State_Name"), "Choose State", new { onchange = "getCities()", @id = "DropDownListStates" })
                @Html.ValidationMessageFor(model => model.StateId)

            </div>
        </div>

        <div class="form-group">
            @Html.LabelFor(model => model.CityId, new { @class = "control=label col-md-2" })
            <div class="col-md-10">
                @Html.DropDownListFor(model => model.CityId, new SelectList(Model.Cities, "City_ID", "State_ID", "City_Name"), "Choose City", new { @id = "DropDownListCities" })
                @Html.ValidationMessageFor(model => model.CityId)
            </div>
        </div>

        <div class="form-group">
            <div class="col-md-offset-2 col-md-10">
                <input type="submit" value="Create" class="btn btn-success" />
            </div>
        </div>
    </div>
}

<div>
    @Html.ActionLink("Back to List", "GetCollegeList")
</div>

@section Scripts{
    @Scripts.Render("~/bundles/jqueryval");
}
حال پروژه را اجرا کرده و روی دکمه Create New مانند تصویر زیر کلیک می کنیم.
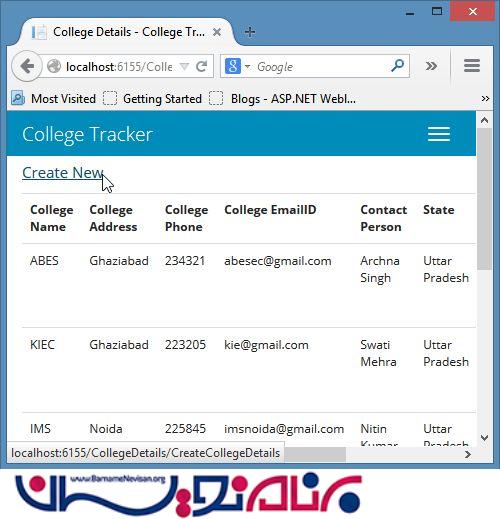
در صفحه بعدی شما می توانید ببینید که کشورها در dropdownlist کشورها لیست شده اند.
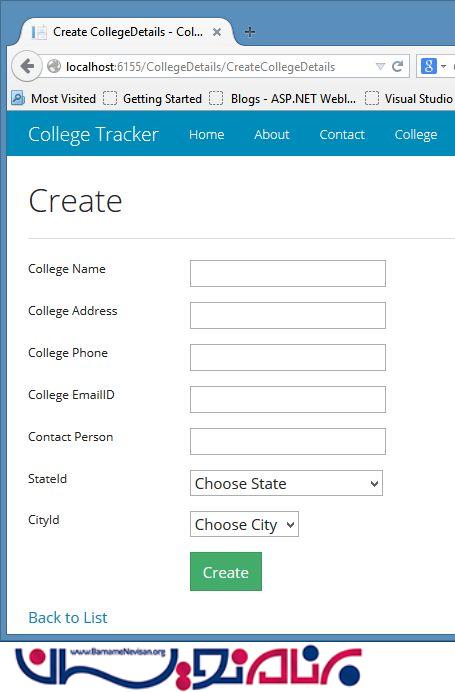
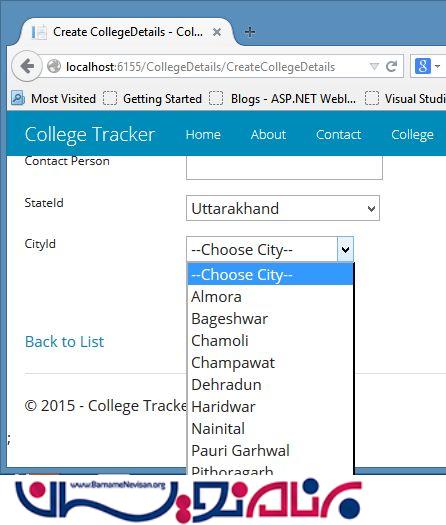
با انتخاب کشور لیست مربوط به شهرها تغییر کرده و در این لیست شهر های مربوط به آن کشوری که در لیست قبلی انتخاب شده می آیند.
- ASP.net MVC
- 2k بازدید
- 5 تشکر
