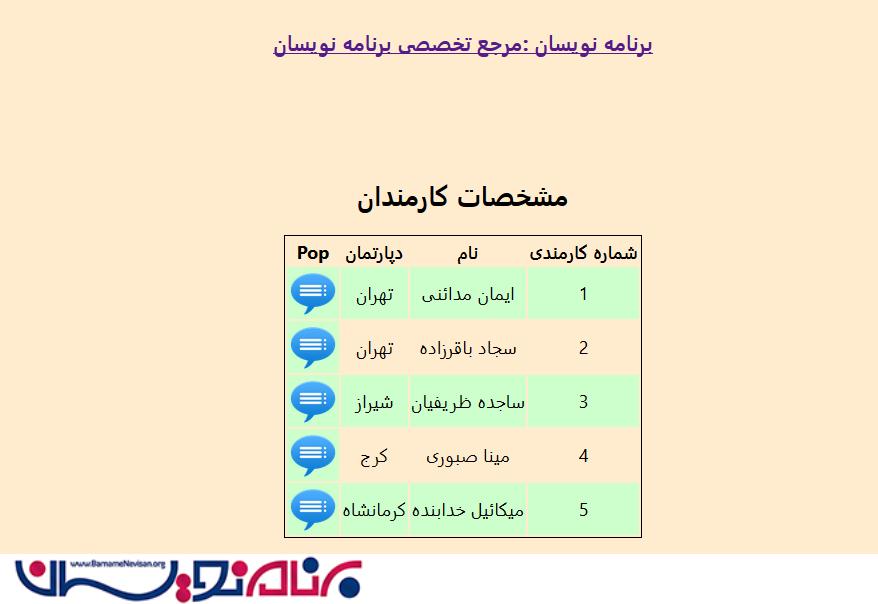
کنترل Repeater با Dialog Popup توسط jQuery
دوشنبه 11 آبان 1394در این مقاله شما با مراحل ساخت یک Repeater در ASP.NET آشنا خواهید شد.همچنین نحوه نمایش هر کدام از آیتم های Repeater را در یک jQuery Dialog popup خواهید دید

در این مقاله شما با مراحل ساخت یک Repeater در ASP.NET آشنا خواهید شد.همچنین نحوه نمایش هر کدام از آیتم های Repeater را در یک jQuery Dialog popup خواهید دید
مرحله 1- افزودن Repeater به صفحه aspx
یک صفحه وب فرم ایجاد کرده و نام آنرا RepeaterWithjQueryPopup بگذارید.قصد داریم مشخصات کارمندانی با آیتم های Employee Id و Name و Location را در Repeater نمایش دهیم .
در قسمت Design صفحه برای اینکه Repeater داشته باشیم از کد های زیر استفاده می کنیم .ابتدا در HeaderTemplate سر نام هر یک از ستون ها را مشخص کرده ایم : به صورت زیر
  <HeaderTemplate>
                <table id="tblEmployeeDetails" style="border: 1px solid; margin-left: auto; margin-right: auto;">
                    <tr>
                        <th>
                            شماره کارمندی
                        </th>
                        <th>
                            نام
                        </th>
                        <th>
                            دپارتمان
                        </th>
                        <th>
                            Pop
                        </th>
                    </tr>
            </HeaderTemplate>
در قسمت ItemTemplate باید دیتای خود را تعریف کنیم .در این قسمت یک Lable ساده گذاشته ایم که با استفاده از تابع Eval در قسمت Text آنرا با مقادیری پر کرده ایم.کد مربوط به این قسمت به صورت زیر است .
 <ItemTemplate>
                <tr>
                    <td bgcolor="#CCFFCC">
                        <asp:Label runat="server" ID="lblEmployeeId" Text='<%# Eval("EmployeeId") %>' />
                    </td>
                    <td bgcolor="#CCFFCC">
                        <asp:Label runat="server" ID="lblName" Text='<%# Eval("Name") %>' />
                    </td>
                    <td bgcolor="#CCFFCC">
                        <asp:Label runat="server" ID="lblLocation" Text='<%# Eval("Location") %>' />
                    </td>
                    <td bgcolor="#CCFFCC">
                        <asp:ImageButton ID="imbShowDetails" class="imgButton" Height="50" runat="server"
                            ImageUrl="images/popup.png" />
                    </td>
                </tr>
            </ItemTemplate>
AlternatingItemTemplate
در این قسمت تعیین می کنیم که هر کدام از ردیف های ما به صورت یک در میان رنگی شوند .
    <AlternatingItemTemplate>
                <tr>
                    <td>
                        <asp:Label runat="server" ID="lblEmployeeId" Text='<%# Eval("EmployeeId") %>' />
                    </td>
                    <td>
                        <asp:Label runat="server" ID="lblName" Text='<%# Eval("Name") %>' />
                    </td>
                    <td>
                        <asp:Label runat="server" ID="lblLocation" Text='<%# Eval("Location") %>' />
                    </td>
                    <td bgcolor="#CCFFCC">
                        <asp:ImageButton ID="imbShowDetails" class="imgButton" Height="50" runat="server"
                            ImageUrl="images/popup.png" />
                    </td>
                </tr>
            </AlternatingItemTemplate>
مرحله 2- در این قسمت اطلاعات مورد نظر را به Repeater خود bind می کنیم .در قسمت code Behind صفحه کد های زیر را می نویسیم
    private void BindEmployees()
        {
            // Create DataTable and add Columns.
            DataTable dtEmployees = new DataTable();
            dtEmployees.Columns.Add("Name", typeof(string));
            dtEmployees.Columns.Add("EmployeeId", typeof(int));
            dtEmployees.Columns.Add("Location", typeof(string));

            // Add demo Rows.
            dtEmployees.Rows.Add("ایمان مدائنی", 1, "تهران");
            dtEmployees.Rows.Add("سجاد باقرزاده", 2, "تهران");
            dtEmployees.Rows.Add("ساجده ظریفیان", 3, "شیراز ");
            dtEmployees.Rows.Add("مینا صبوری", 4, "کرج");
            dtEmployees.Rows.Add("میکائیل خدابنده", 5, "کرمانشاه");

            // Bind the Repeater.
            rptEmployees.DataSource = dtEmployees;
            rptEmployees.DataBind();
        }
مرحله 3- ایجاد Dialog Popup Div
در این قسمت قصد داریم که یک پنجره PopUp در صورتی که کاربر بر روی تصویری که در هر ردیف Repeater درج کرده ایم ، کلیک کرد ، نمایش داده شود
کد های مربوط به Div این قسمت به صورت زیر است .
 <div id="popupdiv" style="display: none">
        <table>
            <tbody>
                <tr>
                    <td>
                        <label class="label">
                            Employee Id:</label>
                    </td>
                    <td>
                        <label id="lblEmpId">
                        </label>
                    </td>
                </tr>
                <tr>
                    <td>
                        <label class="label">
                            Name:</label>
                    </td>
                    <td>
                        <label id="lblEmpName">
                        </label>
                    </td>
                </tr>
                <tr>
                    <td>
                        <label class="label">
                            Location:</label>
                    </td>
                    <td>
                        <label id="lblEmpLocation">
                        </label>
                    </td>
                </tr>
            </tbody>
        </table>
    </div>
سپس باید برای کلیک این تصویر یک رویداد بنویسیم.ابتدا Refrence های مورد نظر را انجام میدهیم .
<link type="text/css" rel="stylesheet" href="http://code.jquery.com/ui/1.10.3/themes/smoothness/jquery-ui.css" />
    <script type="text/javascript" src="http://code.jquery.com/jquery-1.8.2.js"></script>
    <script type="text/javascript" src="http://code.jquery.com/ui/1.10.3/jquery-ui.js"></script>
سپس در قسمت Script رویداد کلیک را به صورت زیر می نویسیم
<script type="text/javascript">
$(document).ready(function () {
// Prototype to assign HTML to the dialog title bar.
$.widget('ui.dialog', jQuery.extend({}, jQuery.ui.dialog.prototype, {
_title: function (titleBar) {
titleBar.html(this.options.title || ' ');
}
}));
// ImageButton Click Event.
$('#tblEmployeeDetails .imgButton').click(function () {
// Get the Current Row and its values.
var currentRow = $(this).parents("tr");
var empId = currentRow.find("span[id*='lblEmployeeId']").text();
var empName = currentRow.find("span[id*='lblName']").text();
var empLocation = currentRow.find("span[id*='lblLocation']").text();
// Populate labels inside the dailog.
$("#lblEmpId").text(empId);
$("#lblEmpName").text(empName);
$("#lblEmpLocation").text(empLocation);
// Open the dialog.
$("#popupdiv").dialog({
title: "Details of <em>" + empName + "</em>",
width: 430,
height: 240,
modal: true,
buttons: {
Close: function () {
$(this).dialog('close');
}
}
});
return false;
});
});
</script>
- ASP.net
- 2k بازدید
- 2 تشکر
