پیاده سازی عملیات CRUD با استفاده از AngularJS در MVC
پنجشنبه 8 بهمن 1394در این مقاله ابتدا مرور کوتاهی بر روی AnuglarJS خواهیم داشت سپس یک اپلیکیشن MVC برای پیاده سازی عملیات CRUD ایجاد می کنیم که از AnuglarJS استفاده می کند.هدف این مقاله انجام عملیات CRUD در پایگاه داده با استفاده از AnuglarJS می باشد.

مقدمه
AnuglarJS یک فریم ورک جاوا اسکریپتی مبتنی بر MVC سمت کلاینت می باشد. دستورات AnuglarJS به صورت ng-app و ng-model می باشد که بر پایه فرمان ng شروع می شود و لغت Angular را به ذهن می آورد.
ویژگی های AnuglarJS:
متن باز است
توسط گوگل نگهداری و پشتیبانی می شود.
data-binding قوی دارد.
از الگوی طراحی MVC استفاده می کند.
اعتبار سنجی های قوی دارد
بوسیله آن می توان اپلیکیشن های تک صفحه ای (SPA) ایجاد کرد
Unit testing در آن آسان است
معماری ماژولار دارد
نمونه کد در AngularJS
<body ng-app>
    First Name: <input type="text" ng-model="fname" /> <br />
    Last Name: <input type="text" ng-model="lname" /> <br />
    Result: {{fname +' '+ lname}}
</body>

<script src="Scripts/angular.min.js"></script>
نمونه کد در JQuery
<body>
    First Name: <input type="text" id="txtfName" /> <br />
    Last Name: <input type="text" id="txtlName" /> <br />
    Result: <label id="lblName"></label>
</body>

<script src="Scripts/jquery-2.2.0.min.js"></script>
<script type="text/javascript">
    $(document).ready(function () {
        $(function () {
            $('#txtfName').keyup(function () {
                $('#lblName').text($('#txtfName').val() + ' ' + $('#txtlName').val());
            });

            $('#txtlName').keyup(function () {
                $('#lblName').text($('#txtfName').val() + ' ' + $('#txtlName').val());
            });
        });
    });
</script>
در ادامه آموزش می دهیم که چگونه Angular را نصب و استفاده کنید.
دانلود کتابخانه AngularJS
به وب سایت https://angularjs.org رفته و AngularJS را دانلود کنید. بر روی لینک دانلود کلیک کرده و آخرین نسخه کتابخانه AngularJS را دانلود کنید. ما در این اپلیکیشن از نسخه v1.4.8 استفاده می کنیم.
حالا کار را شروع می کنیم:
برنامه Visual Studio را باز کرده و از مسیر File > New > Project یک پنجره جدیدی باز می شود که باید بر روی ASP.Net Web Application کلیک کرده و گزینه OK را انتخاب کنید.
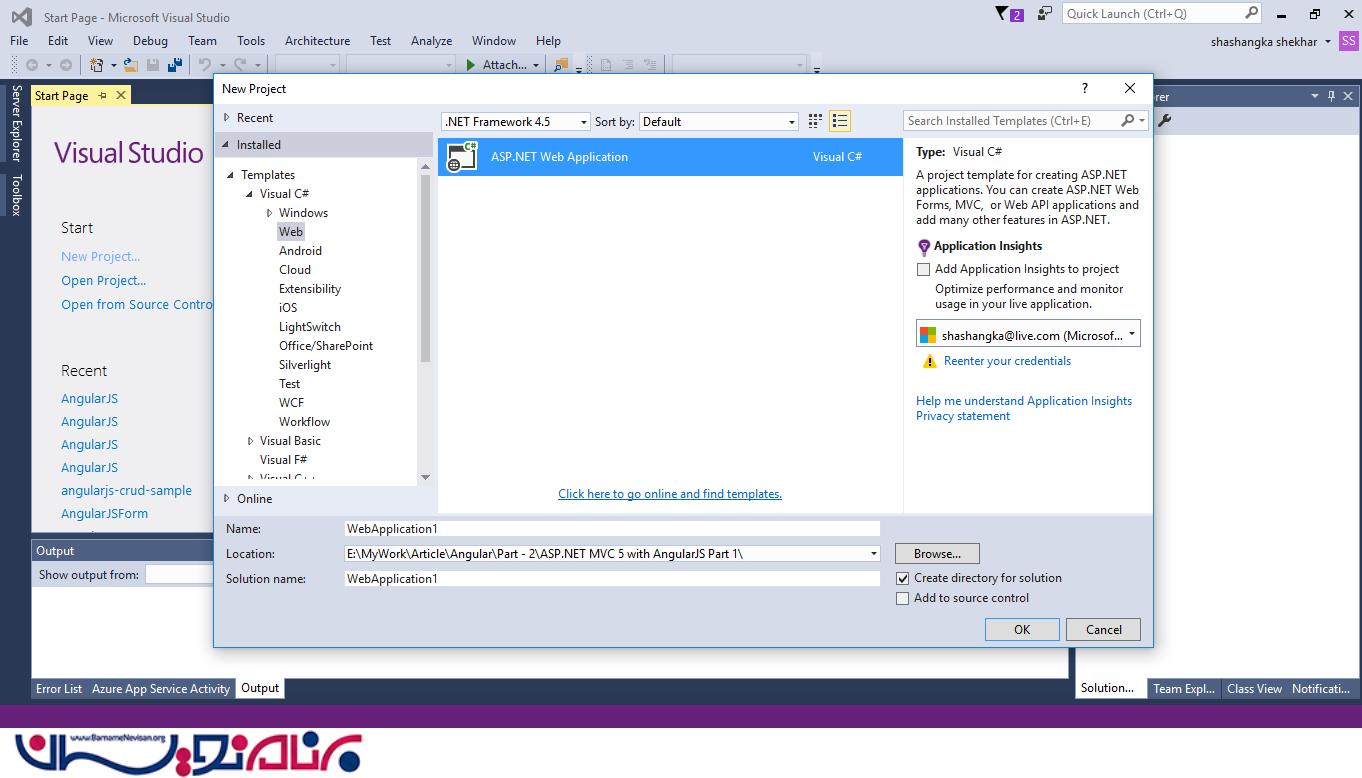
یک template خالی با تکنولوژی MVC انتخاب کرده و بر روی OK کلیک کنید. کمی طول می کشد تا پروژه بارگذاری شود.

حالا اولین چیزی که با آن احتیاج داریم ثبت AngularJS.Core در این پروژه است. برای همین رفرنس ها را از NuGet دریافت می کنیم.
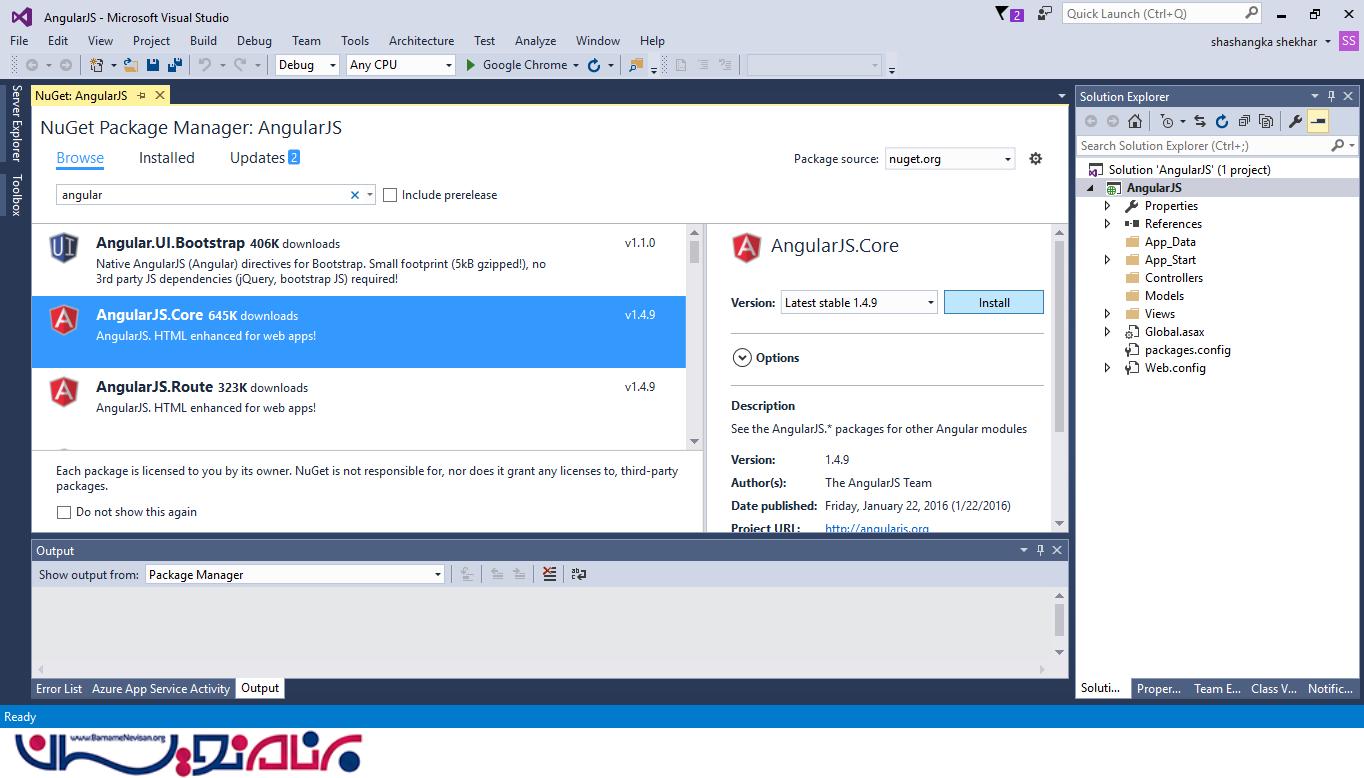
برای انجام آن بر روی نام پروژه کلیک کرده و Manage NuGet Packages را انتخاب کنید سپس در پنجره بعدی کلمه Angular را جستجو کرده و نسخه آپدیت شده AngularJS.Core را نصب کنید.
یا
بر روی Tools > NuGet Package Manager > Package Manager Console کلیک کرده و عبارت زیر را بنویسید:
Install-Package AngularJS.Core
همچنین باید کتابخانه jQuery را در پروژه خود اضافه کنیم. تا اینجا فرایند نصب موارد لازم انجام شد.
لایه داده
public class GenericRepository<T> : IRepository<T> where T : class
{

    CRUD_SampleEntities context = null;
    private DbSet<T> entities = null;

    public GenericRepository(CRUD_SampleEntities context)
    {
        this.context = context;
        entities = context.Set<T>();
    }

    /// <summary>
    /// Get Data From Database
    /// <para>Use it when to retive data through a stored procedure</para>
    /// </summary>
    public IEnumerable<T> ExecuteQuery(string spQuery, object[] parameters)
    {
        using (context = new CRUD_SampleEntities())
        {
            return context.Database.SqlQuery<T>(spQuery, parameters).ToList();
        }
    }

    /// <summary>
    /// Get Single Data From Database
    /// <para>Use it when to retive single data through a stored procedure</para>
    /// </summary>
    public T ExecuteQuerySingle(string spQuery, object[] parameters)
    {
        using (context = new CRUD_SampleEntities())
        {
            return context.Database.SqlQuery<T>(spQuery, parameters).FirstOrDefault();
        }
    }

    /// <summary>
    /// Insert/Update/Delete Data To Database
    /// <para>Use it when to Insert/Update/Delete data through a stored procedure</para>
    /// </summary>
    public int ExecuteCommand(string spQuery, object[] parameters)
    {
        int result = 0;
        try
        {
            using (context = new CRUD_SampleEntities())
            {
                result = context.Database.SqlQuery<int>(spQuery, parameters).FirstOrDefault();
            }
        }
        catch { }
        return result;
    }

    private bool disposed = false;

    protected virtual void Dispose(bool disposing)
    {
        if (!this.disposed)
        {
            if (disposing)
            {
                context.Dispose();
            }
        }
        this.disposed = true;
    }

    public void Dispose()
    {
        Dispose(true);
        GC.SuppressFinalize(this);
    }
}
توضیح کد:
واسط:
interface IRepository<T> : IDisposable where T : class
{
    IEnumerable<T> ExecuteQuery(string spQuery, object[] parameters);
    T ExecuteQuerySingle(string spQuery, object[] parameters);
    int ExecuteCommand(string spQuery, object[] parameters);
}
لایه میانی(Middel Layer):
public partial class CustomerService
{
    private GenericRepository<Customer> CustRepository;

    public CustomerService()
    {
        this.CustRepository = new GenericRepository<Customer>(new CRUD_SampleEntities());
    }

    public IEnumerable<Customer> GetAll(object[] parameters)
    {
        string spQuery = "[Get_Customer] {0}";
        return CustRepository.ExecuteQuery(spQuery, parameters);
    }

    public Customer GetbyID(object[] parameters)
    {
        string spQuery = "[Get_CustomerbyID] {0}";
        return CustRepository.ExecuteQuerySingle(spQuery, parameters);
    }

    public int Insert(object[] parameters)
    {
        string spQuery = "[Set_Customer] {0}, {1}";
        return CustRepository.ExecuteCommand(spQuery, parameters);
    }

    public int Update(object[] parameters)
    {
        string spQuery = "[Update_Customer] {0}, {1}, {2}";
        return CustRepository.ExecuteCommand(spQuery, parameters);
    }

    public int Delete(object[] parameters)
    {
        string spQuery = "[Delete_Customer] {0}";
        return CustRepository.ExecuteCommand(spQuery, parameters);
    }
}
لایه داده و لایه سرویس ما آماده است. برای ایجاد پایگاه داده اسکریپت موجود در فایل ضمیمه را دانلود و آن را با استفاده از نرم افزار MS SQL Server اجرا کنید. حالا یک HomeController در فولدر Controllers ایجاد کرده و یک Vew خالی می سازیم.
MVC HomeController:
در اینجا کد زیر را در home controller خود قرار دهید که آن را در ادامه توضیح می دهیم.
public class HomeController : Controller
{
    private CustomerService objCust;
    public HomeController()
    {
        this.objCust = new CustomerService();
    }

    // GET: Home
    public ActionResult Index()
    {
        return View();
    }

    // GET: All Customer
    [HttpGet]
    public JsonResult GetAllData()
    {
        int Count = 10; IEnumerable<object> customers = null;
        try
        {
            object[] parameters = { Count };
            customers = objCust.GetAll(parameters);
        }
        catch { }
        return Json(customers.ToList(), JsonRequestBehavior.AllowGet);
    }

    // GET: Get Single Customer
    [HttpGet]
    public JsonResult GetbyID(int id)
    {
        object customer = null;
        try
        {
            object[] parameters = { id };
            customer = this.objCust.GetbyID(parameters);
        }
        catch { }
        return Json(customer, JsonRequestBehavior.AllowGet);
    }

    public ActionResult Insert()
    {
        return View();
    }

    // POST: Save New Customer
    [HttpPost]
    public JsonResult Insert(Customer model)
    {
        int result = 0; bool status = false;
        if (ModelState.IsValid)
        {
            try
            {
                object[] parameters = { model.CustName, model.CustEmail };
                result = objCust.Insert(parameters);
                if (result == 1)
                {
                    status = true;
                }
                return Json(new { success = status });
            }
            catch { }
        }
        return Json(new
        {
            success = false,
            errors = ModelState.Keys.SelectMany(i => ModelState[i].Errors).Select(m => m.ErrorMessage).ToArray()
        });
    }

    public ActionResult Update()
    {
        return View();
    }

    // POST: Update Existing Customer
    [HttpPost]
    public JsonResult Update(Customer model)
    {
        int result = 0; bool status = false;
        if (ModelState.IsValid)
        {
            try
            {
                object[] parameters = { model.Id, model.CustName, model.CustEmail };
                result = objCust.Update(parameters);
                if (result == 1)
                {
                    status = true;
                }
                return Json(new { success = status });
            }
            catch { }
        }
        return Json(new
        {
            success = false,
            errors = ModelState.Keys.SelectMany(i => ModelState[i].Errors).Select(m => m.ErrorMessage).ToArray()
        });
    }

    // DELETE: Delete Customer
    [HttpDelete]
    public JsonResult Delete(int id)
    {
        int result = 0; bool status = false;
        try
        {
            object[] parameters = { id };
            result = objCust.Delete(parameters);
            if (result == 1)
            {
                status = true;
            }
        }
        catch { }
        return Json(new
        {
            success = status
        });
    }

    protected override void Dispose(bool disposing)
    {
        base.Dispose(disposing);
    }
}
توضیح کد:
حالا کد را بخش به بخش توضیح می دهیم:
دریافت تمام رکوردها: نمونه کد زیر برای دریافت تمام رکوردها از پایگاه داده توسط لایه میانی سرویس می باشد. ما در اینجا داده را به صورت JSON بر می گردانیم. خواندن فرمت داده ای JSON بسیار راحت تر است.
در ابتدا 10 رکورد دریافت می کنیم. با این کار می توانیم paging یا صفحه بندی را در صفحه نشان دهیم.
// GET: All Customer
[HttpGet]
public JsonResult GetAllData()
{
    int Count = 10; IEnumerable<object> customers = null;
    try
    {
        object[] parameters = { Count };
        customers = objCust.GetAll(parameters);
    }
    catch { }
    return Json(customers.ToList(), JsonRequestBehavior.AllowGet);
}
توجه داشته باشید که ما در حال برگرداندن لیستی از داده هستیم که آن را به صورت JsonRequestBehavior دریافت می کنیم. اگر آن را از دست بدهیم، یک خطا به صورت زیر نمایش داده می شود:
This request has been blocked because sensitive information could be disclosed to third party web sites when this is used in a GET request.
To allow GET requests, set JsonRequestBehavior to AllowGet.
ما چرا از آن استفاده می کنیم؟ اگر پیغام خطا را با دقت بخوانید می بینید که دلیل آن به خاطر مسائل امنیتی است.
دریافت جزئیات یک رکورد: نمونه کد زیر جزئیات یک رکورد را از پایگاه داده برمیگرداند که آن هم داده ها را در قالب JSON ارسال می کند.
// GET: Get Single Customer
[HttpGet]
public JsonResult GetbyID(int id)
{
    object customer = null;
    try
    {
        object[] parameters = { id };
        customer = this.objCust.GetbyID(parameters);
    }
    catch { }
    return Json(customer, JsonRequestBehavior.AllowGet);
}
درج رکوردها: نمونه کد زیر جزئیات رکورد را در پایگاه داده درج می کند که نتیجه آن به صورت Boolean و در قالب JSOn بر میگردد. اگر True باشد نشان می دهد که داده با موفقیت در پایگاه داده درج شده است.
// POST: Save New Customer
[HttpPost]
public JsonResult Insert(Customer model)
{
    int result = 0; bool status = false;
    if (ModelState.IsValid)
    {
        try
        {
            object[] parameters = { model.CustName, model.CustEmail };
            result = objCust.Insert(parameters);
            if (result == 1)
            {
                status = true;
            }
            return Json(new { success = status });
        }
        catch { }
    }
    return Json(new
    {
        success = false,
        errors = ModelState.Keys.SelectMany(i => ModelState[i].Errors).Select(m => m.ErrorMessage).ToArray()
    });
}
آپدیت رکوردها: کد زیر رکوردهای موجود را در پایگاه داده آپدیت می کند که این مرحله نیز نتیجه ای از نوع Boolean و در قالب JSOn برمی گرداند. مثل قبل اگر نتیجه True باشد نشان می دهد که رکورد مورد نظر با موفقیت آپدیت شده است.
// POST: Update Existing Customer
[HttpPost]
public JsonResult Update(Customer model)
{
    int result = 0; bool status = false;
    if (ModelState.IsValid)
    {
        try
        {
            object[] parameters = { model.Id, model.CustName, model.CustEmail };
            result = objCust.Update(parameters);
            if (result == 1)
            {
                status = true;
            }
            return Json(new { success = status });
        }
        catch { }
    }
    return Json(new
    {
        success = false,
        errors = ModelState.Keys.SelectMany(i => ModelState[i].Errors).Select(m => m.ErrorMessage).ToArray()
    });
}
حذف رکوردها : نمونه کد زیر جزئیات رکورد انتخاب شده را حذف می کند که این نیز نتیجه ای به صورت Boolean و در قالب Json بر می گرداند که در صورت True بودن نشان می دهد که داده مورد نظر با موفقیت حذف شده است.
// DELETE: Delete Customer
[HttpDelete]
public JsonResult Delete(int id)
{
    int result = 0; bool status = false;
    try
    {
        object[] parameters = { id };
        result = objCust.Delete(parameters);
        if (result == 1)
        {
            status = true;
        }
    }
    catch { }
    return Json(new
    {
        success = status
    });
}
ما از MVC Controller خود برای انجام عملیات CRUD در MVC انجام داده ایم. حالا به بخش بعدی می رویم که قسمت AngularJS است.
AngularJS(JavaScript) Controller:
angular.module('myFormApp', [])
.controller('CustomerController', function ($scope, $http, $location, $window) {
    $scope.custModel = {};
    $scope.message = '';
    $scope.result = "color-default";
    $scope.isViewLoading = false;
    $scope.ListCustomer = null;
    getallData();

    //******=========Get All Customer=========******
    function getallData() {
        //debugger;
        $http.get('/Home/GetAllData')
         .success(function (data, status, headers, config) {
             $scope.ListCustomer = data;
         })
         .error(function (data, status, headers, config) {
             $scope.message = 'Unexpected Error while loading data!!';
             $scope.result = "color-red";
             console.log($scope.message);
         });
    };

    //******=========Get Single Customer=========******
    $scope.getCustomer = function (custModel) {
        $http.get('/Home/GetbyID/' + custModel.Id)
        .success(function (data, status, headers, config) {
            //debugger;
            $scope.custModel = data;
            getallData();
            console.log(data);
        })
       .error(function (data, status, headers, config) {
           $scope.message = 'Unexpected Error while loading data!!';
           $scope.result = "color-red";
           console.log($scope.message);
       });
    };

    //******=========Save Customer=========******
    $scope.saveCustomer = function () {
        $scope.isViewLoading = true;

        $http({
            method: 'POST',
            url: '/Home/Insert',
            data: $scope.custModel
        }).success(function (data, status, headers, config) {
            if (data.success === true) {
                $scope.message = 'Form data Saved!';
                $scope.result = "color-green";
                getallData();
                $scope.custModel = {};
                console.log(data);
            }
            else {
                $scope.message = 'Form data not Saved!';
                $scope.result = "color-red";
            }
        }).error(function (data, status, headers, config) {
            $scope.message = 'Unexpected Error while saving data!!' + data.errors;
            $scope.result = "color-red";
            console.log($scope.message);
        });
        getallData();
        $scope.isViewLoading = false;
    };

    //******=========Edit Customer=========******
    $scope.updateCustomer = function () {
        //debugger;
        $scope.isViewLoading = true;
        $http({
            method: 'POST',
            url: '/Home/Update',
            data: $scope.custModel
        }).success(function (data, status, headers, config) {
            if (data.success === true) {
                $scope.custModel = null;
                $scope.message = 'Form data Updated!';
                $scope.result = "color-green";
                getallData();
                console.log(data);
            }
            else {
                $scope.message = 'Form data not Updated!';
                $scope.result = "color-red";
            }
        }).error(function (data, status, headers, config) {
            $scope.message = 'Unexpected Error while updating data!!' + data.errors;
            $scope.result = "color-red";
            console.log($scope.message);
        });
        $scope.isViewLoading = false;
    };

    //******=========Delete Customer=========******
    $scope.deleteCustomer = function (custModel) {
        //debugger;
        var IsConf = confirm('You are about to delete ' + custModel.CustName + '. Are you sure?');
        if (IsConf) {
            $http.delete('/Home/Delete/' + custModel.Id)
           .success(function (data, status, headers, config) {
               if (data.success === true) {
                   $scope.message = custModel.CustName + ' deleted from record!!';
                   $scope.result = "color-green";
                   getallData();
                   console.log(data);
               }
               else {
                   $scope.message = 'Error on deleting Record!';
                   $scope.result = "color-red";
               }
           })
           .error(function (data, status, headers, config) {
               $scope.message = 'Unexpected Error while deleting data!!';
               $scope.result = "color-red";
               console.log($scope.message);
           });
        }
    };
})
.config(function ($locationProvider) {
    $locationProvider.html5Mode(true);
});
توضیح کد :
http$ هسته سرویس AngularJS است که می تواند با سرور HTTP از راه دور ارتباط برقرا کند. متدهای HTTP که برای برقراری ارتباط استفاده می شوند به صورت زیر است:
$http.get: در یافت داده
$http.post: ارسال داده جدید
$http.put: آپدیت داده موجود
$http.delete: حذف داده موجود
Get All Record: با استفاده از متد $http.get ما می توانیم تمام رکوردها را از پایگاه داده بازیابی کنیم.
//******=========Get All Customer=========******
function getallData() {
    //debugger;
    $http.get('/Home/GetAllData')
        .success(function (data, status, headers, config) {
            $scope.ListCustomer = data;
        })
        .error(function (data, status, headers, config) {
            $scope.message = 'Unexpected Error while loading data!!';
            $scope.result = "color-red";
            console.log($scope.message);
        });
};
دریافت یک رکورد: در اینجا یک رکورد را از پایگاه داده بازیابی می کنیم. متدهای scope.getCustomer$ زمانی که دکمه edit کلیک شود فراخوانی می شود.
//******=========Get Single Customer=========******
$scope.getCustomer = function (custModel) {
    $http.get('/Home/GetbyID/' + custModel.Id)
    .success(function (data, status, headers, config) {
        //debugger;
        $scope.custModel = data;
        getallData();
        console.log(data);
    })
    .error(function (data, status, headers, config) {
        $scope.message = 'Unexpected Error while loading data!!';
        $scope.result = "color-red";
        console.log($scope.message);
    });
};
با استفاده از متد http.get$ رکورد انتخاب شده را از پایگاه داده با ارسال ID مشتری به متد MVC Controller update بازیابی می کنیم. در عوض ما یک Query برای دریافت داده در AngularJS $scope.custModel انجام می دهیم که داده را به مدل ورودی با استفاده از ng-model متصل می کند، همانطور که می دانید پشتیبانی AngularJS از اتصال داده ها به صورت دو طرفه است.
ذخیره رکوردها: در اینجا رکوردهای مشتریان را ذخیره می کنیم. متد scope.saveCustomer$ زمانی از UI فراخوانی می شود که ما فرم را با اطلاعات مشتریان و با کلیک بر روی دکمه "ارسال" بفرستیم. استفاده از http.post$ شیئ customer را به کنترلر ما می فرستد.
//******=========Save Customer=========******
$scope.saveCustomer = function () {
    $scope.isViewLoading = true;

    $http({
        method: 'POST',
        url: '/Home/Insert',
        data: $scope.custModel
    }).success(function (data, status, headers, config) {
        if (data.success === true) {
            $scope.message = 'Form data Saved!';
            $scope.result = "color-green";
            getallData();
            $scope.custModel = {};
            console.log(data);
        }
        else {
            $scope.message = 'Form data not Saved!';
            $scope.result = "color-red";
        }
    }).error(function (data, status, headers, config) {
        $scope.message = 'Unexpected Error while saving data!!' + data.errors;
        $scope.result = "color-red";
        console.log($scope.message);
    });
    getallData();
    $scope.isViewLoading = false;
};
بعد از درج موفقیت آمیز باید جدول داده را با فراخوانی مجدد متد ( )getallData بارگذاری مجدد کنیم.
ویرایش رکوردها: در اینجا رکوردهای موجود را در پایگاه داده آپدیت می کنیم. متدهای $scope.updateCustomer زمانی که دکمه آپدیت کلیک شود، فراخوانی می شوند. مانند ذخیره رکوردها همان مراحل نیز اتفاق میفتد. اما تفاوت اصلی آن است که در اینجا ID مشتری را با شیئ customer ارسال می کند که از یک فیلد ورودی مخفی دریافت می شود.
<input type="hidden" ng-model="custModel.Id" name="cid" />
با استفاده از http.post$ یک شیئ Customer به کنترلر می فرستیم. بعد از به روز رسانی موفقیت آمیز با فراخوانی متد ( )getallData جدول داده را مجدد بارگذاری می کنیم.
//******=========Edit Customer=========******
$scope.updateCustomer = function () {
    //debugger;
    $scope.isViewLoading = true;
    $http({
        method: 'POST',
        url: '/Home/Update',
        data: $scope.custModel
    }).success(function (data, status, headers, config) {
        if (data.success === true) {
            $scope.custModel = null;
            $scope.message = 'Form data Updated!';
            $scope.result = "color-green";
            getallData();
            console.log(data);
        }
        else {
            $scope.message = 'Form data not Updated!';
            $scope.result = "color-red";
        }
    }).error(function (data, status, headers, config) {
        $scope.errors = [];
        $scope.message = 'Unexpected Error while updating data!!' + data.errors;
        $scope.result = "color-red";
        console.log($scope.message);
    });
    $scope.isViewLoading = false;
};
حذف رکوردها: در اینجا رکوردهای موجود را از پایگاه داده حذف می کنیم.متد scope.deleteCustomer$ زمانی که بر روی دکمه حذف کلیک شود فراخوانی می شود.
//******=========Delete Customer=========******
$scope.deleteCustomer = function (custModel) {
    //debugger;
    var IsConf = confirm('You are about to delete ' + custModel.CustName + '. Are you sure?');
    if (IsConf) {
        $http.delete('/Home/Delete/' + custModel.Id)
        .success(function (data, status, headers, config) {
            if (data.success === true) {
                $scope.message = custModel.CustName + ' deleted from record!!';
                $scope.result = "color-red";
                getallData();
                console.log(data);
            }
            else {
                $scope.message = 'Error on deleting Record!';
                $scope.result = "color-red";
            }
        })
        .error(function (data, status, headers, config) {
            $scope.message = 'Unexpected Error while deleting data!!';
            $scope.result = "color-red";
            console.log($scope.message);
        });
    }
};
حالا به بخش UI پروژه می رویم. در اینجا View مربوط به Index وجود دارد که در آن عملیات CRUD را به صورت گرافیکی نشان می دهیم.
Html View:
@{
    ViewBag.Title = "Index";
}

<h2>Create Customer</h2>

<div id="content" ng-controller="CustomerController">
    <span ng-show="isViewLoading" class="viewLoading">
        <img src="~/Content/images/ng-loader.gif" /> loading...
    </span>
    <div ng-class="result">{{message}}</div>
    <hr />
    <form name="frmCustomer" novalidate>
        <div>
            <input type="hidden" ng-model="custModel.Id" name="cid" />
        </div>
        <div>
            <label for="email">Customer Name</label>
            <input type="text" ng-model="custModel.CustName" name="cname" placeholder="" required ng-minlength="4" ng-maxlength="14" />
            <span class="error" ng-show="(frmCustomer.$dirty||submitted) && frmCustomer.cname.$error.required">Customer name is Required</span>
            <span class="error" ng-show="frmCustomer.$dirty && frmCustomer.cname.$error.minlength">Minimum length required is 5</span>
            <span class="error" ng-show="frmCustomer.$dirty && frmCustomer.cname.$error.maxlength">Minimum length required is 15</span>
        </div>
        <div>
            <label for="email">E-mail address</label>
            <input type="email" ng-model="custModel.CustEmail" name="email" placeholder="" required />
            <span class="error" ng-show="(frmCustomer.$dirty ||submitted) && frmCustomer.email.$error.required">EmailId is Required!</span>
            <span class="error" ng-show="(frmCustomer.$dirty ||submitted) && frmCustomer.$error.email">Invalid EmailId!</span>
        </div>
        <div class="btn">
            <input type="submit" value="Save" ng-click="saveCustomer()" ng-disabled="frmCustomer.$invalid">
            <input type="submit" value="Update" ng-click="updateCustomer()" ng-disabled="frmCustomer.$invalid">
        </div>
    </form>
    <hr />

    <h2>All Customers</h2>
    <table class="table table-striped">
        <tr ng-repeat="custModel in ListCustomer">
            <td>{{custModel.Id}}</td>
            <td>{{custModel.CustName}}</td>
            <td>{{custModel.CustEmail}}</td>
            <td>
                <a href="#" ng-click="getCustomer(custModel)" title="Edit Record">
                    <img src="~/Content/images/edit.png" />
                </a><a href="#" ng-click="deleteCustomer(custModel)" title="Delete Record">
                    <img src="~/Content/images/erase.png" />
                </a>
            </td>
        </tr>
    </table>
</div>

@section JavaScript{
    <script src="~/Scripts/angular.js"></script>
    <script src="~/ScriptsNg/CustomerController.js"></script>
}
توضیح کد:
نمونه کد زیر یک جدول را با تکرار <tr> ایجاد می کند. در اینجا ng-repeat یک رکورد را برای هر رکورد از ListCustomer نشان می دهد و به سادگی با یک repeater برای هر سطر جدول کار می کند.
<table class="table table-striped">
    <tr ng-repeat="custModel in ListCustomer">
        <td>{{custModel.Id}}</td>
        <td>{{custModel.CustName}}</td>
        <td>{{custModel.CustEmail}}</td>
        <td>
            <a href="#" ng-click="getCustomer(custModel)" title="Edit Record">
                <img src="~/Content/images/edit.png" />
            </a><a href="#" ng-click="deleteCustomer(custModel)" title="Delete Record">
                <img src="~/Content/images/erase.png" />
            </a>
        </td>
    </tr>
</table>
کد زیر CSS ای است که برای استایل UI استفاده می شود.
#content label {
    width: 150px;
}

.btn {
    margin-left: 140px;
}

#content input[type=submit] {
    width: 85px;
    padding: 5px 15px;
    background: #ff6a00;
    border: 0 none;
    cursor: pointer;
    color: #fff;
}

.error {
    color: red;
}

.color-default {
    color: #000;
}

.color-red {
    color: red;
}

.color-green {
    color: green;
}

#content input.ng-dirty.ng-invalid {
    border: 1px solid red;
    background-color: rgb(255, 244, 244);
}

[ng\:cloak], [ng-cloak], [data-ng-cloak], [x-ng-cloak], .ng-cloak, .x-ng-cloak {
  display: none !important;
}
Hide Html Flash(ng-cloak)
در حالی که صفحه شما لود می شودممکن است متوجه شده باشید که قالب Angular html به صورت flash قابل مشاهده است. این زمانی اتفاق می افتد که مرورگر در حال کامپایل کردن قالب Angular html باشد در واقع زمانی که صفحه در حال لود شدن است flash می شود که می توانیم آن را با استفاده از دستور ng-cloak/data-ng-cloak مخفی کنیم.
ما همچنین باید کلاس CSS زیر را به نقطه شروع اپلیکیشن خود اضافه کنیم:
<body ng-app="myFormApp" class="ng-cloak">
کد زیر کلاس CSS برای استفاده از ng-cloak را نشان می دهد:
[ng\:cloak], [ng-cloak], [data-ng-cloak], [x-ng-cloak], .ng-cloak, .x-ng-cloak {
  display: none !important;
}
حالا یک breakpoint روی متد ( )Updater در HomeController قرار داده و آن را اجرا می کنیم.
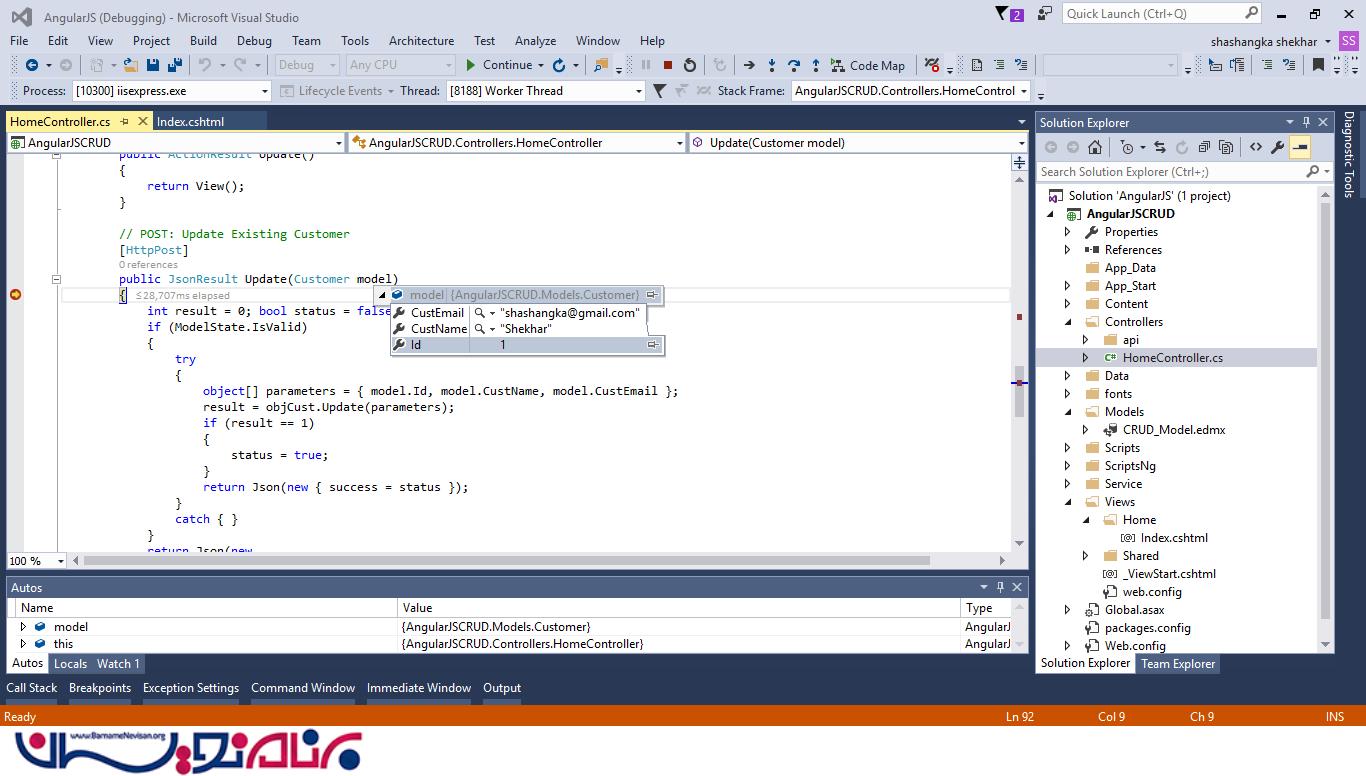
در حالت debug می توانیم مدل را ببینیم که مدل با form data منتشر شده است. همچنین می توانیم با استفاده از مرورگر و قرار دادن debugger در script آن را debug کنیم.
$scope.updateCustomer = function () {
  debugger;
};
در حالت debug در مرورگر می توانیم ببینیم که scope.custModel$ با form data قرار گرفته است که رکوردهای انتخاب شده را در پایگاه داده آپدیت می کند.
خروجی نهایی:


- ASP.net MVC
- 2k بازدید
- 6 تشکر