ایجاد جدول داینامیک با قابلیت صفحه بندی دراندروید
چهارشنبه 14 بهمن 1394در این مقاله قصد داریم یک نمونه پروژه ی آماده یک جدول با اطلاعات که داینامیک هستند و قابلیت صفحه بندی را هم دارند برای شما نمایش دهیم، این نمونه سورس در محیط Android Studio نوشته شده است.

ابتدا داخل لایه ی activity از یک لایه استفاده کرده ایم داخل این لایه یک tablelayout تعریف کرده است، از یک tablerow برای تعریف جدول خود استفاده نمایید و داخل آن از textview برای نمایش اطلاعات استفاده می نماییم، در مرحله ی بعدی یک linearlayout دیگر می اندازید و دکمه و متن برای صفحه بندی را داخل آن تعریف می نماییم.
<ScrollView xmlns:android="http://schemas.android.com/apk/res/android"
    android:layout_width="match_parent"
    android:layout_height="match_parent"
    android:id="@+id/scrollView">

    <LinearLayout
        android:orientation="vertical"
        android:layout_width="fill_parent"
        android:layout_height="fill_parent">

        <TableLayout
            android:layout_width="match_parent"
            android:layout_height="match_parent"
            android:id="@+id/main" >

            <TableRow
                android:background="#ff00aa63"
                android:layout_width="fill_parent"
                android:layout_height="wrap_content"
                android:id="@+id/rowHeader">

                <TextView
                    android:text="ID"
                    android:layout_weight="1"
                    android:gravity="center_horizontal"
                    android:typeface="normal"
                    android:fontFamily="sans-serif-medium"
                    android:textColor="@android:color/background_light"
                    android:id="@+id/tvID"
                    android:layout_width="wrap_content"
                    android:layout_height="wrap_content" />

                <TextView
                    android:text="Given Name"
                    android:layout_weight="1"
                    android:gravity="center_horizontal"
                    android:typeface="normal"
                    android:fontFamily="sans-serif-medium"
                    android:textColor="@android:color/background_light"
                    android:layout_width="wrap_content"
                    android:layout_height="wrap_content"
                     />

                <TextView
                    android:text="Middle Name"
                    android:layout_weight="1"
                    android:gravity="center_horizontal"
                    android:typeface="normal"
                    android:fontFamily="sans-serif-medium"
                    android:textColor="@android:color/background_light"
                    android:layout_width="wrap_content"
                    android:layout_height="wrap_content"
                     />

                <TextView
                    android:text="Surname"
                    android:layout_weight="1"
                    android:gravity="center_horizontal"
                    android:typeface="normal"
                    android:fontFamily="sans-serif-medium"
                    android:textColor="@android:color/background_light"
                    android:layout_width="wrap_content"
                    android:layout_height="wrap_content"
                     />
            </TableRow>

            <LinearLayout
                android:orientation="vertical"
                android:layout_width="fill_parent"
                android:background="@drawable/radius_middle"
                android:layout_height="2dp" />
        </TableLayout>

        <LinearLayout
            android:orientation="horizontal"
            android:layout_width="fill_parent"
            android:layout_height="fill_parent"
            android:background="#ff00aa63"
            >

            <TextView
                android:layout_width="wrap_content"
                android:layout_height="wrap_content"
                android:textAppearance="?android:attr/textAppearanceMedium"
                android:text="Page 1 of 50"
                android:id="@+id/txtPageCount"
                android:layout_marginLeft="20dp"
                android:layout_weight="1" />

            <Button
                style="?android:attr/buttonStyleSmall"
                android:layout_width="wrap_content"
                android:layout_height="wrap_content"
                android:text="Prev"
                android:id="@+id/btnPrevious"
                android:layout_weight="1"
                android:layout_marginRight="2dp" />

            <Button
                style="?android:attr/buttonStyleSmall"
                android:layout_width="wrap_content"
                android:layout_height="wrap_content"
                android:text="Next"
                android:id="@+id/btnNext"
                android:layout_weight="1"
                android:layout_marginLeft="2dp"
                android:layout_marginRight="10dp"/>
        </LinearLayout>

    </LinearLayout>
</ScrollView>
حالا تعریف کلاس ها است یک کلاس به نام person تعریف نمایید و با استفاده از get , set اطلاعات را می گیرد و نمایش می دهد.
public class Person {
    private Integer _id;
    private String _givenName;
    private String _middleName;
    private String _surName;

    public Person(Integer _id, String _givenName, String _middleName, String _surName) {
        this._id = _id;
        this._givenName = _givenName;
        this._middleName = _middleName;
        this._surName = _surName;
    }

    public Integer get_id() {
        return _id;
    }

    public void set_id(Integer _id) {
        this._id = _id;
    }

    public String get_givenName() {
        return _givenName;
    }

    public void set_givenName(String _givenName) {
        this._givenName = _givenName;
    }

    public String get_middleName() {
        return _middleName;
    }

    public void set_middleName(String _middleName) {
        this._middleName = _middleName;
    }

    public String get_surName() {
        return _surName;
    }

    public void set_surName(String _surName) {
        this._surName = _surName;
    }
}
کلاس بعدی کلاس برای صفحه بندی کردن صفحات جدول مان است که یک مقدار پیش فرض بگیرد و داخل این کلاس صفحه ی شروع و پایان و تعداد صفحات و max تعداد صفحات و ... نمایش می دهد.
public class Pageable<T> {
    /** the default page size */
    public static final int DEFAULT_PAGE_SIZE = 10;
    private static final int PAGE_WINDOW = 10;
    /** the list over which this class is paging */
    private List<T> list;
    /** the page size */
    private int pageSize = DEFAULT_PAGE_SIZE;
    /** the current page */
    private int page;
    /** the starting index */
    private int startingIndex;
    /** the ending index */
    private int endingIndex;
    /** the maximum number of pages */
    private int maxPages;
    /**
     * Creates a new instance with the specified list.
     *
     * @param list    a List
     */
    public Pageable(List<T> list) {
        this.list = list;
        this.page = 1;
        this.maxPages = 1;

        calculatePages();
    }
    private void calculatePages() {
        if (pageSize > 0) {
            // calculate how many pages there are
            if (list.size() % pageSize == 0) {
                maxPages = list.size() / pageSize;
            } else {
                maxPages = (list.size() / pageSize) + 1;
            }
        }
    }
    /**
     * Gets the list that this instance is paging over.
     *
     * @return  a List
     */
    public List<T> getList() {
        return this.list;
    }
    /**
     * Gets the subset of the list for the current page.
     *
     * @return  a List
     */
    public List<T> getListForPage() {
        return list.subList(startingIndex, endingIndex);
    }
    /**
     * Gets the page size.
     *
     * @return  the page size as an int
     */
    public int getPageSize() {
        return this.pageSize;
    }
    /**
     * Sets the page size.
     *
     * @param pageSize   the page size as an int
     */
    public void setPageSize(int pageSize) {
        this.pageSize = pageSize;
        calculatePages();
    }
    /**
     * Gets the page.
     *
     * @return  the page as an int
     */
    public int getPage() {
        return this.page;
    }
    /**
     * Sets the page size.
     *
     * @param p    the page as an int
     */
    public void setPage(int p) {
        if (p >= maxPages) {
            this.page = maxPages;
        } else if (p <= 1) {
            this.page = 1;
        } else {
            this.page = p;
        }
        // now work out where the sub-list should start and end
        startingIndex = pageSize * (page-1);
        if (startingIndex < 0) {
            startingIndex = 0;
        }
        endingIndex = startingIndex + pageSize;
        if (endingIndex > list.size()) {
            endingIndex = list.size();
        }
    }
    /**
     * Gets the maximum number of pages.
     *
     * @return  the maximum number of pages as an int
     */
    public int getMaxPages() {
        return this.maxPages;
    }
    /**
     * Determines whether there is a previous page and gets the page number.
     *
     * @return  the previous page number, or zero
     */
    public int getPreviousPage() {
        if (page > 1) {
            return page-1;
        } else {
            return 0;
        }
    }
    /**
     * Determines whether there is a next page and gets the page number.
     *
     * @return  the next page number, or 0
     */
    public int getNextPage() {
        if (page < maxPages) {
            return page+1;
        } else {
            return 0;
        }
    }
    /**
     * Gets the minimum page in the window.
     *
     * @return  the page number
     */
    public int getMinPageRange() {
        if (getPage() > PAGE_WINDOW) {
            return getPage() - PAGE_WINDOW;
        } else {
            return 1;
        }
    }
    /**
     * Gets the maximum page in the window.
     *
     * @return  the page number
     */
    public int getMaxPageRange() {
        if (getPage() < (getMaxPages() - PAGE_WINDOW)) {
            return getPage() + PAGE_WINDOW;
        } else {
            return getMaxPages();
        }
    }

}
در مرحله ی آخر تعریف ابزار های مورد استفاده و مشخص کردن id مورد نظر برای آن ها است، علاوه بر آن دکمه های استفاده شده در صفحه را تعریف می نماید و برای هر کدام رویداد مربوط به خودشان را می نویسید. و یک رویداد هم برای نمایش جدول استفاده می کند که هر کدام از مقادیری را که در کلاس person تعریف کرده است داخل textview مورد نظر قرار می دهد.
import android.content.res.Resources;
import android.graphics.Color;
import android.support.v7.app.ActionBarActivity;
import android.os.Bundle;
import android.view.Gravity;
import android.view.Menu;
import android.view.MenuItem;
import android.view.View;
import android.widget.Button;
import android.widget.LinearLayout;
import android.widget.TableLayout;
import android.widget.TableRow;
import android.widget.TextView;
import java.util.ArrayList;
public class MainActivity extends ActionBarActivity {
    TableLayout maintable;
    TableRow tableRow,rowHead;
    LinearLayout separator;
    TextView value;
    TextView textView;
    Pageable<Person> pageableArray;
    Button buttonNext;
    Button buttonPrev;
    TextView textViewPageCount;
    ArrayList<Person> myValues;
    @Override
    protected void onCreate(Bundle savedInstanceState) {
        super.onCreate(savedInstanceState);
        setContentView(R.layout.activity_main);
        textView = (TextView) findViewById(R.id.tvID);
        maintable = (TableLayout) findViewById(R.id.main);
        rowHead = (TableRow) findViewById(R.id.rowHeader);
        buttonNext = (Button) findViewById(R.id.btnNext);
        buttonPrev = (Button) findViewById(R.id.btnPrevious);
        textViewPageCount = (TextView) findViewById(R.id.txtPageCount);
        myValues = new ArrayList<>();
        buttonNext.setOnClickListener(new View.OnClickListener() {
            @Override
            public void onClick(View v) {
                pageableArray.setPage(pageableArray.getNextPage());
                tableRow.removeAllViews();
                displayPage();
                textViewPageCount.setText("Page " + pageableArray.getPage() + " of " + pageableArray.getMaxPages());
            }
        });
        buttonPrev.setOnClickListener(new View.OnClickListener() {
            @Override
            public void onClick(View v) {
                pageableArray.setPage(pageableArray.getPreviousPage());
                tableRow.removeAllViews();
                displayPage();
                textViewPageCount.setText("Page " + pageableArray.getPage() + " of " + pageableArray.getMaxPages());

            }
        });
        for(int i=0; i<= 55; i++){
            myValues.add(new Person(i,"Sample" + i,"G","Sample" + i));
        }

        pageableArray = new Pageable<>(myValues);
        pageableArray.setPageSize(10);
        pageableArray.setPage(1);
        textViewPageCount.setText("Page " + pageableArray.getPage() + " of " + pageableArray.getMaxPages());
        displayPage();
    }
    public void displayPage() {
        maintable.removeAllViews();
        maintable.addView(rowHead);
        for (Person v : pageableArray.getListForPage()) {
            tableRow = new TableRow(this);
            tableRow.setLayoutParams(new TableLayout.LayoutParams(TableLayout.LayoutParams.WRAP_CONTENT, TableLayout.LayoutParams.WRAP_CONTENT));
            value = new TextView(this);
            value.setLayoutParams(textView.getLayoutParams());
            value.setGravity(Gravity.CENTER_HORIZONTAL);
            value.setText(String.valueOf(v.get_id()));
            tableRow.addView(value);
            value = new TextView(this);
            value.setLayoutParams(textView.getLayoutParams());
            value.setGravity(Gravity.CENTER_HORIZONTAL);
            value.setText(v.get_givenName());
            tableRow.addView(value);
            value = new TextView(this);
            value.setLayoutParams(textView.getLayoutParams());
            value.setGravity(Gravity.CENTER_HORIZONTAL);
            value.setText(v.get_middleName());
            tableRow.addView(value);
            value = new TextView(this);
            value.setLayoutParams(textView.getLayoutParams());
            value.setGravity(Gravity.CENTER_HORIZONTAL);
            value.setText(v.get_surName());
            tableRow.addView(value);
            maintable.addView(tableRow);
            addSeparator();
        }
    }
    private void addSeparator() {
        Resources res = MainActivity.this.getResources();
        separator = new LinearLayout(MainActivity.this);
        separator.setOrientation(LinearLayout.VERTICAL);
        separator.setLayoutParams(new LinearLayout.LayoutParams(LinearLayout.LayoutParams.MATCH_PARENT, 2));
        separator.setBackgroundColor(Color.parseColor("#5e7974"));
        separator.setDividerDrawable(res.getDrawable(R.drawable.radius_middle));
        maintable.addView(separator);
    }
    @Override
    public boolean onCreateOptionsMenu(Menu menu) {
        // Inflate the menu; this adds items to the action bar if it is present.
        getMenuInflater().inflate(R.menu.menu_main, menu);
        return true;
    }
    @Override
    public boolean onOptionsItemSelected(MenuItem item) {
        // Handle action bar item clicks here. The action bar will
        // automatically handle clicks on the Home/Up button, so long
        // as you specify a parent activity in AndroidManifest.xml.
        int id = item.getItemId();

        //noinspection SimplifiableIfStatement
        if (id == R.id.action_settings) {
            return true;
        }
        return super.onOptionsItemSelected(item);
    }
}
داخل کد بالا از یک منو هم استفاه شده است می توانید منو را داخل صفحه در صورت نیاز قرار دهید.
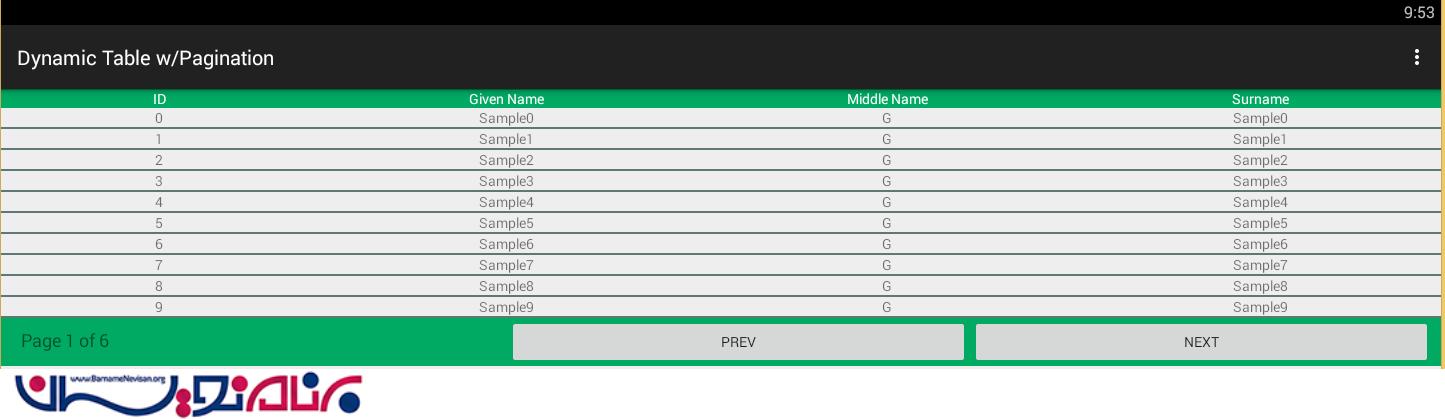
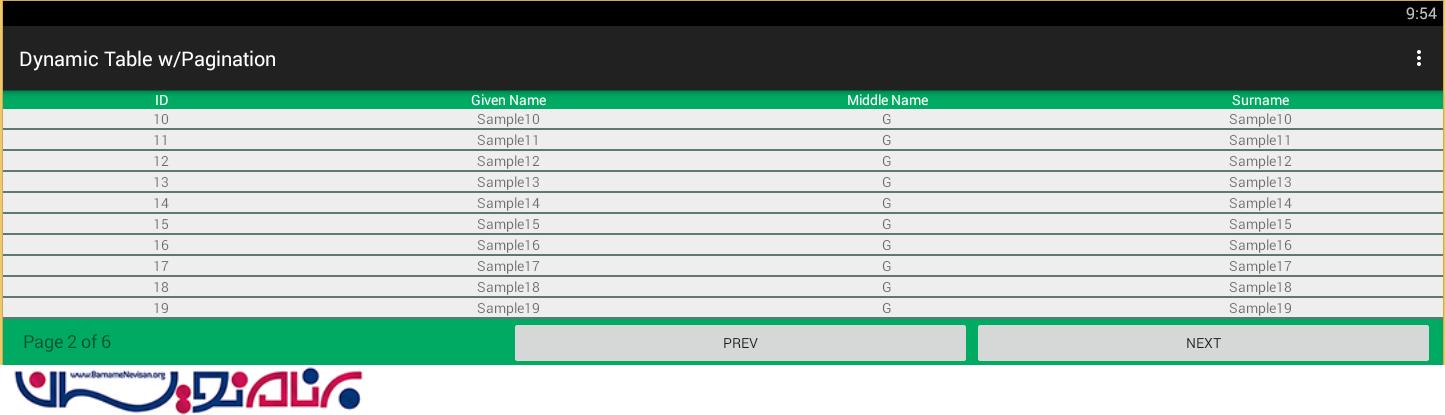
در نهایت خروجی به صورت زیر خواهد بود:

- Android
- 3k بازدید
- 5 تشکر