Toast Notification درWPF
جمعه 16 بهمن 1394در این مقاله قصد داریم که توسط WPF یک پیغام زیبا توسط toast نمایش دهیم .در این مقاله هر دو روش Code behind و MVVM را توضیح خواهیم داد .

تشابه mvc و MVVM در این است که کارکرد View و Model در هر دو یکی است منتها تفاوتی که دارند این است که کنترلر مدل را طبق تغییرات کاربر به روزرسانی می کند و بعد مدل ویو را می سازد .در اینجا کنترلر تصمیم می گیرد که چه اطلاعاتی نمایش داده شود ولی در viewModel این Binder است که تصمیم به به روزرسانی می گیرد.هر عنصری که در صفحه view وجود دارد به یک مدل موجود در viewmodel مربوط شده است .و این view است که در هر لحظه تصمیم می گیرد کدام اطلاعات موجود در viewModel را نمایش دهد .
همان طور که میدانید هر view به یک viewmodel وصل شده است و هر تغییری در viewmodel سریعا توسط view نمایش داده می شود .
یک برنامه از نوع wpf ایجاد می کنیم .در داخل این برنامه Package ایی را با دستور زیر از طریق Nuget package manager console نصب می کنیم .یک رفرنس به WPFNotification.dll. را ایجاد می کنیم .
PM> Install-Package WPFNotification
فایل app.axml را ویرایش می کنیم . و کدهای زیر را در آن وارد می کنیم .
<ResourceDictionary>
  <ResourceDictionary.MergedDictionaries>
   <ResourceDictionary Source="/WPFNotification;component/Assets/NotificationUI.xaml"/>
  </ResourceDictionary.MergedDictionaries>
</ResourceDictionary>
البته اگر با دستوری که در قبل داده شد رفرنس به WPFNotification را ایجاد کرده باشید تغییرات داخل App.config به صورت خودکار ایجاد خواهد شد .
دو نوع پیام Toast قرار است نمایش دهیم یکی از نوع ِdefualt notification و دیگری از نوع mail notification .
نمایش Default Toast Notification
داخل IOC اینترفیس INotificationDialogService را ثبت می کنیم .در اینجا از SimpleIOC استفاده کرده ایم .
SimpleIoc.Default.Register<INotificationDialogService, NotificationDialogService>();
سپس INotificationDialogService را در داخل viewModle تزریق می کنیم .بعد از این یک شی Notification با Title، Messageو ImgURL می سازیم .و نهایتا هم توسط شی
Notification متد ShowNotificationWindow را فراخوانی می کنیم .به کدهای زیر توجه کنید
public class MainViewModel : ViewModelBase
{
        private readonly INotificationDialogService _dailogService;

        // inject INotificationDialogservice

        public MainViewModel(INotificationDialogService dailogService)
        {
            _dailogService = dailogService;
        }

        private RelayCommand _defaultNotification;

        /// <summary>
        /// The DefaultNotification command.
        /// Create Notification object and send it to NotificationDialogService
        /// to display the notification.
        /// </summary>

        public RelayCommand DefaultNotification
        {
            get
            {
                return _defaultNotification
                    ?? (_defaultNotification = new RelayCommand(
                    () =>
                    {
                      // Create the notification object
                        var newNotification = new Notification()
                        {
                            Title = "Machine error",
                            Message = "Error!! Please check your Machine Code and Try Again"
                        };
                      // call the ShowNotificationWindow Method with the notification object
                        _dailogService.ShowNotificationWindow(newNotification);
                    }));
            }
        }
}
اما اگر از الگوی MVVM استفاده نمی کنید و قصد دارید در code Behind برنامه نویسی کنید به شیوه زیر عمل کنید .
-ایجاد شی INotificationDialogService
-ایجاد شی Notification با فیلدهای Title و Message و ImgURL
-توسط شی notification متد ShowNotificationWindow را فراخوانی کنید
کدهای زیر را ببینید .
private void Button_Click(object sender, RoutedEventArgs e)
        {
            INotificationDialogService _dailogService = new NotificationDialogService();
            var newNotification = new Notification()
            {
                Title = "Machine error",
                Message = "Error!! Please check your Machine Code and Try Again"
            };
            _dailogService.ShowNotificationWindow(newNotification);
        }
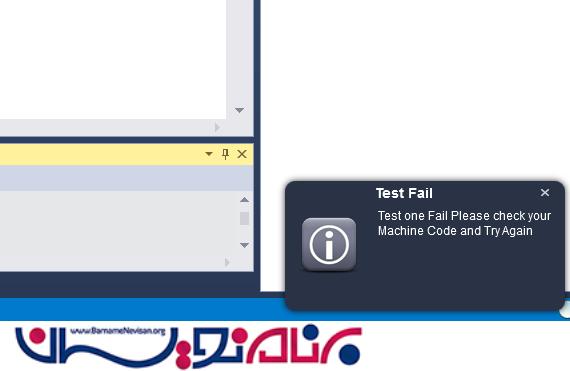
حال باید یک notification مانند زیر ببینید .

نمایش Custom Notification
در اینجا قصد داریم mail notification را نمایش دهیم .برای این کار
1-کلاسی به نام MailNotification ایجاد می کنیم .کدهای این کلاس مانند زیر است
public class MailNotification
   {
       public string Title { get; set; }
       public string Sender { get; set; }
       public string Content { get; set; }
   }
2-ساخت یک view با نام NotificationItem.xaml این ویو از نوع usercontrol است و به MailNotification بایند شده است .
<UserControl x:Class="WPFNotificationDemo.Assets.NotificationItem"
            xmlns="http://schemas.microsoft.com/winfx/2006/xaml/presentation"
             xmlns:x="http://schemas.microsoft.com/winfx/2006/xaml"
             xmlns:mc="http://schemas.openxmlformats.org/markup-compatibility/2006"
             xmlns:d="http://schemas.microsoft.com/expression/blend/2008"
             mc:Ignorable="d"
             xmlns:self="ASTA.Host.Presentation.Views.Notifications"
             d:DesignHeight="180" d:DesignWidth="320"
             x:Name="NotificationWindow"
             Background="Transparent">
    <UserControl.Triggers>
        <EventTrigger RoutedEvent="Button.Click" SourceName="CloseButton">
            <BeginStoryboard>
                <Storyboard >
                    <DoubleAnimation Storyboard.TargetName="NotificationWindow"
                    From="1" To="0"
                    Storyboard.TargetProperty="(Grid.Opacity)" Duration="0:0:0"/>
                </Storyboard>
            </BeginStoryboard>
        </EventTrigger>
    </UserControl.Triggers>
    <UserControl.Style>
        <Style TargetType="UserControl">
            <Style.Triggers>
                <DataTrigger Binding="
                {Binding ElementName=NotificationWindow,Path=Opacity}" Value="0"/>
            </Style.Triggers>
        </Style>
    </UserControl.Style>
    <Grid Background="Transparent">
        <Border Name="border"
                CornerRadius="10"
                Margin="10"
                BorderThickness="1"

                BorderBrush="{DynamicResource Accent}">
            <Border.Background>
                <SolidColorBrush Color="{DynamicResource WindowBackgroundColor}" />
            </Border.Background>
            <Border.Resources>
                <Storyboard x:Key="BackgroundAnimation">
                    <ColorAnimation Storyboard.TargetName="WindowBorderBackground"
                    Storyboard.TargetProperty="Color"
                    To="{DynamicResource WindowBackgroundColor}" Duration="0:0:.6" />
                </Storyboard>
            </Border.Resources>
            <Border.Effect>
                <DropShadowEffect ShadowDepth="0" Opacity="0.8" BlurRadius="10"/>
            </Border.Effect>
            <Grid Height="160" Width="300" Margin="0">
                <Grid.RowDefinitions>
                    <RowDefinition Height="Auto"></RowDefinition>
                    <RowDefinition Height="*"></RowDefinition>
                </Grid.RowDefinitions>
                <Grid.ColumnDefinitions>
                    <ColumnDefinition Width="Auto"></ColumnDefinition>
                    <ColumnDefinition Width="*"></ColumnDefinition>
                </Grid.ColumnDefinitions>
                <Image Grid.RowSpan="2" Source="/Resources/Images/newMail.png"
                Margin="4" Width="80"></Image>
                <TextBlock Text="{Binding Path=Title}"
                TextOptions.TextRenderingMode="ClearType"
                TextOptions.TextFormattingMode="Display"
                Foreground="DimGray" TextAlignment="Center"
                                   FontFamily="Arial"
                                   FontSize="14" FontWeight="Bold"
                                   VerticalAlignment="Center"  Margin="4,4,4,2"
                                   TextWrapping="Wrap" TextTrimming="CharacterEllipsis"
                                   Grid.ColumnSpan="2" />
                <Button x:Name="CloseButton"
                        Grid.Column="1"
                        HorizontalAlignment="Right"
                        Margin="0,0,27,0"
                        Click="CloseButton_Click"
                        Style="{StaticResource SystemCloseButton}"
                        Width="16"
                        Height="16" >
                    <Button.Content>
                        <Grid Width="10" Height="12"
                        RenderTransform="1,0,0,1,0,1">
                            <Path Data="M0,0 L8,7 M8,0 L0,7 Z"
                            Width="8" Height="7" VerticalAlignment="Center"
                            HorizontalAlignment="Center"
                            Stroke="{Binding Foreground,
				RelativeSource={RelativeSource Mode=FindAncestor,
                            AncestorType=Button}}" StrokeThickness="1.5"  />
                        </Grid>
                    </Button.Content>
                </Button>
                <StackPanel Orientation="Vertical" Grid.Row="1"
                Grid.Column="1" VerticalAlignment="Stretch">
                    <StackPanel Orientation="Horizontal" Margin="5">
                        <TextBlock Text="From :" HorizontalAlignment="Left"
                        VerticalAlignment="Top" FontWeight="Black"
                        Foreground="DarkGoldenrod"></TextBlock>
                        <TextBlock Grid.Row="0"
                               Grid.Column="1"
                               Text="{Binding Sender}"
                               TextTrimming="CharacterEllipsis"
                               TextWrapping="Wrap"
                               FontFamily="Arial"
                               VerticalAlignment="Center"
                               Foreground="Black"
                               Margin="5,0,0,0"
                               Width="145"/>
                    </StackPanel>
                    <StackPanel Orientation="Horizontal"  Margin="5">

                        <TextBlock Grid.Row="1"
                               Grid.Column="0" Grid.ColumnSpan="2"
                               Text="{Binding Content}"
                               TextTrimming="CharacterEllipsis"
                               TextWrapping="Wrap"
                               FontFamily="Arial"
                               VerticalAlignment="Center"
                               HorizontalAlignment="Stretch"
                               Foreground="Black"
                               Margin="5,0,0,0"
                               Width="150"/>
                    </StackPanel>
                </StackPanel>
            </Grid>
        </Border>
    </Grid>
</UserControl>
برای اینکه اگر بر روی دکمه close کلیک کردیم این صفحه نمایش داده شود رویداد کلیک این دکمه را به صورت زیر تعریف می کنیم .
private void CloseButton_Click(object sender, RoutedEventArgs e)
        {
            Window parentWindow = Window.GetWindow(this);
            this.Visibility = Visibility.Hidden;
            parentWindow.Close();
        }
3-ساخت منبعی مثلا به اسم MailNotificationUI.xaml برای نمایش ویو های ما و بعد افزودن dataTemplate برای نحوه نمایش پیغام toast.
<ResourceDictionary xmlns="http://schemas.microsoft.com/winfx/2006/xaml/presentation"
                    xmlns:x="http://schemas.microsoft.com/winfx/2006/xaml"
                    xmlns:Model="clr-namespace:WPFNotificationDemo.Model"
                    xmlns:NotificationView="clr-namespace:WPFNotificationDemo.Assets">

    <DataTemplate x:Key="MailNotificationTemplate"
    DataType="{x:Type Model:MailNotification}">
        <NotificationView:NotificationItem/>
    </DataTemplate>

</ResourceDictionary>
4-فایل app.xaml را ویرایش کنید و افزودن MailNotificationUI.xaml را انجام دهید .
<Application.Resources>
    <ResourceDictionary>
      <ResourceDictionary.MergedDictionaries>
                <ResourceDictionary Source=
                "/WPFNotification;component/Assets/NotificationUI.xaml" />
                <ResourceDictionary Source=
                "/Assets/MailNotificationUI.xaml" />
            </ResourceDictionary.MergedDictionaries>
      <vm:ViewModelLocator x:Key="Locator" d:IsDataSource="True" />
    </ResourceDictionary>
  </Application.Resources>
5-نمایش Mail Notification
اگر از MVVM استفاده می کنید .مراحل زیر را انجام دهید .در داخل IOC اینترفیس INotificationDialogService را ثبت کنید .
به داخل viewModel خود INotificationDialogService را تزریق کنید .
شی NotificationConfiguration را ایجاد کنید .متد ShowNotificationWindowرا با شی notification فراخوانی کنید .
public class MainViewModel : ViewModelBase
{
        private readonly INotificationDialogService _dailogService;

        // inject INotificationDialogservice

        public MainViewModel(INotificationDialogService dailogService)
        {
            _dailogService = dailogService;
        }

        private RelayCommand _mailNotification;

        /// <summary>
        /// The MailNotification command.
        /// Create Notification and NotificationConfiguration objects,
        /// and send them to NotificationDialogService to display the notification.
        /// </summary>
        public RelayCommand MailNotification
        {
            get
            {
                return _mailNotification
                    ?? (_mailNotification = new RelayCommand(
                    () =>
                    {
                      // create notification object
                        var newNotification = new MailNotification()
                        {
                            Title = "Vacation Request",
                            Sender = "Mohamed Magdy",
                            Content = "I would like to request for vacation
                                       from 20/12/2015 to 30/12/2015 ............."
                        };
                       // create configuration object
                        var configuration = new NotificationConfiguration(TimeSpan.Zero, null,
                                            null,Constants.MailNotificationTemplateName);
                        // call show method with notification and configuration objects
                        _dailogService.ShowNotificationWindow(newNotification, configuration);
                    }));
            }
        }
}
اگر بنا دارید از روش code Behind استفاده کنید مراحل زیر را انجام دهید.
شی INotificationDialogService را ایجاد کنید .
شی MailNotification را ایجاد کنید
شی NotificationConfiguration را ایجاد کنید .این شی را با TemplateName و با نامی برابر با dataTemplate ایجاد کنید .
توسط شی notification متد ShowNotificationWindow را فراخوانی کنید .
private void Button_Click(object sender, RoutedEventArgs e)
        {
            INotificationDialogService _dailogService = new NotificationDialogService();

           var newNotification = new MailNotification()
               {
                  Title = "Vacation Request",
                  Sender = "Mohamed Magdy",
                  Content = "I would like to request for vacation from 20/12/2015
                            to 30/12/2015 ............."
               };
       var configuration = new NotificationConfiguration(TimeSpan.Zero, null,
                                null, Constants.MailNotificationTemplateName);
       _dailogService.ShowNotificationWindow(newNotification, configuration);

        }
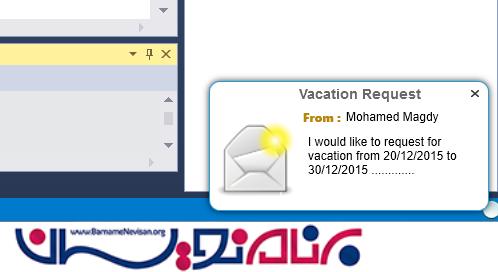
نهایتا خروجی زیر را خواهید دید

- WPF
- 2k بازدید
- 2 تشکر
