پیاده سازی جدول Responsive با استفاده از بوت استرپ و AngularJS
دوشنبه 10 اسفند 1394امروزه واکنش گرایی یا responsive بودن وب سایت ها یکی از مزیت های اصلی در توسعه وب می باشد. از آنجایی که در حال حاضر ممکن است یک صفحه وب سایت را در ابزار های متفاوتی مانند لپ تاپ، تبلت یا گوشی مشاهده کنیم، لازم است صفحات وب به صورت واکنش گرا یا responsive درآید. در این مقاله می خواهیم یک جدول HTML ای را با استفاده از بوت استرپ و AngularJS به صورت واکنش گرا درآوریم.

با توجه به اندازه های مختلف صفحه نمایش، بسیار مهم است که یک صفحه را طوری طراحی کنیم که هم با فرمت HTML و هم aspx به صورت واکنش گرا عمل کند برای مثال مکان قرار گرفتن تمام قطعات صفحه به صورت اتوماتیک تنظیم شود.
در این مقاله می خواهیم نشان دهیم که چگونه می توان یک جدول واکنش گرا با استفاده از بوت استرپ و AngularJS ایجاد کرد.
برای این کار ابتدا یک پروژه خالی ایجاد می کنیم. سپس یک فایل از نوع stylesheet در آن ایجاد کرده و کدهای CSS زیر را به آن اضافه می کنیم:
body: not(.fixed - sidebar): not(.canvas - menu).mini - navbar.nav - second - level
{
    display: none;
}
/* TABLES */
.table - bordered
{
    border: 1 px solid# EBEBEB;
}.table - bordered > thead > tr > th, .table - bordered > thead > tr > td
{
    background - color: #FFF;
    border - bottom - width: 1 px;
}.table - bordered > thead > tr > th, .table - bordered > tbody > tr > th, .table - bordered > tfoot > tr > th, .table - bordered > thead > tr > td, .table - bordered > tbody > tr > td, .table - bordered > tfoot > tr > td
{
    border: 1 px solid# e7e7e7;border - width: 1 px 1 px 0 1 px;
}.table > thead > tr > th
{
    border - bottom: 1 px solid# DDDDDD;
    vertical - align: bottom;
}.table > thead > tr > th, .table > tbody > tr > th, .table > tfoot > tr > th, .table > thead > tr > td, .table > tbody > tr > td, .table > tfoot > tr > td
{
    border - top: 1 px solid# e7eaec;
    line - height: 1.42857;
    padding: 5 px;
    vertical - align: top;
}
/* GLOBAL  */
.ibox
{
    clear: both;margin - bottom: 10 px;margin - top: 0;padding: 0;
}.ibox.collapsed.ibox - content
{
    display: none;
}.ibox.collapsed.fa.fa - chevron - up: before
{
    content: "\f078";
}.ibox.collapsed.fa.fa - chevron - down: before
{
    content: "\f077";
}.ibox: after, .ibox: before
{
    display: table;
}.ibox - title
{
    -moz - border - bottom - colors: none; - moz - border - left - colors: none; - moz - border - right - colors: none; - moz - border - top - colors: none;
    background - color: #ffffff;
    border - color: #e7eaec;
    border - image: none;
    border - style: solid solid none; /*border-width: 3px 0 0;*/
    border - width: 0 px 0 0;
    color: inherit;
    margin - bottom: 0;
    padding: 10 px 15 px 0; /* min-height: 35px;*/
    min - height: 28 px;
}.ibox - content
{
    background - color: #ffffff;
    color: inherit; /* padding: 0px 10px 10px;*/
    padding: 10 px 10 px 10 px;
    border - color: #e7eaec;
    border - image: none;
    border - style: solid solid none; /* border-width: 1px 0px;*/
    border - width: 0 px 0 px;
}.ibox - footer
{
    color: inherit;border - top: 1 px solid# e7eaec;font - size: 90 % ;background: #ffffff;padding: 10 px 15 px;
}
table.table - mail tr td
{
    padding: 12 px;
}.table - mail.check - mail
{
    padding - left: 20 px;
}.table - mail.mail - date
{
    padding - right: 20 px;
}.ibox - content
{
    clear: both;
}.ibox - heading
{
    background - color: #f3f6fb;
    border - bottom: none;
}.ibox - heading h3
{
    font - weight: 200;
    font - size: 24 px;
}.ibox - title h5
{
    display: inline - block;font - size: 14 px;margin: 0 0 7 px;padding: 0;text - overflow: ellipsis;float: left;color: #1ab394; font-weight:bold; }
    .ibox-title .label { float: left; margin-left: 4px; }
    .ibox-tools { display: block; float: none; margin-top: 0; position: relative; padding: 0; text-align: right; }
    .ibox-tools a { cursor: pointer; margin-left: 5px; color: # c4c4c4;
}.ibox - tools a.btn - primary
{
    color: #fff;
}.ibox - tools.dropdown - menu > li > a
{
    padding: 4 px 10 px;font - size: 12 px;
}.ibox.ibox - tools.open > .dropdown - menu
{
    left: auto;right: 0;
}.ibox.fullscreen
{
    z - index: 2030;
    position: fixed;
    top: 0;
    left: 0;
    right: 0;
    bottom: 0;
    overflow: auto;
    margin - bottom: 0;
}.ibox.fullscreen.collapse - link
{
    display: none;
}.ibox.fullscreen.ibox - content
{
    min - height: calc(100 % -48 px);
}
/*Responsive Table*/
.ibox - table
{ /*margin-bottom:10px;*/
    position: relative;
}.ibox - table.responsive - table
{
    width: 100 % ;
}.ibox - table.responsive - table th, .ibox - table.responsive - table td
{
    padding: 7 px;
}
@media screen and(max - width: 992 px)
{.ibox - table.responsive - table thead
{
    display: none;
}.ibox - table.responsive - table tr
{
    display: block;border - bottom: 1 px solid# ddd;
}.ibox - table.responsive - table td
{
    display: block;text - align: left;padding: 7 px 5 px 7 px 50 % !important;
}.ibox - table.responsive - table td: last - child
{
    border - bottom: 0;
}.ibox - table.responsive - table td: before
{
    content: attr(data - label);text - align: right;width: 45 % ;position: absolute;left: 2 px;font - weight: bold;white - space: pre - wrap;padding: 0 px 0 5 px;
}.minimalize - styl - 2.fa - bars
{
    display: inline - block;
}.minimalize - styl - 2.fa - chevron - left
{
    display: none;
}
body.mini - navbar.minimalize - styl - 2.fa - chevron - left
{
    display: inline - block;
}
body.mini - navbar.minimalize - styl - 2.fa - bars
{
    display: none;
}
حالا یک صفحه HTML اضافه کرده و نام آن را index.html قرار می دهیم و کد های زیر را به آن اضافه می کنیم:
<!DOCTYPE html>
<html xmlns="http://www.w3.org/1999/xhtml">
<head>
    <title>Responsive Data Grid in Angular Js</title>
    <link href="../../RefStyle/bootstrap.min.css" rel="stylesheet" />
    <link href="Style.css" rel="stylesheet" />
    <script src="../../Scripts/angular.min.js"></script>
    <script src="IndexController.js"></script>
</head>
<body data-ng-app="TestApp" data-ng-controller="IndexController as model">
    <div class="row animated fadeInRight">
        <div class="col-lg-12">
            <div class="rowDiv">
                <h3>{{model.message}}</h3>
            </div>
        </div>
        <div class="ibox-content">
            <div class="ibox-table">
                <div class="table-responsive">
                    <table class="responsive-table table-striped table-bordered table-hover">
                        <thead>
                            <tr>
                                <th data-ng-repeat="header in model.headerData" data-ng-switch on="header.caption">
                                    <span data-ng-switch-when="chkBox">
                                        <input id="chkHeader" type="checkbox" class="i-checks" name="input[]" data-ng-init="model.assignControlProperty(-1);">
                                    </span>
                                    <span data-ng-switch-when="btnInfo"></span>
                                    <span data-ng-switch-default>{{header.caption}}</span>
                            </tr>
                        </thead>
                        <tbody>
                            <tr data-ng-repeat="item in model.gridData">
                                <td data-ng-repeat="field in model.columnField" data-ng-switch on="field.fieldName" data-label="{{field.dataLabel}}" data-ng-click="model.gridRowClick(item,$parent.$index,field);">
                                    <span data-ng-switch-default>{{item[field.fieldName]}}</span>
                                </td>
                            </tr>
                        </tbody>
                    </table>
                </div>
            </div>
        </div>
</body>
</html>
حالا موقع آن است که فایل جاوا اسکریپت را به پروژه اضافه کنیم که کد آن به صورت زیر است:
'use strict';
var testApp = angular.module('TestApp', []);
testApp.controller('IndexController', ['$http', function ($http, urlService)
{
    var self = this;
    self.message = 'Responsive Bootstrap Based Table';
    var gridData = [
    {
        Id: 1,
        Code: 'A001',
        EmployeeName: 'Sumit Sharma',
        Dept: 'Accounts',
        Desig: 'Manager',
        City: 'Kolkata',
        Salary: 25000
    },
    {
        Id: 2,
        Code: 'A002',
        EmployeeName: 'Ramesh Sharma',
        Dept: 'Sales',
        Desig: 'Agent',
        City: 'New Delhi',
        Salary: 15000
    },
    {
        Id: 3,
        Code: 'A003',
        EmployeeName: 'Arun Roy',
        Dept: 'Accounts',
        Desig: 'Clerk',
        City: 'Mumbai',
        Salary: 22000
    },
    {
        Id: 4,
        Code: 'D001',
        EmployeeName: 'Swapan Das',
        Dept: 'HR',
        Desig: 'Admin',
        City: 'Kolkata',
        Salary: 40000
    },
    {
        Id: 5,
        Code: 'S021',
        EmployeeName: 'Akash Srivastava',
        Dept: 'Marketing',
        Desig: 'Manager',
        City: 'Pune',
        Salary: 32000
    },
    {
        Id: 6,
        Code: 'A004',
        EmployeeName: 'Nilesh Roy',
        Dept: 'Sales',
        Desig: 'Executive',
        City: 'Kolkata',
        Salary: 17000
    }];
    var gridHeader = 'Code,Employee Name,Department,Designation,Salary Amount';
    var displayField = 'Code,EmployeeName,Dept,Desig,Salary';
    self.gridData = gridData;
    self.headerArray = gridHeader.split(',')
    self.headerData = [];
    angular.forEach(self.headerArray, function (field, i)
    {
        self.headerData.push(
        {
            caption: self.headerArray[i]
        });
    });
    var returnDataLabel = function (index)
    {
        return self.headerArray[index];
    }
    var colData = displayField.split(',');
    self.columnField = [];
    angular.forEach(colData, function (field, i)
    {
        self.columnField.push(
        {
            fieldName: colData[i],
            dataLabel: returnDataLabel(i)
        });
    });
    var returnDataLabel = function (index)
    {
        return self.headerArray[index];
    }
    self.gridRowClick = function (item, index, column)
    {
        alert('grid row click for ' + item.EmployeeName);
    }
}]);
جدول پیاده سازی شده توسط کدهای بالا کاملا داینامیک است و از آنجای که grid source data ( برای مثال self.source) شامل فیلدهای منو مانند id و غیره است اما در جدول فقط فیلدهایی را نشان می دهد که در متغیر displayField ذکر شده باشد.
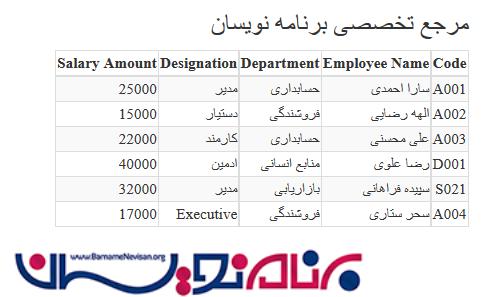
حالا از برنامه اجرا گرفته و میبینیم که خروجی به صورت زیر نشان داده می شود:

آموزش angular
- AngularJs
- 3k بازدید
- 6 تشکر
