جزئیات و تصویر کاربر در MVC 5
چهارشنبه 10 شهریور 1395در این مقاله قصد داریم با استفاده از MVC 5 CRUD پیاده سازی کنیم که تصاویر و جزئیات کاربر را نمایش دهد .در این مقاله ما از VS2015 استفاده می کنیم .

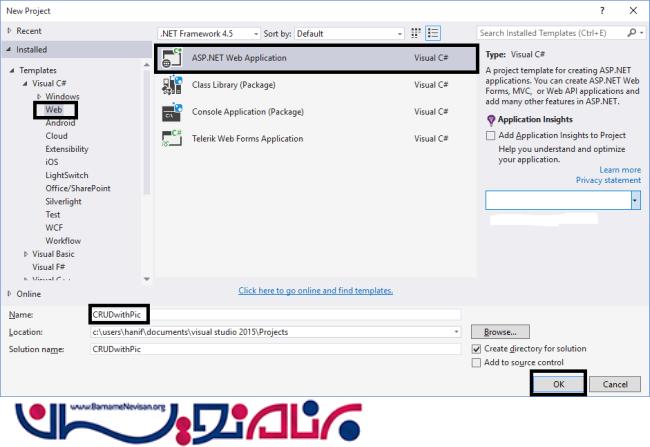
ویژوال استودیو را اجرا کرده یک پروژه جدید ایجاد کنید مانند تصویر زیر :
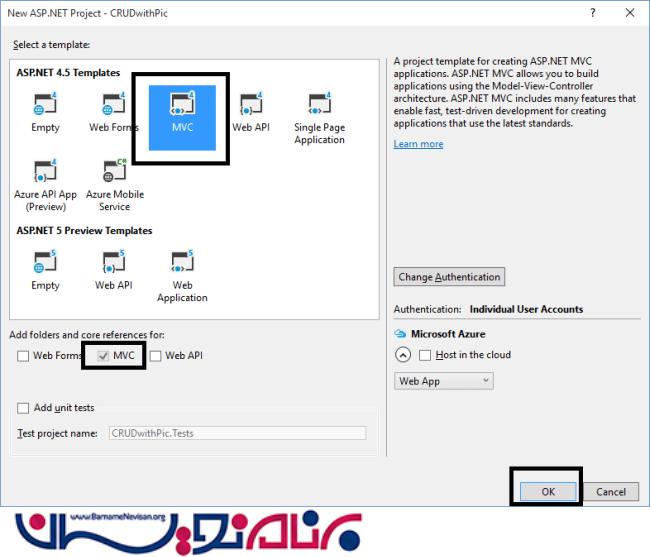
در این تصویر MVC را انتخاب کرده و OK را بزنید .
حال برروی پوشه Models کلیک راست کرده و یک کلاس به آن اضافه می کنیم و نام آن را File قرار می دهیم . کد زیر را درآن وارد می کنیم :
•  public class File
•  {
•          public int FileId { get; set; }
•          [StringLength(255)]
•          public string FileName { get; set; }
•          [StringLength(100)]
•          public string ContentType { get; set; }
•          public byte[] Content { get; set; }
•          public FileType FileType { get; set; }
•          public int UserId { get; set; }
•          public virtual User User { get; set; }
•  }
دوباره بر روی پوشه Models کلیک راست کرده و یک کلاس به نام FileType.cs ایجاد می کنیم .
•  public enum FileType
•  {
•      Avatar = 1, Photo
•  }
حال یک کلاس به نام Users.cs ایجاد کرده و کلاس دیگر را به آن متصل می کنیم .
توجه : در این کلاس Data Context را تعریف می کنیم .
•  public class  User
•     {
•
•         public int ID { get; set; }
•         [Required]
•         public string Name { get; set; }
•         public string LastName { get; set; }
•         public string Province { get; set; }
•         public string District { get; set; }
•         public byte[] Photo { get; set; }
•        [Required]
•         public string Group{ get; set; }
•         [Required]
•         public string RH { get; set; }
•         [Required]
•         public string Location { get; set; }
•        [Required]
•         public string Mobile { get; set; }
•         public virtual ICollection<File> Files { get; set; }
•     }
•
•     public class UserDBContext : DbContext
•     {
•         public DbSet<User> Users { get; set; }
•         public DbSet<File> Files { get; set; }
•     }
تا به این جای مدل خود را طراحی کرده ایم . حال میخواهیم به پوشه Controller برویم و یک کنترلر ایجاد می کنیم. کد ها زیر را درون Controller خود اضافه کنید.
به خاطر داشته باشید که اگر در اتصال به بانک اطلاعاتی با مشکل بر خوردید میتوان در فایل Web.Config رشته اتصال خود را تنظیم کنید .
public class UsersController : Controller
•     {
•         private UserDBContext db = new UserDBContext();
•
•         // GET: Users
•         public ActionResult Index()
•         {
•                     return View(users);
•         }
•
•         // GET: Users/Details/5
•         public ActionResult Details(int? id)
•         {
•             if (id == null)
•             {
•                 return new HttpStatusCodeResult(HttpStatusCode.BadRequest);
•             }
•             User user = db.Users.Include(s => s.Files).SingleOrDefault(s => s.ID == id);
•
•             if (user == null)
•             {
•                 return HttpNotFound();
•             }
•             return View(user);
•         }
•
•         // GET: Users/Create
•         public ActionResult Create()
•         {
•             return View();
•         }
•
•         // POST: Users/Create
•         [Authorize]
•         [HttpPost]
•         [ValidateAntiForgeryToken]
•         public ActionResult Create([Bind(Include = "ID,Name,LastName,Province,District,Photo,Group,RH,Location,Mobile")] User user, HttpPostedFileBase upload)
•         {
•             if (ModelState.IsValid)
•             {
•                 if (upload != null && upload.ContentLength > 0)
•                 {
•                     var avatar = new File
•                     {
•                         FileName = System.IO.Path.GetFileName(upload.FileName),
•                         FileType = FileType.Avatar,
•                         ContentType = upload.ContentType
•                     };
•                     using (var reader = new System.IO.BinaryReader(upload.InputStream))
•                     {
•                         avatar.Content = reader.ReadBytes(upload.ContentLength);
•                     }
•                     user.Files = new List<File> { avatar };
•                 }
•                 db.Users.Add(user);
•                 db.SaveChanges();
•                 return RedirectToAction("Index");
•             }
•
•             return View(user);
•         }
•
•         // GET: Users/Edit/5
•         public ActionResult Edit(int? id)
•         {
•             if (id == null)
•             {
•                 return new HttpStatusCodeResult(HttpStatusCode.BadRequest);
•             }
•             User user = db.Users.Find(id);
•             if (user == null)
•             {
•                 return HttpNotFound();
•             }
•             return View(user);
•         }
•
•         // POST: Users/Edit/5
•         [HttpPost]
•         [ValidateAntiForgeryToken]
•         public ActionResult Edit([Bind(Include = "ID,Name,LastName,Province,District,Photo,Group,RH,Location,Mobile")] User user)
•         {
•             if (ModelState.IsValid)
•             {
•                 db.Entry(user).State = EntityState.Modified;
•                 db.SaveChanges();
•                 return RedirectToAction("Index");
•             }
•             return View(user);
•         }
•
•         // GET: Users/Delete/5
•         public ActionResult Delete(int? id)
•         {
•             if (id == null)
•             {
•                 return new HttpStatusCodeResult(HttpStatusCode.BadRequest);
•             }
•             User user = db.Users.Find(id);
•             if (user == null)
•             {
•                 return HttpNotFound();
•             }
•             return View(user);
•         }
•
•         // POST: Users/Delete/5
•         [HttpPost, ActionName("Delete")]
•         [ValidateAntiForgeryToken]
•         public ActionResult DeleteConfirmed(int id)
•         {
•             User user = db.Users.Find(id);
•             db.Users.Remove(user);
•             db.SaveChanges();
•             return RedirectToAction("Index");
•         }
•
•         protected override void Dispose(bool disposing)
•         {
•             if (disposing)
•             {
•                 db.Dispose();
•             }
•             base.Dispose(disposing);
•         }
•
•     }
کد های بالایی Controller را تشکل میدهند. حال میخوایم به View ها بپردازیم .
نکته: اگر موقع اضافه کردن Controller با خطا مواجه شدید Solution را Build کنید و به کار خود ادامه دهید .برنامه را اجرا کنید حال مشاهده میکنید که میتوان برای کاربران خود عکس تعیین کنید . دراین قسمت باید کد های زیر در Create.cshtml وارد کنید :
@model MVCPicSample.Models.User

@{
    ViewBag.Title = "Create A New Profile";
}

<h2>میریت پروفایل کاربر</h2>


@using (Html.BeginForm("Create", "Users", null, FormMethod.Post, new { enctype = "multipart/form-data" }))
{
    @Html.AntiForgeryToken()

    <div class="form-horizontal">

        <hr />
        @Html.ValidationSummary(true, "", new { @class = "text-danger" })
        <div class="form-group">
            @Html.LabelFor(model => model.Name, htmlAttributes: new { @class = "control-label col-md-2" })
            <div class="col-md-10">
                @Html.EditorFor(model => model.Name, new { htmlAttributes = new { @class = "form-control" } })
                @Html.ValidationMessageFor(model => model.Name, "", new { @class = "text-danger" })
            </div>
        </div>

        <div class="form-group">
            @Html.LabelFor(model => model.LastName, htmlAttributes: new { @class = "control-label col-md-2" })
            <div class="col-md-10">
                @Html.EditorFor(model => model.LastName, new { htmlAttributes = new { @class = "form-control" } })
                @Html.ValidationMessageFor(model => model.LastName, "", new { @class = "text-danger" })
            </div>
        </div>

        <div class="form-group">
            @Html.LabelFor(model => model.Province, htmlAttributes: new { @class = "control-label col-md-2" })
            <div class="col-md-10">
                @Html.EditorFor(model => model.Province, new { htmlAttributes = new { @class = "form-control" } })
                @Html.ValidationMessageFor(model => model.Province, "", new { @class = "text-danger" })
            </div>
        </div>

        <div class="form-group">
            @Html.LabelFor(model => model.District, htmlAttributes: new { @class = "control-label col-md-2" })
            <div class="col-md-10">
                @Html.EditorFor(model => model.District, new { htmlAttributes = new { @class = "form-control" } })
                @Html.ValidationMessageFor(model => model.District, "", new { @class = "text-danger" })
            </div>
        </div>

        <div class="form-group">
            @Html.Label("Avatar", new { @class = "control-label col-md-2" })
            <div class="col-md-10">
                <input type="file" id="Avatar" name="upload" />
            </div>


        </div>

        <div class="form-group">
            @Html.LabelFor(model => model.Group, htmlAttributes: new { @class = "control-label col-md-2" })
            <div class="col-md-10">
                @Html.EditorFor(model => model.Group, new { htmlAttributes = new { @class = "form-control" } })
                @Html.ValidationMessageFor(model => model.Group, "", new { @class = "text-danger" })
            </div>
        </div>

        <div class="form-group">
            @Html.LabelFor(model => model.RH, htmlAttributes: new { @class = "control-label col-md-2" })
            <div class="col-md-10">
                @Html.EditorFor(model => model.RH, new { htmlAttributes = new { @class = "form-control" } })
                @Html.ValidationMessageFor(model => model.RH, "", new { @class = "text-danger" })
            </div>
        </div>

        <div class="form-group">
            @Html.LabelFor(model => model.Location, htmlAttributes: new { @class = "control-label col-md-2" })
            <div class="col-md-10">
                @Html.EditorFor(model => model.Location, new { htmlAttributes = new { @class = "form-control" } })
                @Html.ValidationMessageFor(model => model.Location, "", new { @class = "text-danger" })
            </div>
        </div>

        <div class="form-group">
            @Html.LabelFor(model => model.Mobile, htmlAttributes: new { @class = "control-label col-md-2" })
            <div class="col-md-10">
                @Html.EditorFor(model => model.Mobile, new { htmlAttributes = new { @class = "form-control" } })
                @Html.ValidationMessageFor(model => model.Mobile, "", new { @class = "text-danger" })
            </div>
        </div>

        <div class="form-group">
            <div class="col-md-offset-2 col-md-10">
                <input type="submit" value="افزودن" class="btn btn-default" />
            </div>
        </div>
    </div>
}

<div>

</div>

@section Scripts {
    @Scripts.Render("~/bundles/jqueryval")
}
حال برنامه اجرا کنید و خروجی را مشاهده کنید . در مرحله بعدی در Details.cshtml عکس کاربر را نمایش می دهیم .
مرحله اول : کد زیر را در Details.cshtml وارد می کنیم .
@model MVCPicSample.Models.User

@{
    ViewBag.Title = "Details";
}

<h2>جزئیات<br></h2>
<link rel="stylesheet" type="text/css" href="~/Content/Site.css" />
<div>

    <hr />
    <div class="container">


                                    <dl class="dl-horizontal">

                                        @if (Model.Files.Any(f => f.FileType == MVCPicSample.Models.FileType.Avatar))
                                        {

                                            <dt>تصویر کاربر<br></dt>
                                                <dd>
                                                    <img src="~/File?id=@Model.Files.First(f => f.FileType == MVCPicSample.Models.FileType.Avatar).FileId" alt="avatar" class="img-circle" height="100" width="100" />
                                                </dd>
                                        }
                                        <dt>
                                            @Html.DisplayNameFor(model => model.Name)
                                        </dt>

                                        <dd>
                                            @Html.DisplayFor(model => model.Name)
                                        </dd>

                                        <dt>
                                            @Html.DisplayNameFor(model => model.LastName)
                                        </dt>

                                        <dd>
                                            @Html.DisplayFor(model => model.LastName)
                                        </dd>

                                        <dt>
                                            @Html.DisplayNameFor(model => model.Province)
                                        </dt>

                                        <dd>
                                            @Html.DisplayFor(model => model.Province)
                                        </dd>

                                        <dt>
                                            @Html.DisplayNameFor(model => model.District)
                                        </dt>

                                        <dd>
                                            @Html.DisplayFor(model => model.District)
                                        </dd>


                                        <dt>
                                            @Html.DisplayNameFor(model => model.Group)
                                        </dt>

                                        <dd>
                                            @Html.DisplayFor(model => model.Group)
                                        </dd>

                                        <dt>
                                            @Html.DisplayNameFor(model => model.RH)
                                        </dt>

                                        <dd>
                                            @Html.DisplayFor(model => model.RH)
                                        </dd>

                                        <dt>
                                            @Html.DisplayNameFor(model => model.Location)
                                        </dt>

                                        <dd>
                                            @Html.DisplayFor(model => model.Location)
                                        </dd>

                                        <dt>
                                            @Html.DisplayNameFor(model => model.Mobile)
                                        </dt>

                                        <dd>
                                            @Html.DisplayFor(model => model.Mobile)
                                        </dd>

                                    </dl>
                                </div>

                            </div>

<br />


<p>
    @Html.ActionLink("Edit", "Edit", new { id = Model.ID }) |
    @Html.ActionLink("Back to List", "Index")
</p>
مرحله دوم: در این قسمت یک Controller خالی به نام FileController ایجاد کرده و کد زیر را وارد می کنیم :
•  using System;
•  using System.Collections.Generic;
•  using System.Linq;
•  using System.Web;
•  using System.Web.Mvc;
•  using CRUDwithPic.Models;
•
•  namespace CRUDwithPic.Controllers
•  {
•      public class FileController : Controller
•      {
•          private UserDBContext db = new UserDBContext();
•          //
•          // GET: /File/
•          public ActionResult Index(int id)
•          {
•              var fileToRetrieve = db.Files.Find(id);
•              return File(fileToRetrieve.Content, fileToRetrieve.ContentType);
•          }
•      }
•  }
نکته: اگر خطایی رخ داد قطعه کد زیر را به Web.Config اضافه کنید .
<add namespace="CRUDwithPic.Models" />
آموزش asp.net mvc

- ASP.net MVC
- 2k بازدید
- 4 تشکر