الگوی Repository با ASP.Net MVC و Entity Framework
سه شنبه 27 مهر 1395Repository Pattern برای ایجاد یک لایه مجزا بین data access layer و business logic layer یک برنامه مورد استفاده قرار میگیرد . در این مقاله با ارائه یک مثال ساده ، شما را با Repository Pattern در ASP.Net و Entity Framework آشنا خواهیم کرد .

Repository بصورت مستقیم با لایه DAL در ارتباط است و از آن داده هایی را دریافت و برای لایه BAL آماده میکند . مهم ترین مزیت استفاده از Repository Pattern ایزوله کردن لایه های data access layer و business logic layer میباشد .
در این قسمت ما ، قصد بررسی Repository Pattern در ASP.Net و Entity Framework را داریم .
مرحله اول :
• ابتدا visual studio را باز کنید .
• یک پروژه web جدید ایجاد کنید .
• در مرحله بعد ASP.Net MVC 4 را انتخاب کنید .
• Empty Template را انتخاب کنید .
مرحله دوم :
دو کلاس EmployeeContext.cs و Employee.cs را در فولدر Models ایجاد کنید . ما در این مثال از روش Code First استفاده میکنیم و نیازی به ایجاد جدول ها در پایگاه داده نیست ، و با همین کدها بصورت خودکار جداول ما در پایگاه داده ایجاد خواهد شد .
Employee.cs
using System;
using System.Collections.Generic;
using System.ComponentModel.DataAnnotations;
using System.ComponentModel.DataAnnotations.Schema;
using System.Linq;
using System.Web;

namespace RepositoryWithMVC.Models
{
    [Table("Employee")]
    public class Employee
    {
        [Key]
        [Display(Name = "شناسه کارمند")]
        public int EmployeeId
        {
            get;
            set;
        }

        [Display(Name = "نام کارمند")]
        [Required(ErrorMessage = "وارد کردن نام اجباریست")]
        public string EmployeeName
        {
            get;
            set;
        }

        [Display(Name = "آدرس")]
        [Required(ErrorMessage = "وارد کردن آدرس اجباریست")]
        public string Address
        {
            get;
            set;
        }
        [Display(Name = "ایمیل")]
        [Required(ErrorMessage = "وارد کردن ایمیل اجباریست")]
        public string EmailId
        {
            get;
            set;
        }
    }
}
EmployeeContext.cs
using System;
using System.Collections.Generic;
using System.Data.Entity;
using System.Linq;
using System.Web;

namespace RepositoryWithMVC.Models
{
    public class EmployeeContext : DbContext
    {
        public EmployeeContext() : base("DefaultConnection") { }
        public DbSet<Employee> Employees
        {
            get;
            set;
        }
    }
}
Web.Config
<connectionStrings>
    <add name="DefaultConnection" connectionString="data source=(local); database=Demodb; user id=sa; password=xyz;" providerName="System.Data.SqlClient" />
</connectionStrings>
توجه داشته باشید که ، فیلد های Connection string را باید ویرایش کنید و اطلاعات پایگاه داده خود را وارد کنید .
مرحله سوم :
یک فولدر با نام "Repository" ایجاد کنید . یک کلاس و یک Interface با نام
IEmployeeRepository.cs و EmployeeRepository.cs به آن اضافه کنید .
IEmployeeRepository.cs
using RepositoryWithMVC.Models;
using System;
using System.Collections.Generic;
using System.Linq;
using System.Web;

namespace RepositoryWithMVC.Repository
{
    public interface IEmployeeRepository : IDisposable
    {
        IEnumerable<Employee> GetAllEmployee();
        Employee GetEmployeeById(int studentId);
        int AddEmployee(Employee employeeEntity);
        int UpdateEmployee(Employee employeeEntity);
        void DeleteEmployee(int employeeId);
    }
}
EmployeeRepository.cs
using RepositoryWithMVC.Models;
using System;
using System.Collections.Generic;
using System.Data;
using System.Linq;
using System.Data.Entity;
using System.Web;

namespace RepositoryWithMVC.Repository
{
    public class EmployeeRepository : IEmployeeRepository
    {
        private readonly EmployeeContext _context;

        public EmployeeRepository(EmployeeContext context)
        {
            _context = context;
        }

        public IEnumerable<Employee> GetAllEmployee()
        {
            return _context.Employees.ToList();
        }
        public Employee GetEmployeeById(int studentId)
        {
            return _context.Employees.Find(studentId);
        }

        public int AddEmployee(Employee employeeEntity)

        {
            int result = -1;

            if (employeeEntity != null)
            {
                _context.Employees.Add(employeeEntity);
                _context.SaveChanges();
                result = employeeEntity.EmployeeId;
            }
            return result;

        }
        public int UpdateEmployee(Employee employeeEntity)
        {
            int result = -1;

            if (employeeEntity != null)
            {
                _context.Entry(employeeEntity).State = EntityState.Modified;
                _context.SaveChanges();
                result = employeeEntity.EmployeeId;
            }
            return result;
        }
        public void DeleteEmployee(int employeeId)
        {
            Employee employeeEntity = _context.Employees.Find(employeeId);
            _context.Employees.Remove(employeeEntity);
            _context.SaveChanges();

        }

        private bool disposed = false;

        protected virtual void Dispose(bool disposing)
        {
            if (!this.disposed)
            {
                if (disposing)
                {
                    _context.Dispose();
                }
            }
            this.disposed = true;
        }

        public void Dispose()
        {
            Dispose(true);

            GC.SuppressFinalize(this);
        }
    }
}
مرحله چهارم :
یک EmployeeController که مستقیم با Repository در ارتباط است را به پروژه اضافه کنید :
using RepositoryWithMVC.Models;
using RepositoryWithMVC.Repository;
using System;
using System.Collections.Generic;
using System.Linq;
using System.Web;
using System.Web.Mvc;

namespace RepositoryWithMVC.Controllers
{
    public class EmployeeController: Controller
    {
        private IEmployeeRepository _employeeRepository;

        public EmployeeController()
        {
            _employeeRepository = new EmployeeRepository(new Models.EmployeeContext());
        }
        public EmployeeController(IEmployeeRepository employeeRepository)
        {
            _employeeRepository = employeeRepository;
        }

        public ActionResult Index()
        {
            var model = _employeeRepository.GetAllEmployee();
            return View(model);
        }

        public ActionResult AddEmployee()
        {
            if (TempData["Failed"] != null)
            {
                ViewBag.Failed = "Add Employee Failed";
            }
            return View();
        }

        [HttpPost]
        public ActionResult AddEmployee(Employee model)
        {
            if (ModelState.IsValid) {
                int result = _employeeRepository.AddEmployee(model);
                if (result > 0) {
                    return RedirectToAction("Index", "Employee");
                } else {
                    TempData["Failed"] = "Failed";
                    return RedirectToAction("AddEmployee", "Employee");
                }
            }
            return View();
        }

        public ActionResult EditEmployee(int EmployeeId)
        {
            if (TempData["Failed"] != null) {
                ViewBag.Failed = "Edit Employee Failed";
            }
            Employee model = _employeeRepository.GetEmployeeById(EmployeeId);
            return View(model);
        }

        [HttpPost]
        public ActionResult EditEmployee(Employee model)
        {
            if (ModelState.IsValid) {
                int result = _employeeRepository.UpdateEmployee(model);
                if (result > 0) {
                    return RedirectToAction("Index", "Employee");
                } else {

                    return RedirectToAction("Index", "Employee");
                }
            }
            return View();
        }


        public ActionResult DeleteEmployee(int EmployeeId)
        {
            Employee model = _employeeRepository.GetEmployeeById(EmployeeId);
            return View(model);
        }

        [HttpPost]
        public ActionResult DeleteEmployee(Employee model)
        {
            if (TempData["Failed"] != null) {
                ViewBag.Failed = "Delete Employee Failed";
            }
            _employeeRepository.DeleteEmployee(model.EmployeeId);
            return RedirectToAction("Index", "Employee");
        }

    }
}
مرحله پنجم :
برای متدهای View ، Controller ایجاد میکنیم :
Index.cshtml
@model IEnumerable<RepositoryWithMVC.Models.Employee>
@{
ViewBag.Title = "Index";
} <div align="center">
<h3> سیستم مدیریت کارمندان </h3> <span> <a href="/Employee/AddEmployee" class="btn btn-success btn-sm"> اضافه کردن کارمند جدید </a></span>
<br />
<br />
<table cellpadding="5"
border="1">
<tr style="background-color:#808080; color:white;">
<td>
شناسه کارمندی
</td>
<td>
نام
</td>
<td>
آدرس
</td>
<td>
ایمیل
</td>
<td>
دستورات
</td>
</tr>
@foreach (var emp in Model)
{
<tr>
<td>
@emp.EmployeeId
</td>
<td>
@emp.EmployeeName
</td>
<td>
@emp.Address
</td>
<td>
@emp.EmailId
</td>
<td>
@*<a href = "@Url.Action("EditEmployee", "Employee ", new { id = emp.EmployeeId })" > Edit </a>*@
 @Html.ActionLink("ویرایش", "EditEmployee", new { id = emp.EmployeeId },new{@class="btn btn-warning btn-sm"})
  
@Html.ActionLink("حذف", "DeleteEmployee", new { id = emp.EmployeeId },new{@class="btn btn-danger btn-sm"}) 
</td>
</tr>
}
</table>
</div>
AddEmployee.cshtml
@model RepositoryWithMVC.Models.Employee
@{

    ViewBag.Title = "AddEmployee";
}

<div align = "center" >
    <h3 > مدیریت کارمندان</h3> <br/>
    <b> اضافه کردن کارمند جدید </b> <br/>
    <br/>

@{

    ViewBag.Title = "AddEmployee";
}

<div align = "center" >

    <br/>

@using (Html.BeginForm("AddEmployee", "Employee", FormMethod.Post))
{ <table >
    <tr >
    <td colspan = "2" >
    @if (ViewBag.Failed != null)
    { <span style = "color:red;" > @ViewBag.Failed </span>
    } </td> </tr> <tr >
    <td >
    @Html.LabelFor(e => e.EmployeeName) </td> <td >
    @Html.TextBoxFor(e => e.EmployeeName) <br/>
    @Html.ValidationMessageFor(e => e.EmployeeName, null, new { style = "color:red ;"})
    </td> </tr> <tr >
    <td >
    @Html.LabelFor(e => e.Address) </td> <td >
    @Html.TextBoxFor(e => e.Address) <br/>
    @Html.ValidationMessageFor(e => e.EmployeeName, null, new
       {
           style = "color:red;"
       }) </td> </tr> <tr >
    <td >
    @Html.LabelFor(e => e.EmailId) </td> <td >
    @Html.TextBoxFor(e => e.EmailId) <br/>
    @Html.ValidationMessageFor(e => e.EmployeeName, null, new
       {
           style = "color:red;"
       }) </td> </tr> <tr >
    <td colspan = "2"
    align = "center" >
    <br/>
    <input type = "submit" class="btn btn-success btn-sm"
    value = "ثبت"/>
    </td> </tr> </table>
    } </div>  </div>
EditEmployee.cshtml
@model RepositoryWithMVC.Models.Employee
@{

    ViewBag.Title = "Edit Employee";
}

<div align = "center" >
    <h3 >مدیریت کارمندان</h3> <br/>
    <b> ویرایش کارمندان </b> <br/>
    <br/>

@using (Html.BeginForm("EditEmployee", "Employee", FormMethod.Post))
{
    @Html.HiddenFor(e => e.EmployeeId) <table>
    <tr >
    <td colspan = "2" >
    @if (ViewBag.Failed != null)
    { <span style = "color:red;" > @ViewBag.Failed </span>
    } </td> </tr> <tr>
    <td >
    @Html.LabelFor(e => e.EmployeeName) </td> <td>
    @Html.TextBoxFor(e => e.EmployeeName) <br/>
    @Html.ValidationMessageFor(e => e.EmployeeName, null, new
       {
           style = "color:red;"
       }) </td> </tr> <tr >
    <td>
    @Html.LabelFor(e => e.Address) </td> <td>
    @Html.TextBoxFor(e => e.Address) <br/>
    @Html.ValidationMessageFor(e => e.EmployeeName, null, new
       {
           style = "color:red;"
       }) </td> </tr> <tr>
    <td>
    @Html.LabelFor(e => e.EmailId) </td> <td>
    @Html.TextBoxFor(e => e.EmailId) <br/>
    @Html.ValidationMessageFor(e => e.EmployeeName, null, new
       {
           style = "color:red;"
       }) </td> </tr> <tr>
    <td colspan = "2"
    align = "center" >
    <br/>
    <input type = "submit" class="btn btn-primary btn-sm"
    value = "بروزرسانی"/>
    </td> </tr> </table>
    } </div>
DeleteEmployee.cshtml
@model RepositoryWithMVC.Models.Employee
@{

    ViewBag.Title = "Delete Employee";
}

<div align = "center" >
    <h3 > مدیریت کارمندان </h3> <br/>


@using (Html.BeginForm("DeleteEmployee", "Employee", FormMethod.Post))
{
    @Html.HiddenFor(e => e.EmployeeId) <table border = "1"
    cellpadding = "10" >
    <tr >
    <td colspan = "2"
    align = "center" >
    <b > حذف کارمندان </b>
    @if (ViewBag.Failed != null)
    { <span style = "color:red;" > @ViewBag.Failed </span>
    } </td> </tr> <tr >
    <td >
    @Html.LabelFor(e => e.EmployeeName) </td> <td >
    @Html.TextBoxFor(e => e.EmployeeName, new
       {
           @readonly = "readonly"
       })

    </td> </tr> <tr >
    <td >
    @Html.LabelFor(e => e.Address) </td><td >
    @Html.TextBoxFor(e => e.Address, new
       {
           @readonly = "readonly"
       })

    </td> </tr> <tr >
    <td >
    @Html.LabelFor(e => e.EmailId) </td> <td >
    @Html.TextBoxFor(e => e.EmailId, new
       {
           @readonly = "readonly"
       })

    </td> </tr> <tr >
    <td colspan = "2"
    align = "center" >
    <br/>
    <input type = "submit" class="btn btn-danger btn-sm"
    value = "حذف"/>
    </td> </tr> </table>
    } </div>
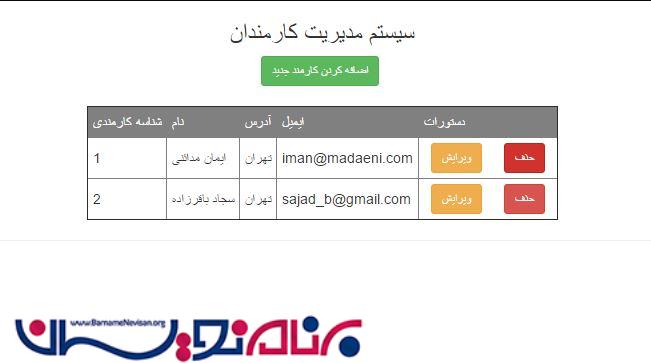
خروجی برنامه بصورت زیر خواهد شد :
آموزش asp.net mvc

- ASP.net MVC
- 4k بازدید
- 9 تشکر