ایجاد stopwatch در اندروید
پنجشنبه 21 اردیبهشت 1396در این مقاله قصد داریم که یک کرنومتر در اندروید ایجاد نماییم این کرنومتر یک دکمه شروع یک دکمه توقف و یک دکمه برای دوباره کار کردن و صفر شدن زمان دارد و یک دکمه هم برای ثبت زمان ها استفاده می شود.

ابتدا در این سمپل می خواهیم در مورد خود سمپل توضیح بدهیم که این مثال چه امکاناتی را برای شما فراهم می کند:
1- شروع زمان
2-توقف زمان
3-از سرگیری زمان
4-ثبت زمان های اندازه گیری شده
در کلاس جاوا قطعه کد زیر را قرار دهید:
import android.os.Bundle;
import android.os.SystemClock;
import android.support.v7.app.AppCompatActivity;
import android.view.View;
import android.widget.ArrayAdapter;
import android.widget.Button;
import android.widget.ListView;
import android.widget.TextView;
import android.os.Handler;
import java.util.Arrays;
import java.util.List;
import java.util.ArrayList;

public class MainActivity extends AppCompatActivity {

    TextView textView ;

    Button start, pause, reset, lap ;

    long MillisecondTime, StartTime, TimeBuff, UpdateTime = 0L ;

    Handler handler;

    int Seconds, Minutes, MilliSeconds ;

    ListView listView ;

    String[] ListElements = new String[] {  };

    List<String> ListElementsArrayList ;

    ArrayAdapter<String> adapter ;

    @Override
    protected void onCreate(Bundle savedInstanceState) {
        super.onCreate(savedInstanceState);
        setContentView(R.layout.activity_main);

        textView = (TextView)findViewById(R.id.textView);
        start = (Button)findViewById(R.id.button);
        pause = (Button)findViewById(R.id.button2);
        reset = (Button)findViewById(R.id.button3);
        lap = (Button)findViewById(R.id.button4) ;
        listView = (ListView)findViewById(R.id.listview1);

        handler = new Handler() ;

        ListElementsArrayList = new ArrayList<String>(Arrays.asList(ListElements));

        adapter = new ArrayAdapter<String>(MainActivity.this,
                android.R.layout.simple_list_item_1,
                ListElementsArrayList
        );

        listView.setAdapter(adapter);

        start.setOnClickListener(new View.OnClickListener() {
            @Override
            public void onClick(View view) {

                StartTime = SystemClock.uptimeMillis();
                handler.postDelayed(runnable, 0);

                reset.setEnabled(false);

            }
        });

        pause.setOnClickListener(new View.OnClickListener() {
            @Override
            public void onClick(View view) {

                TimeBuff += MillisecondTime;

                handler.removeCallbacks(runnable);

                reset.setEnabled(true);

            }
        });

        reset.setOnClickListener(new View.OnClickListener() {
            @Override
            public void onClick(View view) {

                MillisecondTime = 0L ;
                StartTime = 0L ;
                TimeBuff = 0L ;
                UpdateTime = 0L ;
                Seconds = 0 ;
                Minutes = 0 ;
                MilliSeconds = 0 ;

                textView.setText("00:00:00");

                ListElementsArrayList.clear();

                adapter.notifyDataSetChanged();
            }
        });

        lap.setOnClickListener(new View.OnClickListener() {
            @Override
            public void onClick(View view) {

                ListElementsArrayList.add(textView.getText().toString());

                adapter.notifyDataSetChanged();

            }
        });

    }

    public Runnable runnable = new Runnable() {

        public void run() {

            MillisecondTime = SystemClock.uptimeMillis() - StartTime;

            UpdateTime = TimeBuff + MillisecondTime;

            Seconds = (int) (UpdateTime / 1000);

            Minutes = Seconds / 60;

            Seconds = Seconds % 60;

            MilliSeconds = (int) (UpdateTime % 1000);

            textView.setText("" + Minutes + ":"
                    + String.format("%02d", Seconds) + ":"
                    + String.format("%03d", MilliSeconds));

            handler.postDelayed(this, 0);
        }

    };

}
حالا در کلاس xml باید قطعه کد زیر را قرار دهید:
<RelativeLayout xmlns:android="http://schemas.android.com/apk/res/android"
    xmlns:tools="http://schemas.android.com/tools"
    android:id="@+id/activity_main"
    android:layout_width="match_parent"
    android:layout_height="match_parent"
    android:paddingBottom="@dimen/activity_vertical_margin"
    android:paddingLeft="@dimen/activity_horizontal_margin"
    android:paddingRight="@dimen/activity_horizontal_margin"
    android:paddingTop="@dimen/activity_vertical_margin"
    tools:context="com.android_examples.stopwatch_android_examplescom.MainActivity"
    android:background="#ECEFF1">

    <TextView
        android:text="00:00:00"
        android:layout_width="wrap_content"
        android:layout_height="wrap_content"
        android:id="@+id/textView"
        android:textSize="50dp"
        android:textStyle="bold"
        android:textColor="#009688"
        android:layout_alignParentTop="true"
        android:layout_centerHorizontal="true" />

    <Button
        android:text="Start"
        android:layout_width="wrap_content"
        android:layout_height="wrap_content"
        android:layout_below="@+id/textView"
        android:layout_alignParentLeft="true"
        android:layout_alignParentStart="true"
        android:layout_marginTop="41dp"
        android:id="@+id/button" />

    <Button
        android:text="Pause"
        android:layout_width="wrap_content"
        android:layout_height="wrap_content"
        android:id="@+id/button2"
        android:layout_alignBaseline="@+id/button"
        android:layout_alignBottom="@+id/button"
        android:layout_centerHorizontal="true" />

    <Button
        android:text="Reset"
        android:layout_width="wrap_content"
        android:layout_height="wrap_content"
        android:layout_alignTop="@+id/button2"
        android:layout_alignParentRight="true"
        android:layout_alignParentEnd="true"
        android:id="@+id/button3" />

    <Button
        android:text="Save Lap"
        android:layout_width="fill_parent"
        android:layout_height="wrap_content"
        android:layout_marginTop="24dp"
        android:id="@+id/button4"
        android:layout_below="@+id/button"
        android:layout_centerHorizontal="true" />

    <ListView
        android:layout_width="match_parent"
        android:layout_height="match_parent"
        android:layout_below="@+id/button4"
        android:layout_centerHorizontal="true"
        android:layout_marginTop="12dp"
        android:id="@+id/listview1"/>

</RelativeLayout>
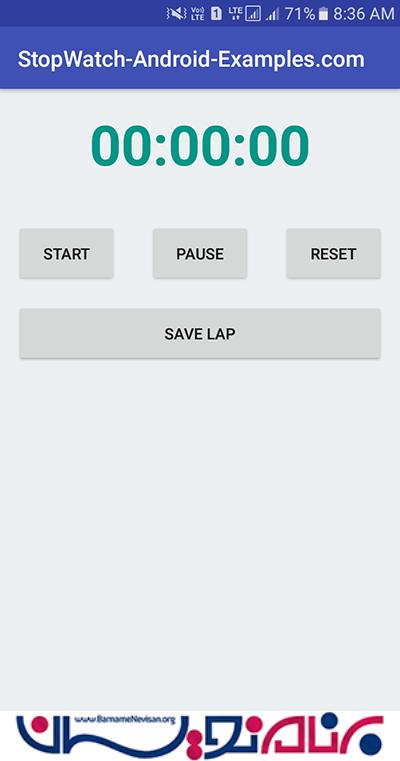
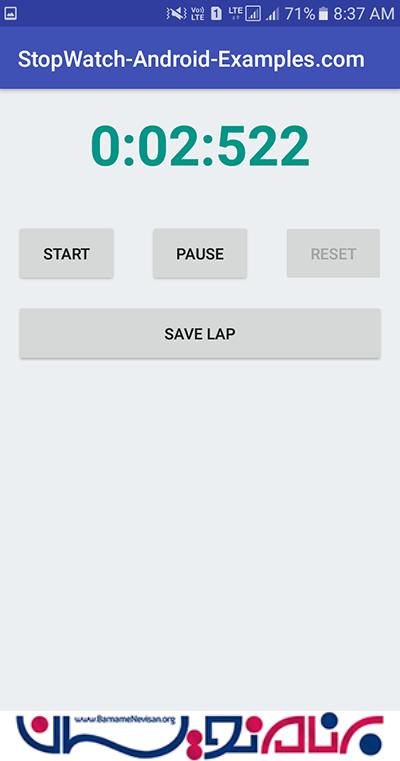
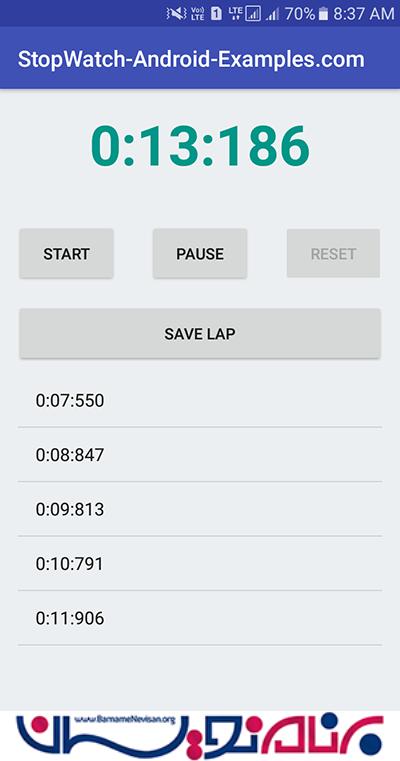
خروجی کار به صورت زیر خواهد بود:

- Android
- 2k بازدید
- 1 تشکر