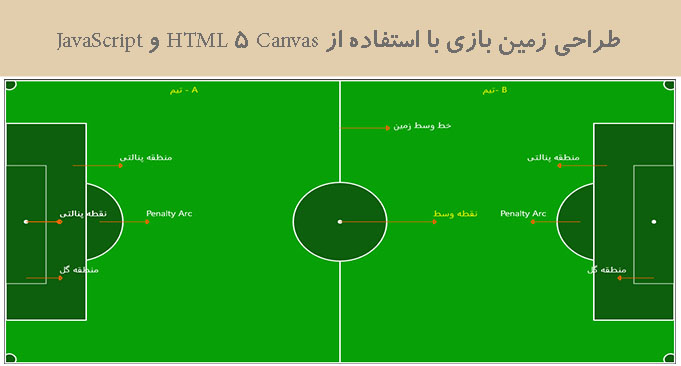
طراحی زمین بازی با استفاده از HTML 5 Canvas و JavaScript
چهارشنبه 4 مرداد 1396در این مقاله، ما قصد رسم یک طرح گرافیکی زمین بازی فوتبال با بررسی کدهای آن با استفاده از HTML 5 Canvas و JavaScript آموزش بدهیم.

در ظاهر ، Canvas چیزی بیشتر از یک عنصر HTML نیست اما بسیار قدرتمند است و به وسیله آن میتوان هر نوع طرح گرافیکی را رسم کرد. اساسا برای طراحی گرافیک به کمک JavaScript میتواند هر گرافیکی را طراحی کند.
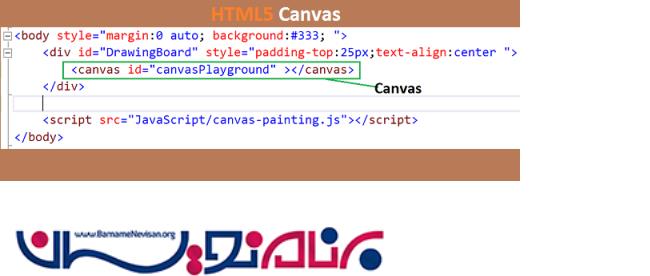
همانند سایر عناصر HTML ، ما میتوانیم خاصیت هایی همچون height و width و id و style ها و دیگر ویژگی ها را به آن تخصیص بدهیم.ما این را میتوانیم در تصویر زیر که در آن ما "canvasPlayground" را به عنوان id کانوس (canvas) ذکر کردیم ، درک کنیم.

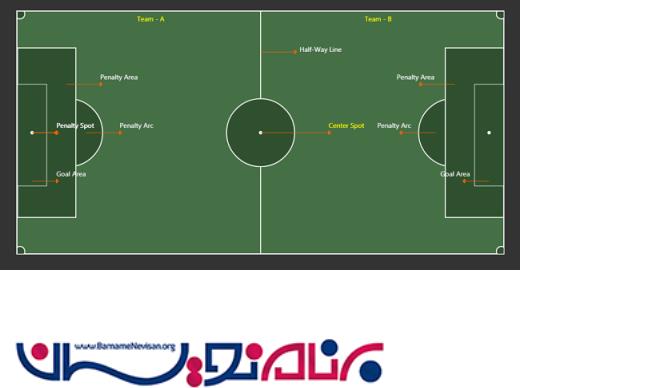
ما اطلاعات کمی راجبه زمین فوتبال مانند منطقه پنالتی (penalty area) ، نقطه پنالتی (penalty spot) ، منطقه گل (goal area) و خیلی چیزهای دیگر داریم که می توانیم با استفاده از کدنویسی پیاده سازی کنیم.
راه های متفاوتی برای پیاده سازی این طرح موجود است اما برای این مقاله ما از HTML5 canvas به همراه JavaScript استفاده میکنیم.

نکته
در این مقاله ، ما قصد داریم یک زمین بازی فوتبال به همین صورت ولی با رنگ متفاوت رسم کنیم.
قبل از شروع
قبل از اینکه بخواهیم طراحی زمین بازی فوتبال را شروع کنیم ، اجازه دهید که اطلاعاتی در رابطه با مفهوم اصول canvas و متدهای که قصد داریم از آن ها برای رسم اشیاء استفاده کنیم کسب کنیم.عنصر <canvas> یک سایز ثابت از سطح طراحی ایجاد میکند که ممکن است در زمینه 2 یا 3 بعدی باشد.اما در این مقاله ، ما میخواهیم در رابطه با زمینه 2 بعدی صحبت کنیم.
ما می توانیم انواع مختلف اشکال و متن را بسازیم اما در این مقاله تنها از موارد زیر استفاده خواهیم کرد.
1)Circle
برای رسم شکل دایره ای بر روی canvas در این مقاله ما قصد داریم که از شی circle برای رسم نقطه وسط و قوس پنالتی استفاده کنیم.
2)Rectangle
ما میتوانیم از شی Rectangle برای جاهایی که نیاز به رسم مستطیل است استفاده کنیم.در این مقاله ما قصد داریم از این شی برای رسم منطقه پنالتی ، منطقه گل و زمین اصلی استفاده کنیم.
3)Line
ما در canvas با استفاده از شی Line ، خط را رسم میکنیم و میخواهیم از این تابع برای رسم خط وسط زمین و همچنین یک خط با پیکان که به وسیله آن نام منطقه زمین را مشخص کنیم ، استفاده کنیم.
4)Text
ما میتوانیم متن را نیز بسازیم.بنابراین در این مقاله ، ما برای نشان دادن اطلاعات مربوط به زمین از این تابع استفاده میکنیم.
عنصر <canvas> یک متد دارد که ()getContext نام دارد که برای رندر کردن زمینه و توابع طراحی آن مورد استفاده قرار میگیرد.
متد ()getContext یک پارامتر به عنوان نوع زمینه که ممکن است 2 یا 3 بعدی باشد.
مثال)
var canvasElement = document.getElementById("canvasPlayground");
var context = canvasPlayground.getContext("2d");
تمام آخرین نسخه های مرورگر canvas را پشتیبانی میکنند.احتمالا که IE8 از canvas پشتیبانی نمیکند.بنابراین ، با کد زیر میتوانیم بررسی کنیم که مرورگر از canvas پشتیبانی میکند یا خیر.
//بررسی میکند که مرورگر  canvas را پشتیبانی میکند یا خیر!
if(canvasElement.getContext){
     //This browser has support for canvas
}
else{
     //it doesn't have support for canvas
}
بعضی از ما (مبتدیان) ممکن است نسبت به canvas شناخت کافی نداشته باشیم، بنابراین نگاهی مختصر به برخی از توابع اساسی که در این مقاله قصد استفاده از ان ها را داریم را ، میکنیم.
فهرست توابعی که در این مقاله قصد داریم از ان ها استفاده کنیم :
1)()beginPath
از این تابع برای ایجاد یک مسیر جدید ، بعد از اینکه ما توانستیم مسیر را به وسیله یکی از توابع ()moveTo و ()lineTo یا هر تابع دیگر تغییر دهیم ، استفاده میشود.
//...
context.beginPath();
//...
2)(moveTo(xPostion, yPosition
از این تابع در انتقال pen به یک مختصات مشخص استفاده میشود.اساسا ، ما از این تابع برای نقطه شروع استفاده میکنیم اما ما میتوانیم از این تابع زمانیکه نیاز به تغییر جهت مسیر داریم نیز استفاده میکنیم.
context.moveTo(0,0);
3)(lineTo(xPostion, yPosition
از این تابع برای رسم خط مستقیم استفاده می شود.این متد دو ارگومان دریافت میکند که یکی از آن ها xPostion و دیگری yPosition است ، که این ارگومان ها مختصات نقطه انتهایی خط هستند.
//...
context.lineTo(0,0);
context.lineTo(100,0)

//..
fill()
از این تابع برای رسم مسیر های تو پر(Solid) با پر کردن مساحت آن مسیر استفاده می شود.
fillStyle()
از این تابع برای پر کردن رنگ پس زمینه استفاده میشود
stroke()
از این تابع برای رسم شکل با استفاده از طرح کلی (outline) و حاشیه (border) استفاده میشود.
strokeStyle()
این برای پر کردن رنگ stroke (حالت stroke همون سایه دور نوشته است) دور استفاده میشود.
lineWidth():این برای تغییر عرض خط stroke استفاده می شود.
(arc(xPos, yPos, radius, startAngle, endAngle, anticlockwise
برای رسم قوس ها یا دایره ها ما میتوانیم از توابع ()arc یا ()arcTo استفاده کنیم.
(fillRect(xPos, yPos, width, height
از این تابع برای رسم مستطیل از یک نقطه مشخص با مختصات x و y خاص و با ابعاد ذکر شده استفاده میشود.
(strokeRect(x, y, width, height
از این تابع برای پر کردن دور مستطیل استفاده میشود.
(clearRect(x, y, width, height
از این تابع برای پاک کردن ناحیه مستطیل خاص با شفاف کردن آن استفاده می شود.
اجازه دهید که قدم به قدم نحوه طراحی یک زمین بازی فوتبال با استفاده از Canvas را شروع کنیم:
در این مقاله ما قصد داریم که از ویژال استودیو 2013 استفاده کنیم اما این کار احباری نیست.این کار را با استفاده از Notepad و به همراه هر مرورگری نیز میتوانیم انجام دهید.
قدم اول
ابتدا یک صفحه با نام index.html ایجاد کنید و کد های زیر را در آن قرار دهید.
<!DOCTYPE html>
<html xmlns="http://www.w3.org/1999/xhtml">
<head>
    <title></title>
</head>
<body style="margin:0 auto; background:#333; ">
    <div id="DrawingBoard" style="padding-top:25px;text-align:center ">
        <canvas id="canvasPlayground" ></canvas>
    </div>

    <script src="JavaScript/canvas-painting.js"></script>
</body>
</html>
قدم دوم
یک فایل جدید javascript ایجاد کنید و نام آن را canvas-painting.js قرار دهید یا هر نامی که برای ان مورد نظرتان است انتخاب کنید و سپس رفرنس های داده شده را به روز رسانی کنید.
قدم سوم
برای اینکه یک محاسبه عملی و متمرکز ایجاد کنیم ما قصد داریم که چند متغییر که در هنگام رسم زمین از این ها استفاده خواهد شد تعریف کنیم.
بنابریان کد های زیر را در فایل javascript خود قرار دهبد.
var _height=500;//height of the canvas
var _width = 1000; //width of the canvas
var x1 = 0, y1 = 0, x2; y2 = 0;

var canvas = {
    width: _width,
    height: _height,
    halfWidth: _width / 2,
    lineWith: 2,
    backgorund: { Default: "#08a107", Orange: "#f60", Green: "#f80" },
    borerColor: { White: "#fff", Green: "#f80" },
    colorMap: { Orange: "#f60", Green: "#f80" }
};
var common = {
    fillColor: { Default: "#0d5f0c", Green: "green", Red: "red", Orange: "#f60", White: "#fff" },
    borderColor: "#fff",
    fontFamily: " 'Segoe UI',Arial,sans-serif",
    font: { Default: "12px 'Segoe UI',Arial,sans-serif", Heading: "14px 'Segoe UI',Arial,sans-serif" },
    lineWidth: { Pixel1: 1, Pixel2: 2, Pixel3:3, Pixel4: 4, Pixel5: 5 },
    arrowLength:{Default:70,Pixel50:50}
};

var penaltyArea = {
    height: Math.ceil((canvas.height * 70) / 100),
    width: Math.ceil((canvas.width * 12) / 100),
    yPosition: Math.ceil(((canvas.height * 30) / 100) / 2),
    xPosition: { TeamA: 0, TeamB: canvas.width - Math.ceil((canvas.width * 12) / 100) }
};
var goalArea = {
    height: Math.ceil((penaltyArea.height * 60)/100),
    width: Math.ceil(penaltyArea.width / 2),
    yPositon: (canvas.height - penaltyArea.height),
    xPosition: { TeamA: 0, TeamB: Math.ceil(canvas.width - (penaltyArea.width / 2)) }
};
var penaltyArc = {
    xPosition: { TeamA: penaltyArea.width - goalArea.width / 4, TeamB: canvas.width - penaltyArea.width + goalArea.width / 4 },
    yPosition: canvas.height/2,
    radius:goalArea.height/3
};

var groundCorner={
    radius:Math.ceil((canvas.height*2)/100)
};
قدم چهارم
حالا کدهای زیر را نیز به فایل javascript خود اضافه کنید چون ما از این متغییر ها در توابع اینده استفاده خواهیم کرد.
var captioinText = "";
var canvasElement = document.getElementById("canvasPlayground");
var context = canvasPlayground.getContext("2d");
قدم پنجم
حالا یک تابع با نام ()playgorund ایجاد میکنیم و بعد از آن متد هایی که برای رسم کردن زمین بازی از ان ها استفاده میکنیم را می افزاییم.نام این متد ها در زیر امده است:
1)()setGroundStyles:برای تنظیم ارتفاع ، عرض و استایل های پس زمینه canvas استفاده میشود.
2)()drawCenterSpot:برای رسم نقطه مرکز زمین از منطقه مرکزی زمین استفاده میشود.
3)()drawCorner:برای رسم قوس در هر چهار گوشه زمین مورد استفاده قرار میگیرد.
4)()drawPenaltyArea:برای رسم قوس پنالتی در هر دو تیم مورد استفاده قرار میگیرد.
5)()drawGoalArea:برای رسم منطقه گل برای هر دو تیم مورد استفاده قرار میگیرد.
6)()drawPenaltyArc:برای رسم پنالتی در هر دو منطقه پنالتی مورد استفاده قرار میگیرد.
7)()drawPenaltySpot:برای رسم نقطه پنالتی در هر دو تیم استفاده می شود.
8)()writeText:منطقه ای از زمین را براساس نام ان نمایش میدهد.
9)()drawLine:برای رسم خطوط مانند خط وسط زمین مورد استفاده قرار میگیرد.
10)()drawArrowLine:برای رسم پیکان خط به متن مورد استفاده قرار میگیرد.
11)()drawCaptionForTeamA;
12)()drawCaptionForTeamA;
function playground() {

}
playground.prototype.setGroundStyles = function () {
    canvasElement.setAttribute("width", canvas.width);
    canvasElement.setAttribute("height", canvas.height);
    canvasElement.style.border = "2px solid " + canvas.borerColor.White;
    canvasElement.style.margin = "auto 25px";
    canvasElement.style.background = canvas.backgorund.Default;
}
playground.prototype.drawCenterSpot = function (xAxis, yAxis, radius) {
    context.beginPath();
    context.arc(xAxis, yAxis, radius, 0, 2 * Math.PI);
    context.fillStyle = common.fillColor.Default;
    context.fill();
    context.lineWidth = common.lineWidth.Pixel2;
    context.strokeStyle = common.borderColor;
    context.stroke();
}

playground.prototype.drawCorner = function (xAxis, yAxis) {
    context.beginPath();
    context.arc(xAxis, yAxis, groundCorner.radius, 0, 2 * Math.PI);
    context.fillStyle = common.fillColor.Default;
    context.fill();
    context.lineWidth = common.lineWidth.Pixel2;
    context.strokeStyle = common.borderColor;
    context.stroke();

}
//Rectangular Area
playground.prototype.drawPenaltyArea = function (xAxis, yAxis) {
    context.beginPath();
    context.fillStyle = common.fillColor.Default;
    context.fill();
    context.fillRect(xAxis, yAxis, penaltyArea.width, penaltyArea.height);
    context.lineWidth = common.lineWidth.Pixel2;
    context.strokeStyle = common.borderColor;
    context.strokeRect(xAxis, yAxis, penaltyArea.width, penaltyArea.height);
}
playground.prototype.drawGoalArea = function (xAxis, yAxis) {
    context.beginPath();
    context.fillStyle = common.fillColor.Default;
    context.fill();
    context.fillRect(xAxis, yAxis, goalArea.width, goalArea.height);
    context.lineWidth = common.lineWidth.Pixel1;
    context.strokeStyle = common.borderColor;
    context.strokeRect(xAxis, yAxis, goalArea.width, goalArea.height);
}
playground.prototype.drawPenaltyArc = function (xAxis, yAxis, radius) {
    context.beginPath();
    context.arc(xAxis, yAxis, radius, 0, 2 * Math.PI);
    context.fillStyle = common.fillColor.Default;
    context.fill();
    context.lineWidth = common.lineWidth.Pixel2;
    context.strokeStyle = common.borderColor;
    context.stroke();

}
playground.prototype.drawPenaltySpot = function (xAxis, yAxis, radius) {
    context.beginPath();
    context.arc(xAxis, yAxis, radius, 0, 2 * Math.PI);
    context.fillStyle = common.fillColor.Default;
    context.fill();
    context.lineWidth = common.lineWidth.Pixel3;
    context.strokeStyle = common.borderColor;
    context.stroke();
}

playground.prototype.writeText = function (text, xAxis, yAxis, font,color) {
    font = (typeof font == 'undefined') ? common.font.Default : font;
    color = (arguments.length >= 5) ? color : common.fillColor.White;
    context.font = font;
    context.fillStyle = color;
    context.fillText(text, xAxis, yAxis);

}
playground.prototype.drawLine = function (x1, y1, x2, y2) {
    context.beginPath();
    context.moveTo(x1, y1);
    context.lineTo(x2, y2);
    context.stroke();
    context.lineWidth = common.lineWidth;
    context.fillStyle = common.fillColor.White;
    context.fill();
}
playground.prototype.drawArrowLine = function (x1, y1, x2, y2, isReverseArrow) {
    context.beginPath();
    context.moveTo(x1, y1);
    context.lineTo(x2, y2);
    context.strokeStyle = common.fillColor.Orange;
    context.lineWidth = common.lineWidth.Pixel1;
    context.stroke();

    var x2ofLine = x2;
    var y2OfLine = y2;

    if (!isReverseArrow) {
        for (var i = 0; i <= 2; i++) {
            x1 = x2ofLine;
            y1 = ((i == 0) || (i == 2)) ? (y2OfLine - 4) : (y2OfLine + 4);
            x2 = (i == 2) ? (x2ofLine) : (x2ofLine + 4);
            y2 = (i == 2) ? (y2OfLine + 4) : y2OfLine;

            context.beginPath();
            context.moveTo(x1, y1);
            context.lineTo(x2, y2);
            context.lineWidth = common.lineWidth.Pixel2;
            context.strokeStyle = common.fillColor.Orange
            context.stroke();
        }
    }
    else {
        for (var i = 0; i <= 2; i++) {
            x1 = x2ofLine;
            y1 = ((i == 0) || (i == 2)) ? (y2OfLine + 4) : (y2OfLine - 4);
            x2 = (i == 2) ? (x2ofLine) : (x2ofLine - 4);
            y2 = (i == 2) ? (y2OfLine - 4) : y2OfLine;

            context.beginPath();
            context.moveTo(x1, y1);
            context.lineTo(x2, y2);
            context.lineWidth = 2;
            context.strokeStyle = common.fillColor.Orange;
            context.stroke();
        }
    }

}

playground.prototype.drawCaptionForTeamA = function (ground) {
    //Caption for Penalty Area
    x1 = penaltyArea.width - 20;
    y1 = canvas.height - penaltyArea.height;
    x2 = x1 + common.arrowLength.Default;
    y2 = y1;
    ground.drawArrowLine(x1, y1, x2, y2, false);
    captioinText = "Penalty Area";
    ground.writeText(captioinText, x2, y2 - 10, common.font.Heading);

    //Caption for Goal Area
    x1 = goalArea.width - goalArea.width / 2;
    y1 = canvas.height - goalArea.height + 60;
    x2 = x1 + common.arrowLength.Pixel50;
    y2 = y1;
    ground.drawArrowLine(x1, y1, x2, y2, false);
    captioinText = "Goal Area";
    ground.writeText(captioinText, x2, y2 - 10, common.font.Heading);

    //Caption for Penalty Arc
    x1 = penaltyArea.width + 20;
    y1 = canvas.height / 2;
    x2 = x1 + common.arrowLength.Default;
    y2 = y1;
    ground.drawArrowLine(x1, y1, x2, y2, false);
    captioinText = "Penalty Arc";
    ground.writeText(captioinText, x2, y2 - 10, common.font.Heading);

    //Caption for Penalty Spot
    x1 = goalArea.width / 2;
    y1 = canvas.height / 2;
    x2 = x1 + common.arrowLength.Pixel50;
    y2 = y1;
    ground.drawArrowLine(x1, y1, x2, y2, false);
    captioinText = "Penalty Spot";
    ground.writeText(captioinText, x2, y2 - 10, common.font.Heading);
}


playground.prototype.drawCaptionForTeamB = function (ground) {

    //Caption for Penalty Area
    x1 = canvas.width - penaltyArea.width + 20;
    y1 = canvas.height - penaltyArea.height ;
    x2 = x1 - common.arrowLength.Default;
    y2 = y1;
    ground.drawArrowLine(x1, y1, x2, y2, true );
    captioinText = "Penalty Area";
    ground.writeText(captioinText, x2 - 50, y2 - 10, common.font.Heading);

    //Caption for Goal Area
    x1 = canvas.width - goalArea.width/2;
    y1 = canvas.height - goalArea.height + 60;
    x2 = x1 - common.arrowLength.Pixel50;
    y2 = y1;
    ground.drawArrowLine(x1, y1, x2, y2, true);
    captioinText = "Goal Area";
    ground.writeText(captioinText, x2-50, y2 - 10, common.font.Heading);

    //Caption for Penalty Arc
    x1 = canvas.width -  penaltyArea.width -20;
    y1 = canvas.height / 2;
    x2 = x1 - common.arrowLength.Default;
    y2 = y1;
    ground.drawArrowLine(x1, y1, x2, y2, true);
    captioinText = "Penalty Arc";
    ground.writeText(captioinText, x2 -50, y2 - 10, common.font.Heading);

    //Caption for Penalty Spot
    x1 = goalArea.width / 2;
    y1 = canvas.height / 2;
    x2 = x1 + common.arrowLength.Pixel50;
    y2 = y1;
    ground.drawArrowLine(x1, y1, x2, y2, true);
    captioinText = "Penalty Spot";
    ground.writeText(captioinText, x2, y2 - 10, common.font.Heading);
}
قدم ششم
کد های زیر را که قرار است با استفاده از آن ها زمین بازی فوتبال را رسم کنیم بدون هیچ تغییری در ()window load قرار دهید.
window.onload = function () {
    var xPos = 0;
    var yPos = 0;
    var ground = new playground();
    ground.setGroundStyles();
    setTimeout(function () {
        //First draw all corners
        ground.drawCorner(5, 5);//Left Top
        ground.drawCorner(5, canvas.height - 5); //Bottom Left
        ground.drawCorner(canvas.width - 5, 5); //Top Right
        ground.drawCorner(canvas.width - 5, canvas.height - 5); //Bottom Right

        //Now draw ground devider after 500 ms
        setTimeout(function () {
            //Half-way line
            ground.drawLine(canvas.width / 2, 0, canvas.width / 2, canvas.height);
            captioinText = "Half-Way Line";
            xPos = (canvas.width / 2) + common.arrowLength.Default;
            yPos = canvas.height / 6;

            //Now draw center spot
            setTimeout(function(){
                ground.drawArrowLine(canvas.halfWidth, yPos, xPos, yPos);
                ground.writeText(captioinText, xPos + 10, yPos, common.font.Heading);
                ground.drawCenterSpot(canvas.width / 2, canvas.height / 2, penaltyArc.radius);
                ground.drawPenaltySpot(canvas.width / 2, canvas.height / 2, 2);

                //Draw Team a Penaly Areas
                setTimeout(function () {
                    //Team-A
                    captioinText = "Team - A";
                    xPos = Math.ceil((canvas.width) / 4) - Math.ceil(captioinText.length / 2);
                    yPos = 20;
                    ground.writeText(captioinText, xPos, yPos, common.font.Heading, "Yellow");
                    ground.drawPenaltyArc(penaltyArc.xPosition.TeamA, penaltyArc.yPosition, penaltyArc.radius);
                    ground.drawPenaltyArea(penaltyArea.xPosition.TeamA, penaltyArea.yPosition);
                    ground.drawGoalArea(goalArea.xPosition.TeamA, goalArea.yPositon);
                    ground.drawPenaltySpot(goalArea.width / 2, canvas.height / 2, 2);
                    ground.drawCaptionForTeamA(ground);

                    ////Draw Team a Penaly Areas
                    setTimeout(function () {
                        //Team*B
                        captioinText = "Team - B";
                        xPos = canvas.width - canvas.width / 3.5;
                        ground.writeText(captioinText, xPos, yPos, common.font.Heading, "Yellow");
                        ground.drawPenaltyArc(penaltyArc.xPosition.TeamB, penaltyArc.yPosition, penaltyArc.radius);
                        ground.drawPenaltyArea(penaltyArea.xPosition.TeamB, penaltyArea.yPosition);
                        ground.drawGoalArea(goalArea.xPosition.TeamB, goalArea.yPositon);
                        ground.drawPenaltySpot(canvas.width - (goalArea.width / 2), canvas.height / 2, 2);
                        ground.drawCaptionForTeamB(ground);

                        setTimeout(function () {
                            //Draw Captions for Center Spot
                            ground.drawArrowLine(canvas.halfWidth, canvas.height / 2, canvas.halfWidth + penaltyArc.radius * 2, canvas.height / 2, false);
                            captioinText = "Center Spot";
                            xPos = canvas.halfWidth + penaltyArc.radius * 2;
                            yPos = (canvas.height / 2) - 10;
                            ground.writeText(captioinText, xPos, yPos, common.font.Heading, "yellow");
                        }, 500);

                    }, 500);

                }, 1000);

            },500);

        }, 500);

    }, 5000);

}
شما میتوانید ببینید که ما از تابع setTimeout برای رسم شی یکی پس از دیگری استفاده میکنیم.
- HTML
- 3k بازدید
- 2 تشکر
