پیاده سازی عملیات CRUD با استفاده ازDapper در MVC
چهارشنبه 11 مرداد 1396در این مقاله شما عملیات (CRUD (Create, Retrieve, Update, Delete در ASP.NET MVC به کمک DAPPER که یک ابزار Micro-ORM است، یاد خواهید گرفت.

شما در این مقاله مباحث زیر را یاد خواهید گرفت:
1)Dapper چیست؟
2)چگونه باید با Dapper کار کرد؟
3)مقایسه اجرا کوئری
4)چگونه باید Dapper را نصب کرد؟
Dapper یک ابزار (ORM (Object Relational Mapping است که به توسعه دهندگان در map کردن پایگاه داده هایشان با مدل (POCO (Plain Old CLR Object کمک میکند.Dapper رایگان و Open source است.Dapper به وسیله Sam Saffron و Marc Gravell و Nick Craver گسترش یافته است.اگر شما مایل به نوشتن کوئری SQL هستید، Dapper یک انتخاب خوب برای شما است.Dapper کنترل کردن انواع عملیات های پایگاه داده را بسیار آسان میکند.
نحوه کار با Dapper یا نحوه پیاده سازی Dapper یا اجرا کردن کوئری (query) در Dapper
برای شروع کار با Dapper شما باید اقدامات زیر را در کد خود انجام دهید:
1) یک شی از IDbConnection بسازید.
2)اجرا کردن کوئری موجود در مقاله
3)پاس دادن کوئری به عنوان پارامتر به متد اجرا کننده
مقایسه اجرا کوئری Dapper
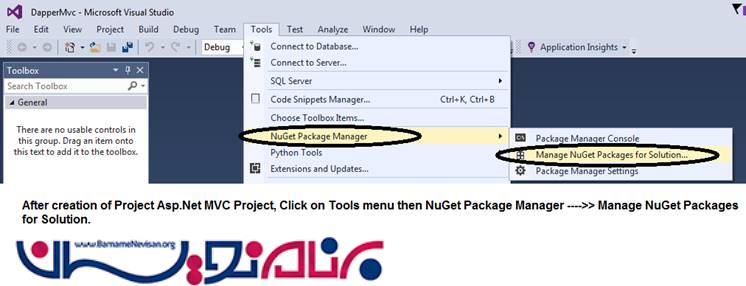
شما میتوانید Dapper را از طریق NuGet که مدیریت پکیج های رایگان و منبع باز و برای پلتفرم های توسعه مایکروسافت است ، نصب کنید.
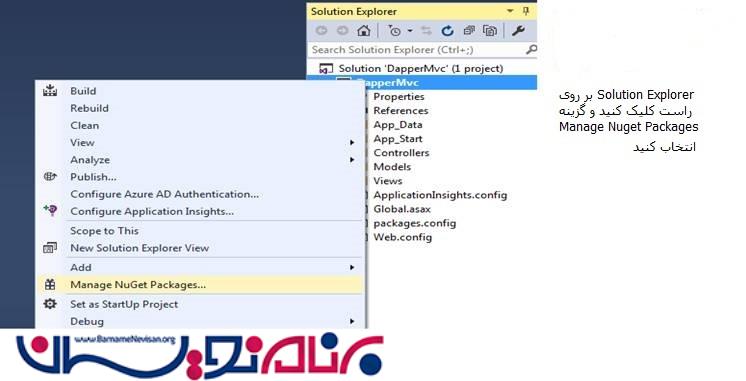
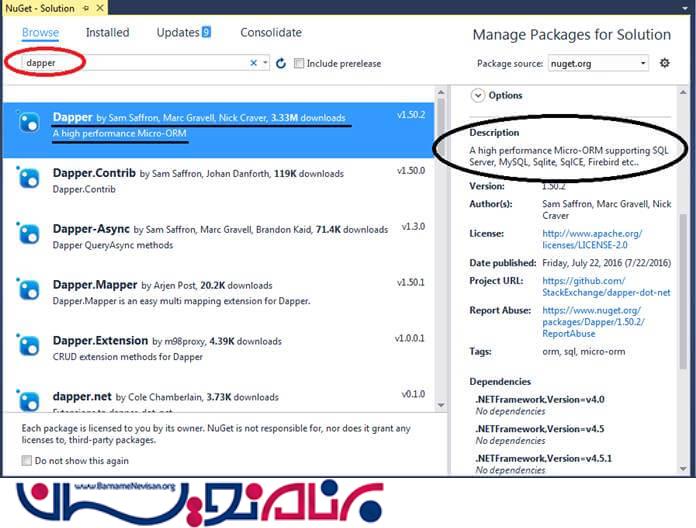
چگونه Dapper را نصب کنیم؟
یا
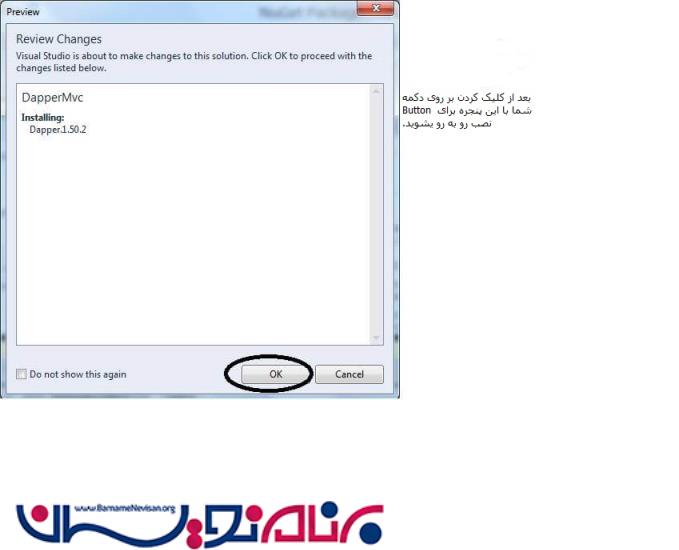
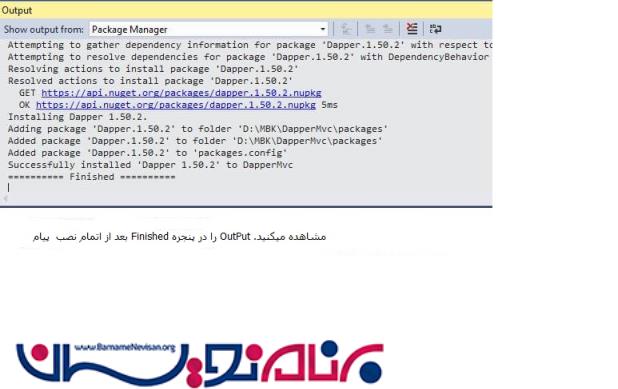

Dapper بر روی پروژه شما با موفقیت نصب شد.
قدم به قدم برای پیاده سازی عملیات Crud در Asp.Net Mvc با استفاده از Dapper
قبل از شروع به کار کردن با Visual Studio و قسمت کدنویسی ، ایتدا بیایید یک نگاه به ساختار جدولی که در آینده قصد داریم با آن کار کنیم بیندازیم.
ساختار جدول
USE [MBKTest]
GO
/****** Object:  Table [dbo].[tblFriends]    Script Date: 27-Jun-17,Tue 3:44:59 PM ******/
SET ANSI_NULLS ON
GO
SET QUOTED_IDENTIFIER ON
GO
SET ANSI_PADDING ON
GO

CREATE TABLE [dbo].[tblFriends](
    [FriendID] [int] IDENTITY(1,1) NOT NULL,
    [FriendName] [varchar](50) NULL,
    [City] [varchar](25) NULL,
    [PhoneNumber] [varchar](15) NULL
) ON [PRIMARY]

GO
SET ANSI_PADDING OFF
GO
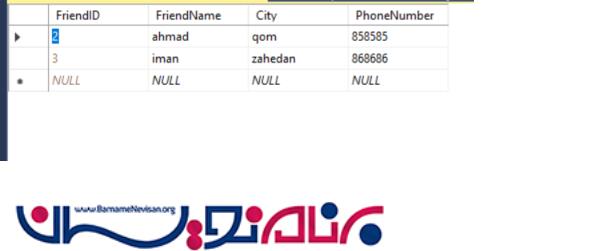
نمونه رکورد در این جدول
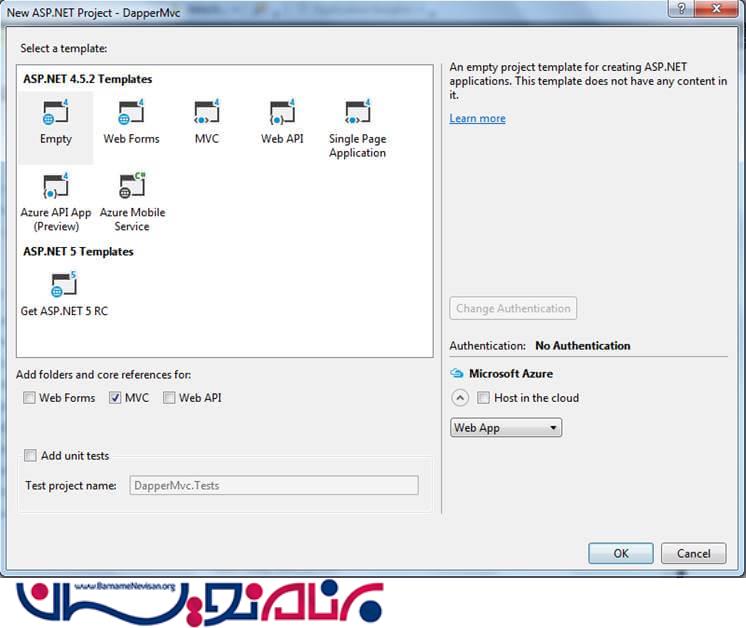
قدم اول)FILE --> NEW --> Project.
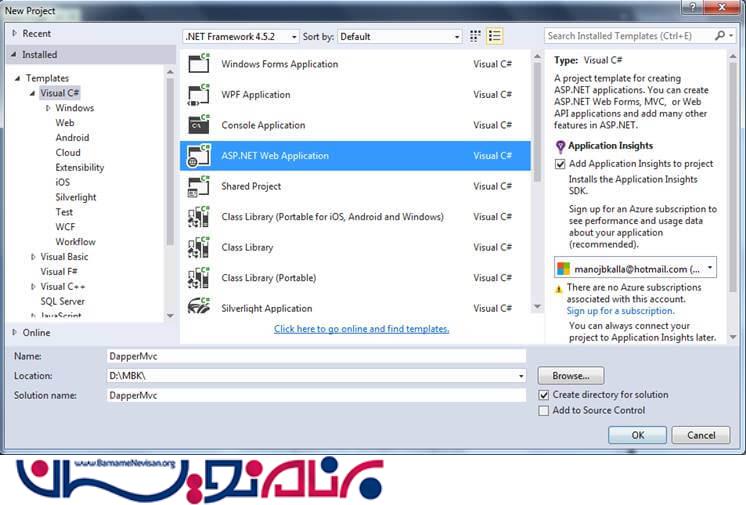
قدم دوم)گزینه های زیر را انتخاب کید.
1)Template : Empty
2)Select MVC CheckBox.
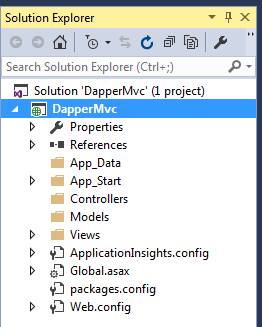
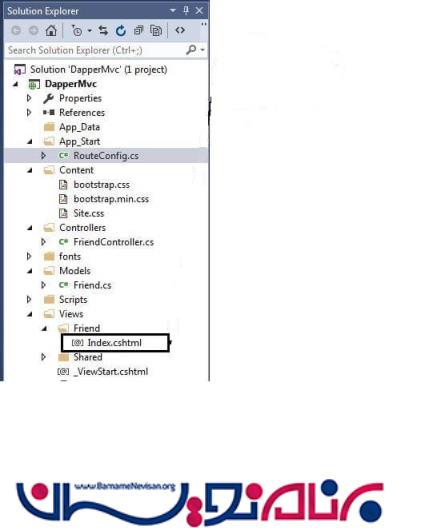
بعد از ایجاد پروژه ، شما میتوانید ساختار پروژه را که مانند تصویر زیر است مشاهده کنید:
قدم سوم)Dapper را نصب میکنیم
Dapper را از طریق Nuget نصب میکنیم.که نحوه نصب آن را قدم به قدم در بالا بیان کرده ایم.
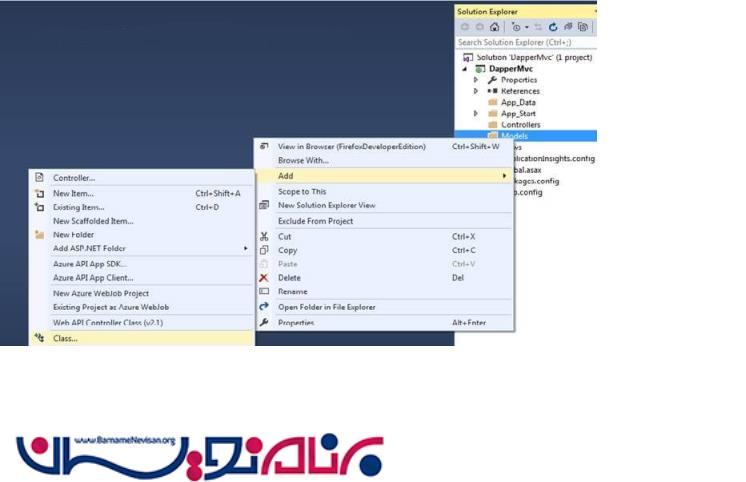
قدم چهارم)یک مدل به نام Friend ایجاد میکنیم.
در Solution Explorer بر روی پوشه Models کلیک راست کرده و از زیر منو Add گزینه Class را انتخاب میکنبم.
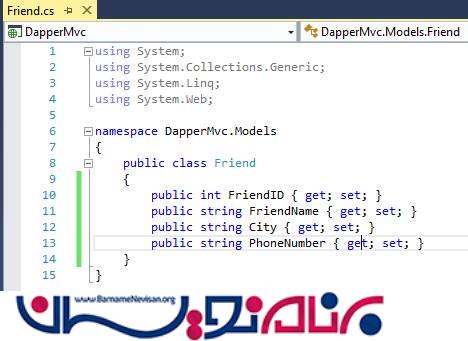
کد(Friend Model (Friend.cs
using System;
using System.Collections.Generic;
using System.Linq;
using System.Web;

namespace DapperMvc.Models
{
    public class Friend
    {
        public int FriendID { get; set; }
        public string FriendName { get; set; }
        public string City { get; set; }
        public string PhoneNumber { get; set; }
    }
}
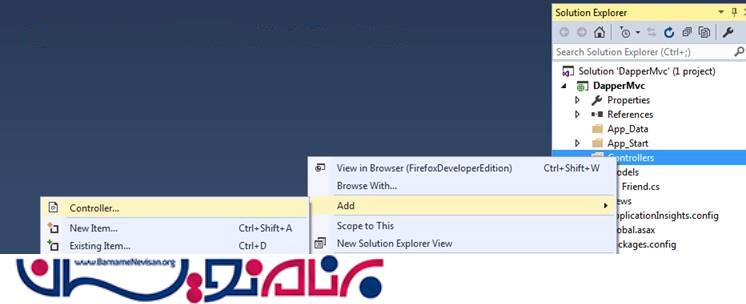
قدم پنجم)ساختن کنترلر Friend

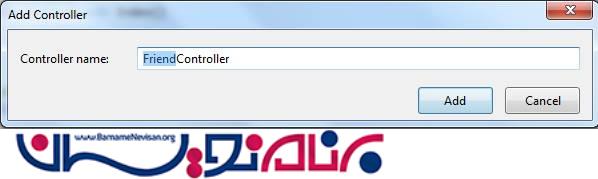
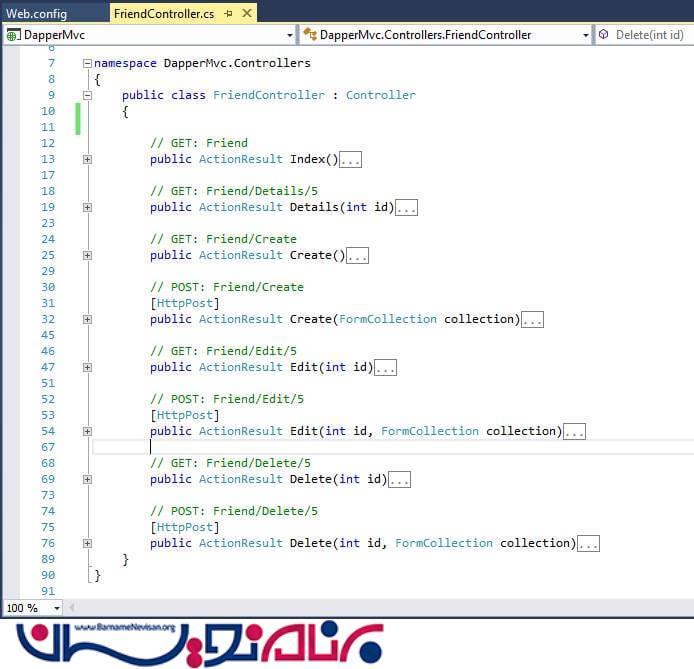
کد پیش فرض کنترلر FriendController.cs
using System;
using System.Collections.Generic;
using System.Linq;
using System.Web;
using System.Web.Mvc;

namespace DapperMvc.Controllers
{
    public class FriendController : Controller
    {

        // GET: Friend
        public ActionResult Index()
        {
            return View();
        }

        // GET: Friend/Details/5
        public ActionResult Details(int id)
        {
            return View();
        }

        // GET: Friend/Create
        public ActionResult Create()
        {
            return View();
        }

        // POST: Friend/Create
        [HttpPost]
        public ActionResult Create(FormCollection collection)
        {
            try
            {
                // TODO: Add insert logic here

                return RedirectToAction("Index");
            }
            catch
            {
                return View();
            }
        }

        // GET: Friend/Edit/5
        public ActionResult Edit(int id)
        {
            return View();
        }

        // POST: Friend/Edit/5
        [HttpPost]
        public ActionResult Edit(int id, FormCollection collection)
        {
            try
            {
                // TODO: Add update logic here

                return RedirectToAction("Index");
            }
            catch
            {
                return View();
            }
        }

        // GET: Friend/Delete/5
        public ActionResult Delete(int id)
        {
            return View();
        }

        // POST: Friend/Delete/5
        [HttpPost]
        public ActionResult Delete(int id, FormCollection collection)
        {
            try
            {
                // TODO: Add delete logic here

                return RedirectToAction("Index");
            }
            catch
            {
                return View();
            }
        }
    }
}
توضیحات مختصر در رابطه با اکشن متدها
1)Index-> لیستی از Friend ها را نمایش میدهد
2)Details -> یک ویو برای نمایش جزئیات Friend
3) Create ->ایجاد یک Friend جدید
4)Edit -> ویرایش یک Friend
5) Delete -> حذف کردن جزئیات یک Friend
قدم ششم)فضاهای نام زیر را به بالای کنترلر Friend اضافه کنید:
using DapperMvc.Models;
using System.Data;
using System.Data.SqlClient;
using System.Configuration;
using Dapper;
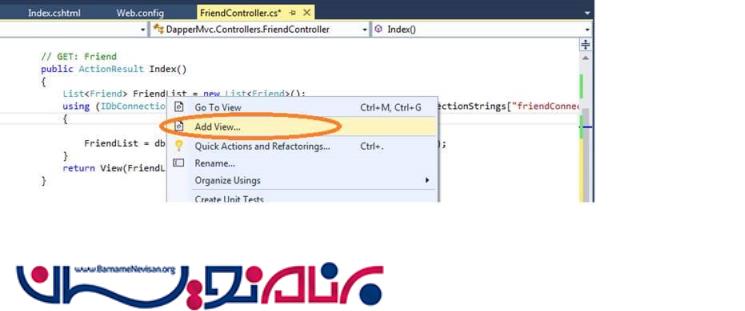
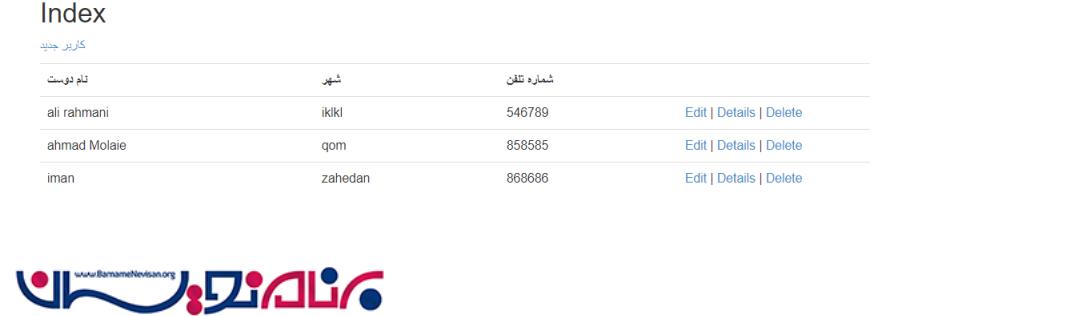
قدم هفتم)پیاده سازی اکشن متد Index
Index
// GET: Friend
        public ActionResult Index()
        {
            List<Friend> FriendList = new List<Friend>();
            using (IDbConnection db = new SqlConnection(ConfigurationManager.ConnectionStrings["friendConnection"].ConnectionString))
            {

                FriendList = db.Query<Friend>("Select * From tblFriends").ToList();
            }
            return View(FriendList);
        }
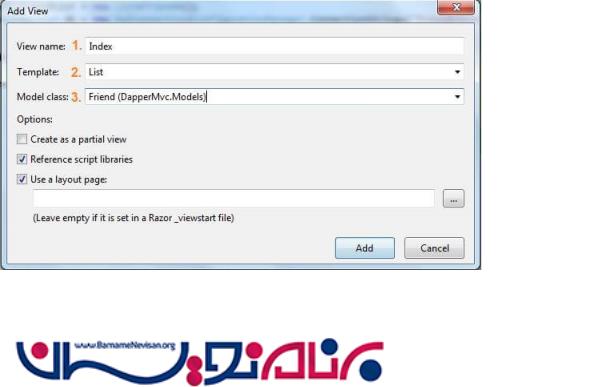
قدم هشتم)ساختن یک ویو برای اکشن متد Index
کد های Index.cshtml
@model IEnumerable<DapperExample.Models.Friend>

@{
    ViewBag.Title = "Index";
}

<h2>Index</h2>

<p>
    @Html.ActionLink("کاربر جدید", "Create")
</p>
<table class="table">
    <tr>
        <th>
            @Html.DisplayNameFor(model => model.FriendName)
        </th>
        <th>
            @Html.DisplayNameFor(model => model.City)
        </th>
        <th>
            @Html.DisplayNameFor(model => model.PhoneNumber)
        </th>
        <th></th>
    </tr>

@foreach (var item in Model) {
    <tr>
        <td>
            @Html.DisplayFor(modelItem => item.FriendName)
        </td>
        <td>
            @Html.DisplayFor(modelItem => item.City)
        </td>
        <td>
            @Html.DisplayFor(modelItem => item.PhoneNumber)
        </td>
        <td>
            @Html.ActionLink("Edit", "Edit", new { id=item.FriendID }) |
            @Html.ActionLink("Details", "Details", new { id=item.FriendID }) |
            @Html.ActionLink("Delete", "Delete", new { id=item.FriendID })
        </td>
    </tr>
}

</table>
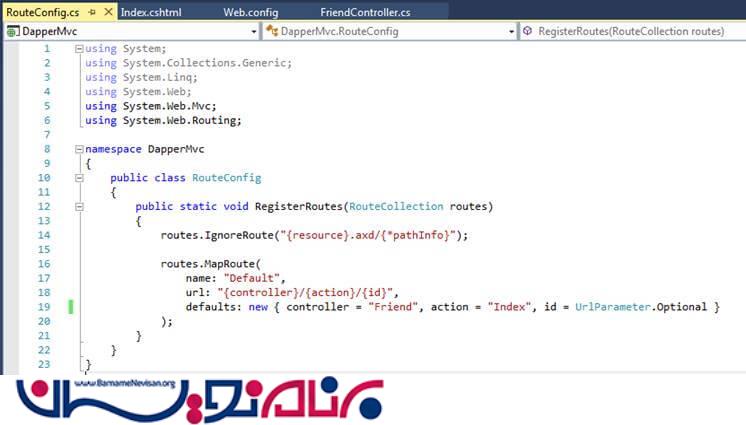
قدم نهم)تنظیم فایل RouteConfig.cs
چرا نیاز به تنظیم کردن RouteConfig.cs داریم؟
به صورت پیشفرض فایل RouteConfig.cs کنترلر Home و اکشن متد Index را فراخوانی میکند.در حال حاضر ما میخواهیم که برنامه به طور پیش فرض کنترلر Friend و اکشن متد Index را فراخوانی کند.
تصویر RouteConfig.cs پیشفرض MVC

کدهای پیش فرض RouteConfig.cs
using System;
using System.Collections.Generic;
using System.Linq;
using System.Web;
using System.Web.Mvc;
using System.Web.Routing;

namespace DapperMvc
{
    public class RouteConfig
    {
        public static void RegisterRoutes(RouteCollection routes)
        {
            routes.IgnoreRoute("{resource}.axd/{*pathInfo}");

            routes.MapRoute(
                name: "Default",
                url: "{controller}/{action}/{id}",
                defaults: new { controller = "Home", action = "Index", id = UrlParameter.Optional }
            );
        }
    }
}
حالا RouteConfig.cs را بر حسب نیازمان مانند زیر تغییر میدهیم.
تصویر RouteConfig.cs تغییر یافته:
کد های فایل تغییر یافته RouteConfig.cs
using System;
using System.Collections.Generic;
using System.Linq;
using System.Web;
using System.Web.Mvc;
using System.Web.Routing;

namespace DapperMvc
{
    public class RouteConfig
    {
        public static void RegisterRoutes(RouteCollection routes)
        {
            routes.IgnoreRoute("{resource}.axd/{*pathInfo}");

            routes.MapRoute(
                name: "Default",
                url: "{controller}/{action}/{id}",
                defaults: new { controller = "Friend", action = "Index", id = UrlParameter.Optional }
            );
        }
    }
}
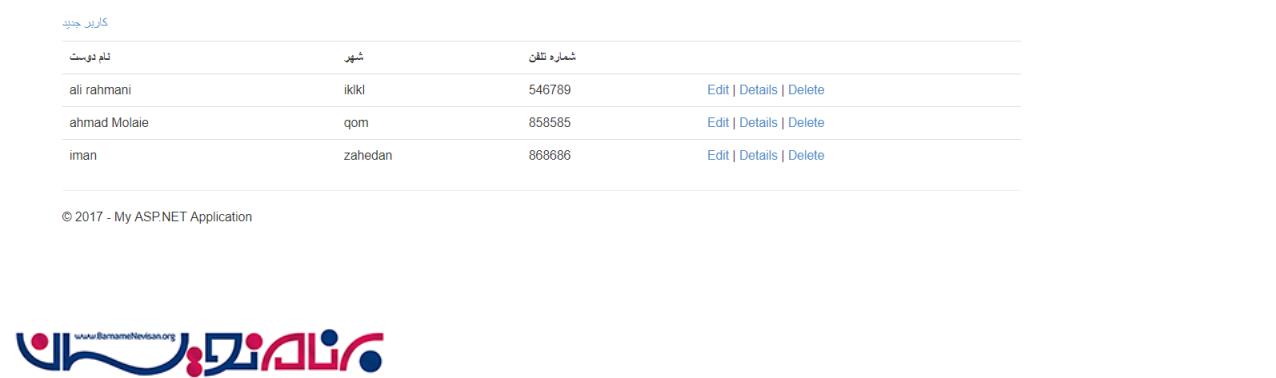
خروجی اکشن متد Index
قدم یازدهم)پیاده سازی اکشن متد Details
Detailes
کدهای اکشن متد:
// GET: Friend/Details/5
       public ActionResult Details(int id)
       {
           Friend _friend = new Friend();
           using (IDbConnection db = new SqlConnection(ConfigurationManager.ConnectionStrings["friendConnection"].ConnectionString))
           {
               _friend = db.Query<Friend>("Select * From tblFriends " +
                                      "WHERE FriendID =" + id, new { id }).SingleOrDefault();
           }
           return View(_friend);
       }
قدم دوازدهم)ساختن یک ویو برای اکشن متد Detailes
بر روی اکشن متد Detailes راست کلیک کنید و گزینه Add View را انتخاب کنید.
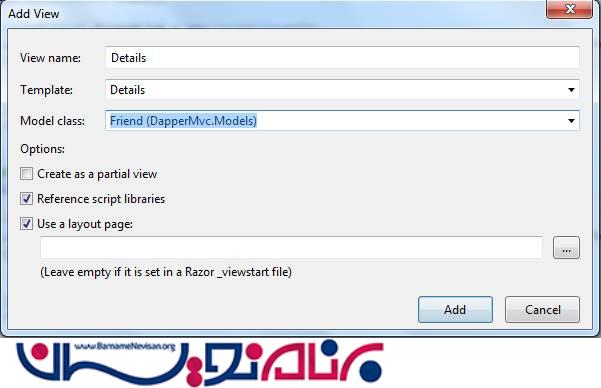
بعد از کلیک بر روی گزینه Add فایل Detail.cshtml با کدهای زیر ایجاد میشود.
کدهای Details.cshtml
@model DapperExample.Models.Friend

@{
    ViewBag.Title = "Details";
}

<h2>جزئیات</h2>

<div>
    <h4>Friend</h4>
    <hr />
    <dl class="dl-horizontal">
        <dt>
            @Html.DisplayNameFor(model => model.FriendName)
        </dt>

        <dd>
            @Html.DisplayFor(model => model.FriendName)
        </dd>

        <dt>
            @Html.DisplayNameFor(model => model.City)
        </dt>

        <dd>
            @Html.DisplayFor(model => model.City)
        </dd>

        <dt>
            @Html.DisplayNameFor(model => model.PhoneNumber)
        </dt>

        <dd>
            @Html.DisplayFor(model => model.PhoneNumber)
        </dd>

    </dl>
</div>
<p>
    @Html.ActionLink("Edit", "Edit", new { id = Model.FriendID }) |
    @Html.ActionLink("بازگشت به لیست", "Index")
</p>
خروجی اکشن متد Detailes

قدم چهاردهم )مراحل افزودن
با توجه به این که نیاز است برای عملیات افزودن یک متد برای پردازش Get و یک متد برای پردازش Post ایجاد کنیم.متدهای زیر رابه کنترلرFriend بیافزایید.
// GET: Friend/Create
     public ActionResult Create()
     {

         return View();
     }

     // POST: Friend/Create
     [HttpPost]
     public ActionResult Create(Friend _friend)
     {

             using (IDbConnection db = new SqlConnection(ConfigurationManager.ConnectionStrings["friendConnection"].ConnectionString))

             {

                 string sqlQuery = "Insert Into tblFriends (FriendName,City,PhoneNumber) Values("+ _friend.FriendName+","+ _friend.City+","+ _friend.PhoneNumber + ")";

                 int rowsAffected = db.Execute(sqlQuery);
             }

             return RedirectToAction("Index");
         }
قدم پانزدهم)بر روی اکشن متد Create راست کلیک کرده و یک ویو برای آن ایجاد کنید.
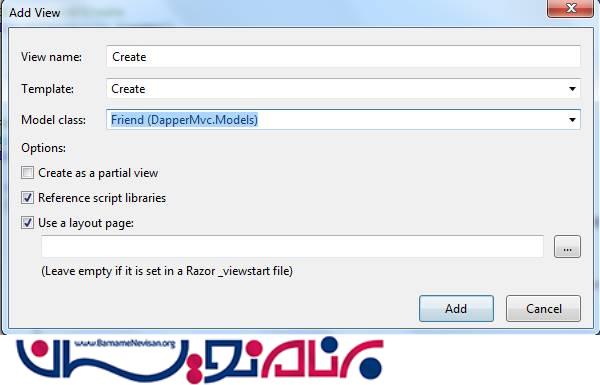
کدهای Create.cshtml
@model DapperExample.Models.Friend
@{
ViewBag.Title = "Create";
}
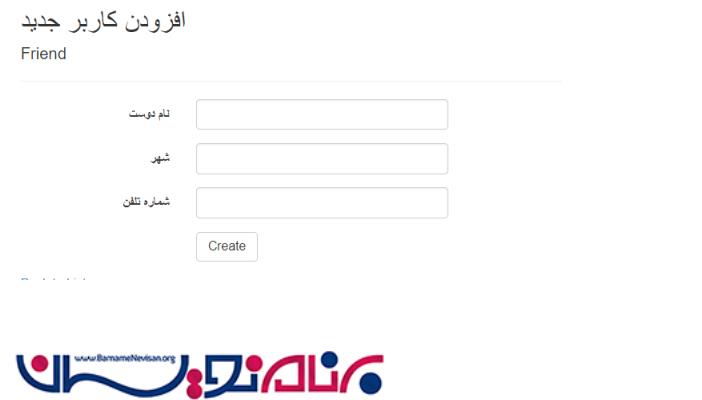
<h2>افزودن کاربر جدید</h2>
@using (Html.BeginForm())
{
@Html.AntiForgeryToken()
<div class="form-horizontal">
<h4>Friend</h4>
<hr />
@Html.ValidationSummary(true, "", new { @class = "text-danger" })
<div class="form-group">
@Html.LabelFor(model => model.FriendName, htmlAttributes: new { @class = "control-label col-md-2" })
<div class="col-md-10">
@Html.EditorFor(model => model.FriendName, new { htmlAttributes = new { @class = "form-control" } })
@Html.ValidationMessageFor(model => model.FriendName, "", new { @class = "text-danger" })
</div>
</div>
<div class="form-group">
@Html.LabelFor(model => model.City, htmlAttributes: new { @class = "control-label col-md-2" })
<div class="col-md-10">
@Html.EditorFor(model => model.City, new { htmlAttributes = new { @class = "form-control" } })
@Html.ValidationMessageFor(model => model.City, "", new { @class = "text-danger" })
</div>
</div>
<div class="form-group">
@Html.LabelFor(model => model.PhoneNumber, htmlAttributes: new { @class = "control-label col-md-2" })
<div class="col-md-10">
@Html.EditorFor(model => model.PhoneNumber, new { htmlAttributes = new { @class = "form-control" } })
@Html.ValidationMessageFor(model => model.PhoneNumber, "", new { @class = "text-danger" })
</div>
</div>
<div class="form-group">
<div class="col-md-offset-2 col-md-10">
<input type="submit" value="Create" class="btn btn-default" />
</div>
</div>
</div>
}
<div>
@Html.ActionLink("Back to List", "Index")
</div>
@section Scripts {
@Scripts.Render("~/bundles/jqueryval")
}
قدم شانزدهم)اجرا کردن برای چک کردن اکشن متد Create
قدم هفدهم)متد های مورد نیاز برای ویرایش یک موجودیت از جدول Friend
با توجه به این که نیاز است برای عملیات ویرایش یک متد برای پردازش Get و یک متد برای پردازش Post ایجاد کنیم.متدهای زیر رابه کنترلرFriend بیافزایید.
// GET: Friend/Edit/5
      public ActionResult Edit(int id)
      {
          Friend _friend = new Friend();
          using (IDbConnection db = new SqlConnection(ConfigurationManager.ConnectionStrings["friendConnection"].ConnectionString))
          {
              _friend = db.Query<Friend>("Select * From tblFriends " +
                                     "WHERE FriendID =" + id, new { id }).SingleOrDefault();
          }
          return View(_friend);
      }

      // POST: Friend/Edit/5
      [HttpPost]
      public ActionResult Edit(Friend _friend)
      {
          using (IDbConnection db = new SqlConnection(ConfigurationManager.ConnectionStrings["friendConnection"].ConnectionString))

          {

              string sqlQuery = "update tblFriends set FriendName='"+_friend.FriendName+ "',City='"+_friend.City+"',PhoneNumber='"+_friend.PhoneNumber + "' where friendid="+_friend.FriendID;

              int rowsAffected = db.Execute(sqlQuery);
          }

          return RedirectToAction("Index");
      }
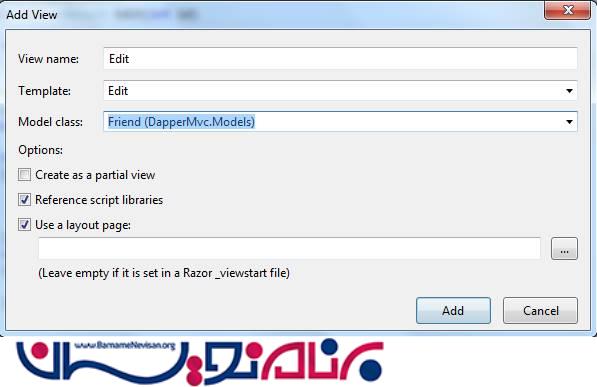
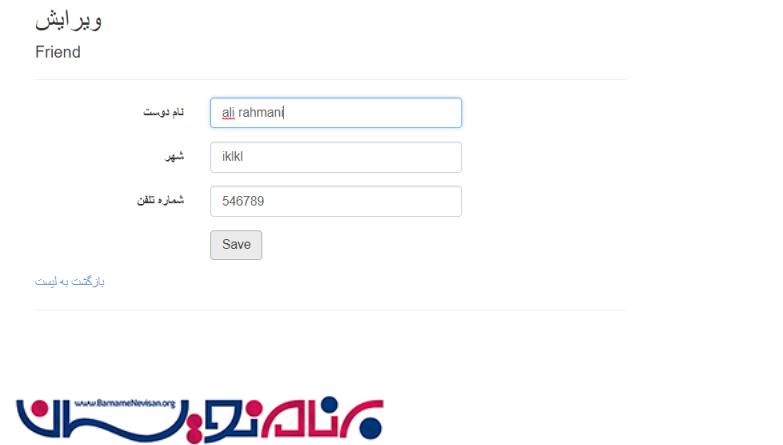
قدم هجدهم)ساختن یک ویو برای اکشن متد Edit
بر روی اکشن متد Edit راست کلیک کرده و یک ویو جدید برای آن ایجاد کنید.
کدهای Edit.CsHml
@model DapperExample.Models.Friend

@{
    ViewBag.Title = "Edit";
}

<h2>ویرایش</h2>


@using (Html.BeginForm())
{
    @Html.AntiForgeryToken()

    <div class="form-horizontal">
        <h4>Friend</h4>
        <hr />
        @Html.ValidationSummary(true, "", new { @class = "text-danger" })
        @Html.HiddenFor(model => model.FriendID)

        <div class="form-group">
            @Html.LabelFor(model => model.FriendName, htmlAttributes: new { @class = "control-label col-md-2" })
            <div class="col-md-10">
                @Html.EditorFor(model => model.FriendName, new { htmlAttributes = new { @class = "form-control" } })
                @Html.ValidationMessageFor(model => model.FriendName, "", new { @class = "text-danger" })
            </div>
        </div>

        <div class="form-group">
            @Html.LabelFor(model => model.City, htmlAttributes: new { @class = "control-label col-md-2" })
            <div class="col-md-10">
                @Html.EditorFor(model => model.City, new { htmlAttributes = new { @class = "form-control" } })
                @Html.ValidationMessageFor(model => model.City, "", new { @class = "text-danger" })
            </div>
        </div>

        <div class="form-group">
            @Html.LabelFor(model => model.PhoneNumber, htmlAttributes: new { @class = "control-label col-md-2" })
            <div class="col-md-10">
                @Html.EditorFor(model => model.PhoneNumber, new { htmlAttributes = new { @class = "form-control" } })
                @Html.ValidationMessageFor(model => model.PhoneNumber, "", new { @class = "text-danger" })
            </div>
        </div>

        <div class="form-group">
            <div class="col-md-offset-2 col-md-10">
                <input type="submit" value="Save" class="btn btn-default" />
            </div>
        </div>
    </div>
}

<div>
    @Html.ActionLink("بازگشت به لیست", "Index")
</div>

@section Scripts {
    @Scripts.Render("~/bundles/jqueryval")
}
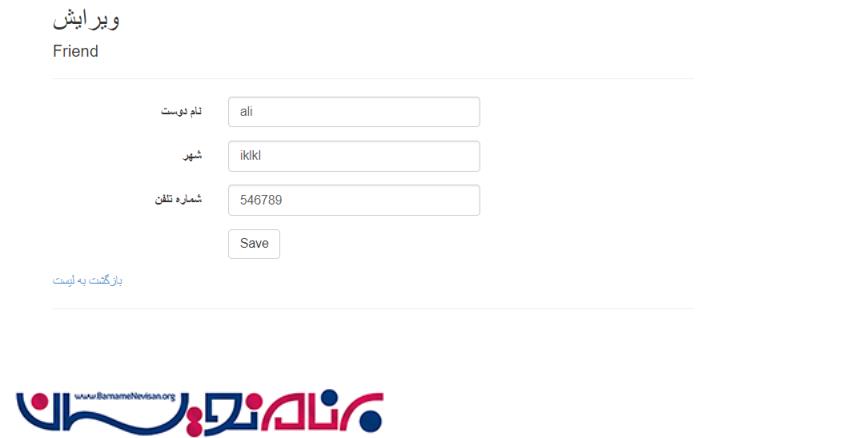
قدم نوزدهم)پروژه را اجرا کنید و اکشن متد Edit را تست کنید.
قدم بیستم)
با توجه به این که نیاز است برای عملیات حذف یک متد برای پردازش Get و یک متد برای پردازش Post ایجاد کنیم.متدهای زیر رابه کنترلرFriend بیافزایید.

کد اکشن متدهای Delete
// GET: Friend/Delete/5
      public ActionResult Delete(int id)
      {
          Friend _friend = new Friend();
          using (IDbConnection db = new SqlConnection(ConfigurationManager.ConnectionStrings["friendConnection"].ConnectionString))
          {
              _friend = db.Query<Friend>("Select * From tblFriends " +
                                     "WHERE FriendID =" + id, new { id }).SingleOrDefault();
          }
          return View(_friend);
      }

// POST: Friend/Delete/5
      [HttpPost]
      public ActionResult Delete(int id, FormCollection collection)
      {
          using (IDbConnection db = new SqlConnection(ConfigurationManager.ConnectionStrings["friendConnection"].ConnectionString))
          {
              string sqlQuery = "Delete From tblFriends WHERE FriendID = " +id;

              int rowsAffected = db.Execute(sqlQuery);


          }
          return RedirectToAction("Index");
      }
قدم بیست و یکم)ساختن یک ویو برای اکشن متد Delete
بر روی اکشن متد Edit راست کلیک کرده و یک ویو جدید برای آن ایجاد کنید.

کدهای Delete.cshtml
@model DapperExample.Models.Friend

@{
    ViewBag.Title = "Delete";
}

<h2>حذف</h2>

<h3>آیا از حذف این رکورد مطمئن هستین؟</h3>
<div>
    <hr />
    <dl class="dl-horizontal">
        <dt>
            @Html.DisplayNameFor(model => model.FriendName)
        </dt>

        <dd>
            @Html.DisplayFor(model => model.FriendName)
        </dd>

        <dt>
            @Html.DisplayNameFor(model => model.City)
        </dt>

        <dd>
            @Html.DisplayFor(model => model.City)
        </dd>

        <dt>
            @Html.DisplayNameFor(model => model.PhoneNumber)
        </dt>

        <dd>
            @Html.DisplayFor(model => model.PhoneNumber)
        </dd>

    </dl>

    @using (Html.BeginForm()) {
        @Html.AntiForgeryToken()

        <div class="form-actions no-color">
            <input type="submit" value="Delete" class="btn btn-default" /> |
            @Html.ActionLink("بازگشت به صفحه اصلی", "Index")
        </div>
    }
</div>

آموزش asp.net mvc

- ASP.net MVC
- 3k بازدید
- 7 تشکر