ویرایش ، بروز رسانی و حذف در گرید ویو توسط AutoGenerateColumns
سه شنبه 16 تیر 1394در این مقاله نحوه ویرایش ، بروز رسانی و حذف در گرید ویو توسط AutoGenerateColumns با استفاده از #C و VB.Net ارائه می گردد .
در این مقاله مثالی ارائه می گردد که نحوه انجام ویرایش،بروز رسانی و حذف در ASP.Net توسط AutoGenerateColumns با استفاده از #C و VB.Net را بطور کامل توضیح داده است .
بانک اطلاعاتی (ِDatabase)
جدولی با نام Customers بصورت زیر ایجاد می کنیم :
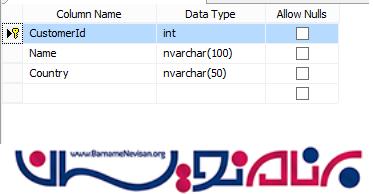
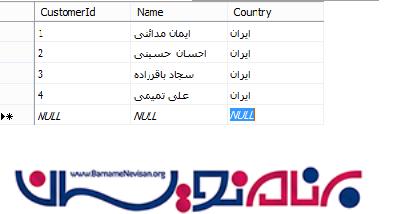
اطلاعاتی درون جدول وارد می کنیم :
بخش HTML
بخش HTML زیر شامل یک کنترل GridView توسط مشخصه AutoGenerateColumns که بابر True تنظیم شده است ، می باشد . به منظور ایجاد خودکار دکمه های حذف و ویرایش ، خصوصیات AutoGenerateEditButton و AutoGenerateDeleteButton با مقدار True تنظیم می شوند .
ستون CustomerId برابر مشخصه DataKeyNames در GridView تنظیم شده است .
GridView با رویداد های OnRowDataBound ، OnRowEditing ، OnRowCancelingEdit، OnRowUpdating و OnRowDeleteting تعیین شده است .
<asp:GridView ID="GridView1" runat="server" DataKeyNames="CustomerId" OnRowDataBound="OnRowDataBound" OnRowEditing="OnRowEditing" OnRowCancelingEdit="OnRowCancelingEdit" OnRowUpdating="OnRowUpdating" OnRowDeleting="OnRowDeleting" EmptyDataText="No records has been added." AutoGenerateEditButton="true" AutoGenerateDeleteButton="true">
</asp:GridView>
فضای نام (namespace)
اکنون باید این فضای نام ها را وارد کنیم .
#C
using System.Data;
using System.Data.SqlClient;
using System.Configuration;
VB.Net
Imports System.Data
Imports System.Data.SqlClient
Imports System.Configuration
پر کردن کنترل GridView با مقدار True مشخصه AutoGenerateColumns
GridView توسط رکوردها از جدول Customers درون رویداد Page Load در صفحه ASP.Net پر می شود.
#C
protected void Page_Load(object sender, EventArgs e)
{
    if (!this.IsPostBack)
    {
        this.BindGrid();
    }
}

private void BindGrid()
{
    string constr = ConfigurationManager.ConnectionStrings["constr"].ConnectionString;
    using (SqlConnection con = new SqlConnection(constr))
    {
        using (SqlCommand cmd = new SqlCommand("SELECT CustomerId, Name, Country FROM Customers"))
        {
            using (SqlDataAdapter sda = new SqlDataAdapter())
            {
                cmd.Connection = con;
                sda.SelectCommand = cmd;
                using (DataTable dt = new DataTable())
                {
                    sda.Fill(dt);
                    GridView1.DataSource = dt;
                    GridView1.DataBind();
                }
            }
        }
    }
}
VB.Net
Protected Sub Page_Load(sender As Object, e As EventArgs) Handles Me.Load
    If Not Me.IsPostBack Then
        Me.BindGrid()
    End If
End Sub

Private Sub BindGrid()
    Dim constr As String = ConfigurationManager.ConnectionStrings("constr").ConnectionString
    Using con As New SqlConnection(constr)
        Using cmd As New SqlCommand("SELECT CustomerId, Name, Country FROM Customers")
            Using sda As New SqlDataAdapter()
                cmd.Connection = con
                sda.SelectCommand = cmd
                Using dt As New DataTable()
                    sda.Fill(dt)
                    GridView1.DataSource = dt
                    GridView1.DataBind()
                End Using
            End Using
        End Using
    End Using
End Sub
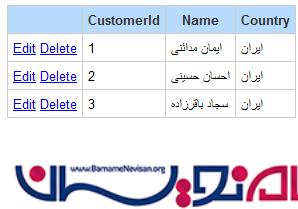
ویرایش و بروز رسانی رکورد های GridView توسط مقدار True مشخصه AutoGenerateColumns
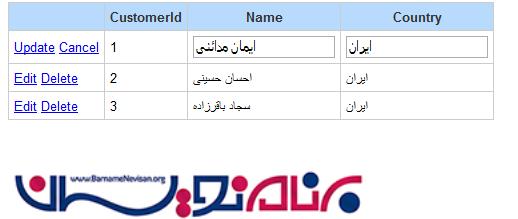
زمانی که روی دکمه Edit کلیک می کنید ، رویداد OnRowEditing در GridView فراخوانی می شود . EditIndex در GridView با Row Index در GridView Row ویرایش شده است بروز رسانی می گردد.
#C
protected void OnRowEditing(object sender, GridViewEditEventArgs e)
{
    GridView1.EditIndex = e.NewEditIndex;
    this.BindGrid();
}
VB.Net
Protected Sub OnRowEditing(sender As Object, e As GridViewEditEventArgs)
    GridView1.EditIndex = e.NewEditIndex
    Me.BindGrid()
End Sub
Update
زمانی که روی دکمه Update کلیک کنید رویداد OnRowUpdating در GridView فراخوانی می شود .
ستون CustomerId که کلید اصلی است از مشخصه DataKey در GridView گرفته می شود در حالیکه فیلدهای Name و Country از ستون های خاص با مراجعه به Textboxها گرفته می شوند .
#C
 protected void OnRowUpdating(object sender, GridViewUpdateEventArgs e)
{
    GridViewRow row = GridView1.Rows[e.RowIndex];
    int customerId = Convert.ToInt32(GridView1.DataKeys[e.RowIndex].Values[0]);
    string name = (row.Cells[2].Controls[0] as TextBox).Text;
    string country = (row.Cells[3].Controls[0] as TextBox).Text;
    string constr = ConfigurationManager.ConnectionStrings["constr"].ConnectionString;
    using (SqlConnection con = new SqlConnection(constr))
    {
        using (SqlCommand cmd = new SqlCommand("UPDATE Customers SET Name = @Name, Country = @Country WHERE CustomerId = @CustomerId"))
        {
            cmd.Parameters.AddWithValue("@CustomerId", customerId);
            cmd.Parameters.AddWithValue("@Name", name);
            cmd.Parameters.AddWithValue("@Country", country);
            cmd.Connection = con;
            con.Open();
            cmd.ExecuteNonQuery();
            con.Close();
        }
    }
    GridView1.EditIndex = -1;
    this.BindGrid();
VB.Net
Protected Sub OnRowUpdating(sender As Object, e As GridViewUpdateEventArgs)
    Dim row As GridViewRow = GridView1.Rows(e.RowIndex)
    Dim customerId As Integer = Convert.ToInt32(GridView1.DataKeys(e.RowIndex).Values(0))
    Dim name As String = TryCast(row.Cells(2).Controls(0), TextBox).Text
    Dim country As String = TryCast(row.Cells(3).Controls(0), TextBox).Text
    Dim constr As String = ConfigurationManager.ConnectionStrings("constr").ConnectionString
    Using con As New SqlConnection(constr)
        Using cmd As New SqlCommand("UPDATE Customers SET Name = @Name, Country = @Country WHERE CustomerId = @CustomerId")
            cmd.Parameters.AddWithValue("@CustomerId", customerId)
            cmd.Parameters.AddWithValue("@Name", name)
            cmd.Parameters.AddWithValue("@Country", country)
            cmd.Connection = con
            con.Open()
            cmd.ExecuteNonQuery()
            con.Close()
        End Using
    End Using
    GridView1.EditIndex = -1
    Me.BindGrid()
End Sub
Cancel Edit
زمانیکه روی دکمه Cancel Edit کلیک کنید ، رویداد OnRowCancelingEdit فرا خوانی می شود . در اینجا EditIndex برابر با 1- است و GridView با اطلاعات پر شده است .
#C
protected void OnRowCancelingEdit(object sender, EventArgs e)
{
    GridView1.EditIndex = -1;
    this.BindGrid();
}
VB.Net
Protected Sub OnRowCancelingEdit(sender As Object, e As EventArgs)
    GridView1.EditIndex = -1
    Me.BindGrid()
End Sub
حذف رکودهای GridView
زمانیکه روی دکه Delete کلیک می کنید ، رویداد OnRowDeleting در GridView فرا خوانی می شود .
CustomerId که کلید اصلی است از مشخصه DataKey property گرفته شده است و با استفاده از CustomerId رکورد از جدول حذف خواهد شد.
#C
protected void OnRowDeleting(object sender, GridViewDeleteEventArgs e)
{
    int customerId = Convert.ToInt32(GridView1.DataKeys[e.RowIndex].Values[0]);
    string constr = ConfigurationManager.ConnectionStrings["constr"].ConnectionString;
    using (SqlConnection con = new SqlConnection(constr))
    {
        using (SqlCommand cmd = new SqlCommand("DELETE FROM Customers WHERE CustomerId = @CustomerId"))
        {
            cmd.Parameters.AddWithValue("@CustomerId", customerId);
            cmd.Connection = con;
            con.Open();
            cmd.ExecuteNonQuery();
            con.Close();
        }
    }
    this.BindGrid();
}
Protected Sub OnRowDeleting(sender As Object, e As GridViewDeleteEventArgs)
    Dim customerId As Integer = Convert.ToInt32(GridView1.DataKeys(e.RowIndex).Values(0))
    Dim constr As String = ConfigurationManager.ConnectionStrings("constr").ConnectionString
    Using con As New SqlConnection(constr)
        Using cmd As New SqlCommand("DELETE FROM Customers WHERE CustomerId = @CustomerId")
            cmd.Parameters.AddWithValue("@CustomerId", customerId)
            cmd.Connection = con
            con.Open()
            cmd.ExecuteNonQuery()
            con.Close()
        End Using
    End Using
    Me.BindGrid()
End Sub
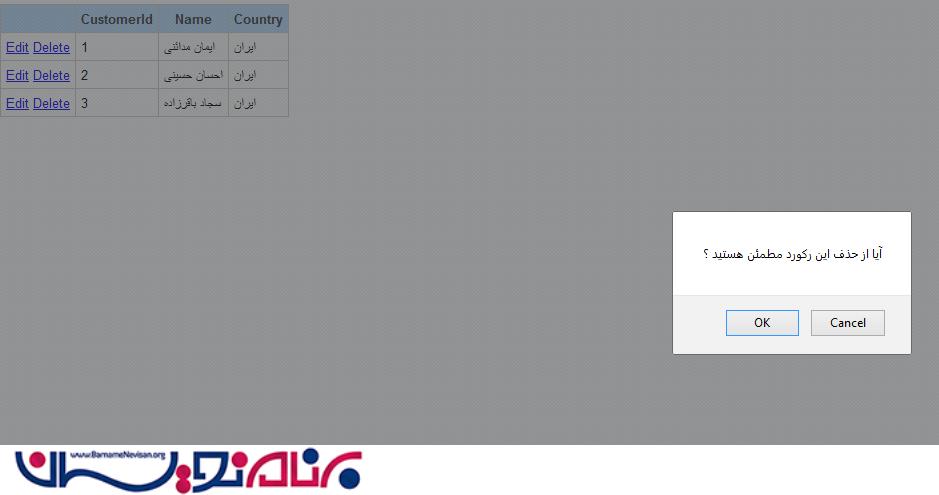
به منظور نمایش پیغام تایید زمانیکه حذف انجام شد، رویداد OnRowDataBound فراخوانی میشود جاییکه دکمه حذف اولین بار کلیک می شود سپس باید تایید جاوا اسکریپت به مدیریت رویداد Click در سمت کاربر متصل شویم .
#C
protected void OnRowDataBound(object sender, GridViewRowEventArgs e)
{
    if (e.Row.RowType == DataControlRowType.DataRow && e.Row.RowIndex != GridView1.EditIndex)
    {
        (e.Row.Cells[0].Controls[2] as LinkButton).Attributes["onclick"] = "return confirm('آیا از حذف این رکورد مطمئن هستید?');";
    }
}
VB.Net
Protected Sub OnRowDataBound(sender As Object, e As GridViewRowEventArgs)
    If e.Row.RowType = DataControlRowType.DataRow AndAlso e.Row.RowIndex <> GridView1.EditIndex Then
        TryCast(e.Row.Cells(0).Controls(2), LinkButton).Attributes("onclick") = "return confirm('آیا از حذف این رکورد مطمئن هستید?');"
    End If
End Sub
- ASP.net
- 3k بازدید
- 2 تشکر
