ایجاد TreeView با Bootstrap در Asp.net MVC
سه شنبه 6 مرداد 1394در این مقاله با نحوه ایجاد یک منوهای درختی با Bootstrap در Asp.net MVC آشنا خواهید شد.

برای این منظور ابتدا اقدام به ایجاد دو ViewModel می کنیم ، View Model اول برای خود کتاب و View Model دوم برای نویسنده کتاب.
کد زیر نشان دهنده ViewModel مربوط به کتاب است :
namespace TreeView.Models
{
    public class BookViewModel
    {
        public long Id
        {
            get;
            set;
        }
        public string Title
        {
            get;
            set;
        }
        public bool IsWritten
        {
            get;
            set;
        }
    }
}
و سپس View Model نویسنده :
using System.Collections.Generic;

namespace TreeView.Models {
    public class AuthorViewModel
    {
        public AuthorViewModel()
        {
            BookViewModel = new List < BookViewModel > ();
        }
        public int Id
        {
            get;
            set;
        }
        public string Name
        {
            get;
            set;
        }
        public bool IsAuthor
        {
            get;
            set;
        }
        public IList < BookViewModel > BookViewModel
        {
            get;
            set;
        }
    }
}
کنترلری با نام Home با دو Action Method ایجاد می کنیم.با نام Index و به صورت Post و Get آن را می نویسیم.که با Get یک View پر شده را می فرستیم و با Post اطلاعات درج شده را می فرستیم به کنترلر.
کنترلر Home :
using System.Collections.Generic;
using System.Linq;
using System.Web.Mvc;
using TreeView.Models;

namespace TreeView.Controllers
{
    public class HomeController : Controller
    {
        [HttpGet]
        public ActionResult Index()
        {
            List<AuthorViewModel> model = new List<AuthorViewModel>();

            AuthorViewModel firstAuthor = new AuthorViewModel
            {
                Id = 1,
                Name = "Iman",
                BookViewModel = new List<BookViewModel>{
                    new BookViewModel{
                        Id=1,
                        Title = "JQuery",
                        IsWritten = false
                    }, new BookViewModel{
                        Id=1,
                        Title = "JavaScript",
                        IsWritten = false
                    }
                }
            };

            AuthorViewModel secondAuthor = new AuthorViewModel
            {
                Id = 2,
                Name = "Sajad",
                BookViewModel = new List<BookViewModel>{
                    new BookViewModel{
                        Id=3,
                        Title = "C#",
                        IsWritten = false
                    }, new BookViewModel{
                        Id=4,
                        Title = "Entity Framework",
                        IsWritten = false
                    }
                }
            };
            model.Add(firstAuthor);
            model.Add(secondAuthor);
            return View("Index", model);
        }

        [HttpPost]
        public ActionResult Index(List<AuthorViewModel> model)
        {
            List<AuthorViewModel> selectedAuthors = model.Where(a => a.IsAuthor).ToList();
            List<BookViewModel> selectedBooks = model.Where(a => a.IsAuthor)
                                                .SelectMany(a => a.BookViewModel.Where(b => b.IsWritten)).ToList();
            return View();
        }
    }
}
در کد قبل نحوه ارتباط کتاب و نویسنده قرار داده شده است.
بعد ازاضافه کردن Bootstrap اقدام به ایجاد یک فایل CSSبه نام tree.css با کد های زیر می کنیم :
.tree li {
    margin: 0px 0;
    list-style-type: none;
    position: relative;
    padding: 20px 5px 0px 5px;
}

.tree li::before{
    content: '';
    position: absolute;
    top: 0;
    width: 1px;
    height: 100%;
    right: auto;
    left: -20px;
    border-left: 1px solid #ccc;
    bottom: 50px;
}
.tree li::after{
    content: '';
    position: absolute;
    top: 30px;
    width: 25px;
    height: 20px;
    right: auto;
    left: -20px;
    border-top: 1px solid #ccc;
}
.tree li a{
    display: inline-block;
    border: 1px solid #ccc;
    padding: 5px 10px;
    text-decoration: none;
    color: #666;
    font-family: 'Open Sans',sans-serif;
    font-size: 14px;
    font-weight :600;
    border-radius: 5px;
    -webkit-border-radius: 5px;
    -moz-border-radius: 5px;
}

/*Remove connectors before root*/
.tree > ul > li::before, .tree > ul > li::after{
    border: 0;
}
/*Remove connectors after last child*/
.tree li:last-child::before{
      height: 30px;
}

/*Time for some hover effects*/
/*We will apply the hover effect the the lineage of the element also*/
.tree li a:hover, .tree li a:hover+ul li a {
    background: #dd4814; color: #ffffff; border: 1px solid #dd4814;
}
/*Connector styles on hover*/
.tree li a:hover+ul li::after,
.tree li a:hover+ul li::before,
.tree li a:hover+ul::before,
.tree li a:hover+ul ul::before{
    border-color:  #dd4814;
}
.tree-checkbox{
    margin :4px !important;
}


.tree:before {
    border-left:  1px solid #ccc;
    bottom: 16px;
    content: "";
    display: block;
    left: 0;
    position: absolute;
    top: -21px;
    width: 1px;
    z-index: 1;
}

.tree ul:after {
    border-top: 1px solid #ccc;
    content: "";
    height: 20px;
    left: -29px;
    position: absolute;
    right: auto;
    top: 37px;
    width: 34px;
}
*:before, *:after {
    box-sizing: border-box;
}
*:before, *:after {
    box-sizing: border-box;
}
.tree {
    overflow: auto;
    padding-left: 0px;
    position: relative;
}
بعد از کد های Css اقدام به ایجاد یک View با نام Index می کنیم.
@model List
<TreeView.Models.AuthorViewModel>
@section head{
@Styles.Render("~/Content/css/tree.css")
}


    <div class="panel panel-primary">
        <div class="panel-heading panel-head">Author Book Tree View</div>
        <div id="frm-author" class="panel-body">
@using (Html.BeginForm())
{

            <div class="tree">
@for (int i = 0; i < Model.Count(); i++)
{

                <ul>
                    <li>
                        <a href="#">
@Html.CheckBoxFor(model => model[i].IsAuthor, new { @class = "tree-checkbox parent", @id = @Model[i].Id })

                            <label for=@i>
                                <strong>Author:</strong>
@Html.DisplayFor(model => model[i].Name)

                            </label>
                        </a>
                        <ul>
@for (int j = 0; j < Model[i].BookViewModel.Count(); j++)
{
int k = 1 + j;
@Html.HiddenFor(model => model[i].BookViewModel[j].Id)

                            <li>
                                <a href="#">
@Html.CheckBoxFor(model => model[i].BookViewModel[j].IsWritten, new { @class = "tree-checkbox node-item", @iid = i + "" + j })

                                    <label for=@i@j>
                                        <strong>Book @(k):</strong> @Html.DisplayFor(model => model[i].BookViewModel[j].Title)
                                    </label>
                                </a>
                            </li>

}

                        </ul>
                    </li>
                </ul>
}

            </div>
            <div class="form-group">
                <div class="col-lg-9"></div>
                <div class="col-lg-3">
                    <button class="btn btn-success" id="btnSubmit" type="submit">
Submit
</button>
                </div>
            </div>
}

        </div>
    </div>

@section scripts{
@Scripts.Render("~/Scripts/tree.js")
}
بعد از آن مهمترین بخش این مقاله فایل جاوا اسکریپتی به نام tree.js است.
(function($)
{
    function Tree() {
        var $this = this;

        function treeNodeClick()
        {
            $(document).on('click', '.tree li a input[type="checkbox"]', function() {
                $(this).closest('li').find('ul input[type="checkbox"]').prop('checked', $(this).is(':checked'));
            }).on('click', '.node-item', function() {
                var parentNode = $(this).parents('.tree ul');
                if ($(this).is(':checked')) {
                    parentNode.find('li a .parent').prop('checked', true);
                } else {
                    var elements = parentNode.find('ul input[type="checkbox"]:checked');
                    if (elements.length == 0) {
                        parentNode.find('li a .parent').prop('checked', false);
                    }
                }
            });
        };

        $this.init = function() {
            treeNodeClick();
        }
    }
    $(function() {
        var self = new Tree();
        self.init();
    })
}(jQuery))
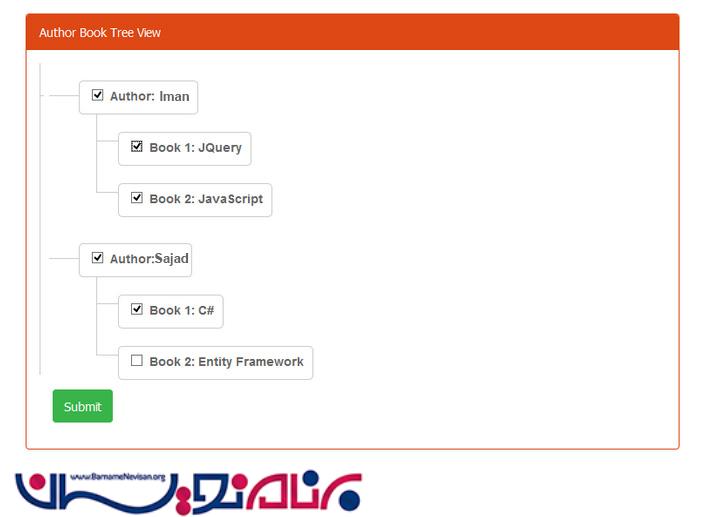
بعد از اجرا تصویر زیر را مشاهده خواهید کرد.

- ASP.net MVC
- 3k بازدید
- 6 تشکر