ساخت یک برنامه وب MVC 5 با امنیت بالا به همراه فرم ورود و قابلیت ایمیل تایید و تغییر کلمه عبور
سه شنبه 27 مرداد 1394در این مقاله نحوه ساخت یک برنامه وب MVC 5 با امنیت بالا به همراه فرم ورود و قابلیت ایمیل تایید و تغییر کلمه عبور توسط سیستم ASP.NET Identity membership را بررسی خواهیم کرد.

مراحل کار
ساخت یک برنامه وب از نوع MVC
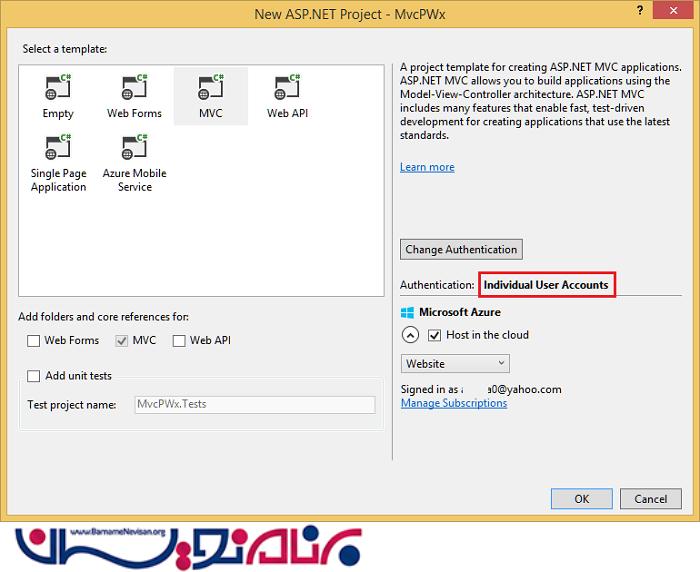
Individual User Accounts به صورت پیش فرض می باشد و آن را تغییر ندهید.
اگر قصد میزبانی برنامه در Azure را دارید تیک آن را بزنید.
پروژه را برای استفاده از SSL تنظیم نمایید.
برنامه را اجرا کرده و روی لینک register کلیک نمایید و یک کاربر Register نمایید. در این جا اعتبارسنجی ها روی صفت [EmailAddress] انجام می گیرد.
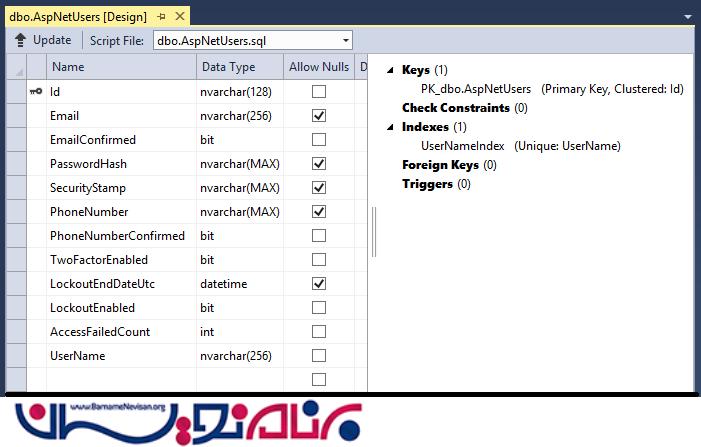
در Server Explorer پروژه به مسیر Data Connections\DefaultConnection\Tables\AspNetUsers بروید و راست کلیک کرده و Open table definition را انتخاب نمایید.
شکل زیر AspNetUsers را نمایش می دهد.
روی جدول AspNetUsers کلیک راست کرده و گزینه Show Table Data را انتخاب نمایید.
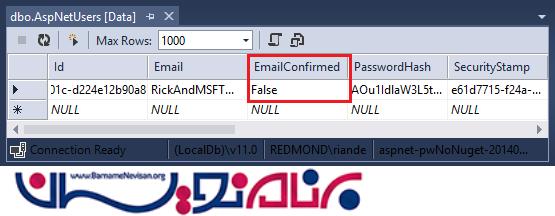
در این مرحله ایمیل تایید نشده و برابر False می باشد.
روی این ردیف کلیک کرده و آن را حذف نمایید. شما ایمیل را در مرحله بعد اضافه خواهید کرد و ایمیل تایید خواهید فرستاد.
ایمیل تایید
بهترین راه تایید ایمیل کاربر جدید می باشد که مشخص می کند کاربر، ایمیل شخص دیگری را وارد نکرده است.
برای مثال شما یک تالار گفتگو دارید و نمی خواهید که مثلا bob@example.com در هنگام ثبت نام ایمیل joe@contoso.com را به عنوان ایمیل خود وارد کند در حالی که ایمیل این شخص bob@example.com می باشد. یا برای مثال این شخص اشتباهی bib@example.com را وارد نماید.
عموما شما می خواهید کاربرانتان تا زمانی که ایمیل خود را تایید نکرده اند(یا هر مکانیزم تاییدیه دیگری) قادر به ایجاد پست نباشند. در قسمت زیر اعتبارسنجی ایمیل فعال شده است. همچنین از ورود و لاگین کردن کاربرانی که ایمیل آنها تایید نشده است جلوگیری می شود.
SendGrid
با وجود اینکه این مقاله تنها نحوه اضافه کردن ایمیل اخطار از طریق SendGrid را نمایش می دهد، شما می توانید ایمیل را توسط SMTP یا روش های دیگر ارسال نمایید.
در Package Manager Console دستور زیر را وارد نمایید.
Install-Package SendGrid
به صفحه ثبت نام Azure SendGrid sign up page رفته و یک اکانت SendGrid ایجاد نمایید.
کدهای زیر را برای تنظیمات SendGrid وارد نمایید :
public class EmailService : IIdentityMessageService
{
   public async Task SendAsync(IdentityMessage message)
   {
      await configSendGridasync(message);
   }

   // Use NuGet to install SendGrid (Basic C# client lib)
   private async Task configSendGridasync(IdentityMessage message)
   {
      var myMessage = new SendGridMessage();
      myMessage.AddTo(message.Destination);
      myMessage.From = new System.Net.Mail.MailAddress(
                          "Joe@contoso.com", "Joe S.");
      myMessage.Subject = message.Subject;
      myMessage.Text = message.Body;
      myMessage.Html = message.Body;

      var credentials = new NetworkCredential(
                 ConfigurationManager.AppSettings["mailAccount"],
                 ConfigurationManager.AppSettings["mailPassword"]
                 );

      // Create a Web transport for sending email.
      var transportWeb = new Web(credentials);

      // Send the email.
      if (transportWeb != null)
      {
         await transportWeb.DeliverAsync(myMessage);
      }
      else
      {
         Trace.TraceError("Failed to create Web transport.");
         await Task.FromResult(0);
      }
   }
}
شما نیاز به اضافه کردن فضای نام های زیر دارید.
using SendGrid;
using System.Net;
using System.Configuration;
using System.Diagnostics;
دستورات زیر را در AppSettings در قسمت Web.Config وارد نمایید.
 </connectionStrings>
   <appSettings>
      <add key="webpages:Version" value="3.0.0.0" />
      <!-- Markup removed for clarity. -->

      <add key="mailAccount" value="xyz" />
      <add key="mailPassword" value="password" />
   </appSettings>
  <system.web>
تذکر : هیچگاه اطلاعات حساس خود را در سورس کد پروژه قرار ندهید. اطلاعات کاربران و حسابها را در appSetting قرار دهید. در Azure شما می توانید این مقادیر را در تب Configure در Azure Portal ذخیره نمایید.
اعتبار سنجی ایمیل را در کنترلر Account فعال می کنیم.
//
// POST: /Account/Register
[HttpPost]
[AllowAnonymous]
[ValidateAntiForgeryToken]
public async Task<ActionResult> Register(RegisterViewModel model)
{
    if (ModelState.IsValid)
    {
        var user = new ApplicationUser { UserName = model.Email, Email = model.Email };
        var result = await UserManager.CreateAsync(user, model.Password);
        if (result.Succeeded)
        {
            await SignInManager.SignInAsync(user, isPersistent:false, rememberBrowser:false);

            string code = await UserManager.GenerateEmailConfirmationTokenAsync(user.Id);
            var callbackUrl = Url.Action("ConfirmEmail", "Account",
               new { userId = user.Id, code = code }, protocol: Request.Url.Scheme);
            await UserManager.SendEmailAsync(user.Id,
               "Confirm your account", "Please confirm your account by clicking <a href=\""
               + callbackUrl + "\">here</a>");

            return RedirectToAction("Index", "Home");
        }
        AddErrors(result);
    }

    // If we got this far, something failed, redisplay form
    return View(model);
}
@{
    ViewBag.Title = "Confirm Email";
}

<h2>@ViewBag.Title.</h2>
<div>
    <p>
        Thank you for confirming your email. Please @Html.ActionLink("Click here to Log in", "Login", "Account", routeValues: null, htmlAttributes: new { id = "loginLink" })
    </p>
</div>
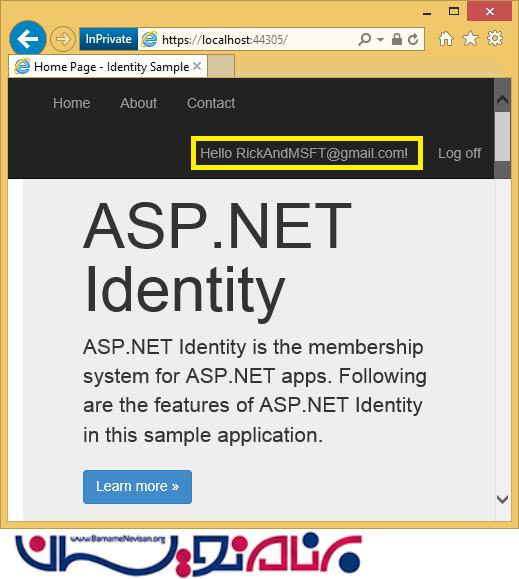
برنامه را اجرا کرده و روی لینک register کلیک نمایید. زمانیکه فرم Register را ارسال می کنید شما Login می شوید.

ایمیل خود را چک کرده و و روی لینک ثبت نام کلیک نمایید.
نیاز به تایید ایمیل قبل از Login
در حال حاضر هنگامی که کاربر ثبت نام را انجام داد به حساب خود وارد می شوند. اما شما می خواهید قبل از ورود به حساب کاربری ، ایمیل خود را تایید کرده باشند. در قسمت زیر کدی برای الزامی شدن تایید ایمیل قبل از ورود به حساب نوشته شده است.
متد HttpPost Register را با کدهای مشخص شده (زرد رنگ) تغییر نمایید.
//
// POST: /Account/Register
[HttpPost]
[AllowAnonymous]
[ValidateAntiForgeryToken]
public async Task<ActionResult> Register(RegisterViewModel model)
{
   if (ModelState.IsValid)
   {
      var user = new ApplicationUser { UserName = model.Email, Email = model.Email };
      var result = await UserManager.CreateAsync(user, model.Password);
      if (result.Succeeded)
      {
         //  Comment the following line to prevent log in until the user is confirmed.
         //  await SignInManager.SignInAsync(user, isPersistent:false, rememberBrowser:false);

         string code = await UserManager.GenerateEmailConfirmationTokenAsync(user.Id);
         var callbackUrl = Url.Action("ConfirmEmail", "Account",
            new { userId = user.Id, code = code }, protocol: Request.Url.Scheme);
         await UserManager.SendEmailAsync(user.Id, "Confirm your account",
            "Please confirm your account by clicking <a href=\"" + callbackUrl + "\">here</a>");

         // Uncomment to debug locally
         // TempData["ViewBagLink"] = callbackUrl;

         ViewBag.Message = "Check your email and confirm your account, you must be confirmed "
                         + "before you can log in.";

         return View("Info");
         //return RedirectToAction("Index", "Home");
      }
      AddErrors(result);
   }

   // If we got this far, something failed, redisplay form
   return View(model);
}
با کامنت کردن متد SignInAsync، کاربر پلافاصله پس از ثبت نام کردن Login نمی شود.
خط
TempData["ViewBagLink"] = callbackUrl;
برای تست کردن ثبت نام بدون فرستادن ایمیل استفاده می شود. ViewBag.Message برای نمایش پیغام "شما موفق به تایید ایمیل خود شدید" می باشد. نمونه موجود در ضمیمه شامل کد برای تست تاییدیه ایمیل بدون ارسال ایمیل می باشد و همچنین برای Debug برنامه به کار می رود.
یک ویو در Views\Shared\Info.cshtml ساخته و کدهای زیر را در آن کپی نمایید.
@{
   ViewBag.Title = "Info";
}
<h2>@ViewBag.Title.</h2>
<h3>@ViewBag.Message</h3>
صفت [Authorize] را به متد Contact در کنترلر Home اضافه نمایید.
با این کار Contact برای کاربران anonymous (عادی یا غیر عضو) غیر فعال شده و تنها برای کاربران عضو شده فعال می شود.
[Authorize]
public ActionResult Contact()
{
   ViewBag.Message = "Your contact page.";

   return View();
}
همچنین شما باید متد HttpPost Login را مانند زیر تغییر دهید :
//
// POST: /Account/Login
[HttpPost]
[AllowAnonymous]
[ValidateAntiForgeryToken]
public async Task<ActionResult> Login(LoginViewModel model, string returnUrl)
{
    if (!ModelState.IsValid)
    {
        return View(model);
    }

    // Require the user to have a confirmed email before they can log on.
    var user = await UserManager.FindByNameAsync(model.Email);
    if (user != null)
    {
       if (!await UserManager.IsEmailConfirmedAsync(user.Id))
       {
          ViewBag.errorMessage = "You must have a confirmed email to log on.";
          return View("Error");
       }
    }

    // This doesn't count login failures towards account lockout
    // To enable password failures to trigger account lockout, change to shouldLockout: true
    var result = await SignInManager.PasswordSignInAsync(model.Email, model.Password, model.RememberMe, shouldLockout: false);
    switch (result)
    {
        case SignInStatus.Success:
            return RedirectToLocal(returnUrl);
        case SignInStatus.LockedOut:
            return View("Lockout");
        case SignInStatus.RequiresVerification:
            return RedirectToAction("SendCode", new { ReturnUrl = returnUrl, RememberMe = model.RememberMe });
        case SignInStatus.Failure:
        default:
            ModelState.AddModelError("", "Invalid login attempt.");
            return View(model);
    }
}
همچنین ویو Views\Shared\Error.cshtml view را برای نمایش پیام خطا مانند زیر تغییر دهید.
@model System.Web.Mvc.HandleErrorInfo

@{
    ViewBag.Title = "Error";
}

<h1 class="text-danger">Error.</h1>
@{
   if (String.IsNullOrEmpty(ViewBag.errorMessage))
   {
      <h2 class="text-danger">An error occurred while processing your request.</h2>
   }
   else
   {
      <h2 class="text-danger">@ViewBag.errorMessage</h2>
   }
}
همه اکانت های جدول AspNetUsers که شامل Email است را تست نمایید. برنامه را اجرا کرده و می بینید که تا زمانی که ایمیل خود را تایید نکرده باشید نمی توانید Login نمایید. پس از اینکه ایمیل خود را تایید کردید روی لینک Contact کلیک نمایید.
بازگردانی پسورد یا تغییر آن
کاراکترهای کامنت شده متد HttpPost ForgotPassword را در کنترلر Account پاک نمایید:
//
// POST: /Account/ForgotPassword
[HttpPost]
[AllowAnonymous]
[ValidateAntiForgeryToken]
public async Task<ActionResult> ForgotPassword(ForgotPasswordViewModel model)
{
    if (ModelState.IsValid)
    {
        var user = await UserManager.FindByNameAsync(model.Email);
        if (user == null || !(await UserManager.IsEmailConfirmedAsync(user.Id)))
        {
            // Don't reveal that the user does not exist or is not confirmed
            return View("ForgotPasswordConfirmation");
        }

        string code = await UserManager.GeneratePasswordResetTokenAsync(user.Id);
        var callbackUrl = Url.Action("ResetPassword", "Account", new { userId = user.Id, code = code }, protocol: Request.Url.Scheme);
        await UserManager.SendEmailAsync(user.Id, "Reset Password", "Please reset your password by clicking <a href=\"" + callbackUrl + "\">here</a>");
        return RedirectToAction("ForgotPasswordConfirmation", "Account");
    }

    // If we got this far, something failed, redisplay form
    return View(model);
}
کاراکترهای کامنت شده در ویو زیر را پاک نمایید :
@using MvcPWy.Models
@model LoginViewModel
@{
   ViewBag.Title = "Log in";
}

<h2>@ViewBag.Title.</h2>
<div class="row">
   <div class="col-md-8">
      <section id="loginForm">
         @using (Html.BeginForm("Login", "Account", new { ReturnUrl = ViewBag.ReturnUrl }, FormMethod.Post, new { @class = "form-horizontal", role = "form" }))
         {
            @Html.AntiForgeryToken()
            <h4>Use a local account to log in.</h4>
            <hr />
            @Html.ValidationSummary(true, "", new { @class = "text-danger" })
            <div class="form-group">
               @Html.LabelFor(m => m.Email, new { @class = "col-md-2 control-label" })
               <div class="col-md-10">
                  @Html.TextBoxFor(m => m.Email, new { @class = "form-control" })
                  @Html.ValidationMessageFor(m => m.Email, "", new { @class = "text-danger" })
               </div>
            </div>
            <div class="form-group">
               @Html.LabelFor(m => m.Password, new { @class = "col-md-2 control-label" })
               <div class="col-md-10">
                  @Html.PasswordFor(m => m.Password, new { @class = "form-control" })
                  @Html.ValidationMessageFor(m => m.Password, "", new { @class = "text-danger" })
               </div>
            </div>
            <div class="form-group">
               <div class="col-md-offset-2 col-md-10">
                  <div class="checkbox">
                     @Html.CheckBoxFor(m => m.RememberMe)
                     @Html.LabelFor(m => m.RememberMe)
                  </div>
               </div>
            </div>
            <div class="form-group">
               <div class="col-md-offset-2 col-md-10">
                  <input type="submit" value="Log in" class="btn btn-default" />
               </div>
            </div>
            <p>
               @Html.ActionLink("Register as a new user", "Register")
            </p>
            @* Enable this once you have account confirmation enabled for password reset functionality *@
            <p>
               @Html.ActionLink("Forgot your password?", "ForgotPassword")
            </p>
         }
      </section>
   </div>
   <div class="col-md-4">
      <section id="socialLoginForm">
         @Html.Partial("_ExternalLoginsListPartial", new ExternalLoginListViewModel { ReturnUrl = ViewBag.ReturnUrl })
      </section>
   </div>
</div>

@section Scripts {
   @Scripts.Render("~/bundles/jqueryval")
}
صفحه ورود از این به بعد دارای گزینه تغییر پسورد خواهد بود. (reset the password)
فرستادن دوباره لینک تایید ایمیل
زمانیکه کاربر یک اکانت Local ایجاد می نماید، یک لینک برای تایید ایمیل قبل از Login کاربر ارسال می شود. اگر کاربر به طور تصادفی ایمیل اعتبارسنجی را پاک نماید یا ایمیل به کاربر فرستاده نشده باشد، کاربر نیاز به ارسال دوباره این ایمیل دارد. کد زیر برای فرستادن دوباره این ایمیل می باشد.
متد زیر را در پایین کنترلر Account اضافه نمایید :
private async Task<string> SendEmailConfirmationTokenAsync(string userID, string subject)
{
   string code = await UserManager.GenerateEmailConfirmationTokenAsync(userID);
   var callbackUrl = Url.Action("ConfirmEmail", "Account",
      new { userId = userID, code = code }, protocol: Request.Url.Scheme);
   await UserManager.SendEmailAsync(userID, subject,
      "Please confirm your account by clicking <a href=\"" + callbackUrl + "\">here</a>");

   return callbackUrl;
}
متد Register را برای استفاده از Helper جدید بروزرسانی می نماییم :
//
// POST: /Account/Register
[HttpPost]
[AllowAnonymous]
[ValidateAntiForgeryToken]
public async Task<ActionResult> Register(RegisterViewModel model)
{
   if (ModelState.IsValid)
   {
      var user = new ApplicationUser { UserName = model.Email, Email = model.Email };
      var result = await UserManager.CreateAsync(user, model.Password);
      if (result.Succeeded)
      {
         //  Comment the following line to prevent log in until the user is confirmed.
         //  await SignInManager.SignInAsync(user, isPersistent:false, rememberBrowser:false);

         string callbackUrl = await SendEmailConfirmationTokenAsync(user.Id, "Confirm your account");


         ViewBag.Message = "Check your email and confirm your account, you must be confirmed "
                         + "before you can log in.";

         return View("Info");
         //return RedirectToAction("Index", "Home");
      }
      AddErrors(result);
   }

   // If we got this far, something failed, redisplay form
   return View(model);
}
متد login را برای فرستادن دوباره Password هنگامی که کاربر تایید نشده بود ، بروزرسانی می نماییم:
//
// POST: /Account/Login
[HttpPost]
[AllowAnonymous]
[ValidateAntiForgeryToken]
public async Task<ActionResult> Login(LoginViewModel model, string returnUrl)
{
   if (!ModelState.IsValid)
   {
      return View(model);
   }

   // Require the user to have a confirmed email before they can log on.
  // var user = await UserManager.FindByNameAsync(model.Email);
   var user =  UserManager.Find(model.Email, model.Password);
   if (user != null)
   {
      if (!await UserManager.IsEmailConfirmedAsync(user.Id))
      {
         string callbackUrl = await SendEmailConfirmationTokenAsync(user.Id, "Confirm your account-Resend");

          // Uncomment to debug locally
          // ViewBag.Link = callbackUrl;
         ViewBag.errorMessage = "You must have a confirmed email to log on. "
                              + "The confirmation token has been resent to your email account.";
         return View("Error");
      }
   }

   // This doesn't count login failures towards account lockout
   // To enable password failures to trigger account lockout, change to shouldLockout: true
   var result = await SignInManager.PasswordSignInAsync(model.Email, model.Password, model.RememberMe, shouldLockout: false);
   switch (result)
   {
      case SignInStatus.Success:
         return RedirectToLocal(returnUrl);
      case SignInStatus.LockedOut:
         return View("Lockout");
      case SignInStatus.RequiresVerification:
         return RedirectToAction("SendCode", new { ReturnUrl = returnUrl, RememberMe = model.RememberMe });
      case SignInStatus.Failure:
      default:
         ModelState.AddModelError("", "Invalid login attempt.");
         return View(model);
   }
}
ترکیب Social Login با Local Login اکانتها
شما می توانید اکانتهای Local و Social را بوسیله کلیک روی لینک ایمیل ارسالی ترکیب نمایید.
روی لینک Manage کلیک کنید. می بینید که External Logins (ورود خارجی) برای این اکانت 0 است.

روی لینک another log in service کلیک کرده و درخواستهای برنامه را قبول نمایید. دو اکانت با همدیگر ترکیب شده و شما قادر خواهید بود تا با یکی از آنها وارد شوید. شاید شما بخواهید تا کاربران فقط با اکانت اصلی سایت شما وارد شوند.
در شکل زیر می بینید که شخص Tom با اکانت سایت اجتماعی خود وارد شده و می بینید که
External Logins : 1
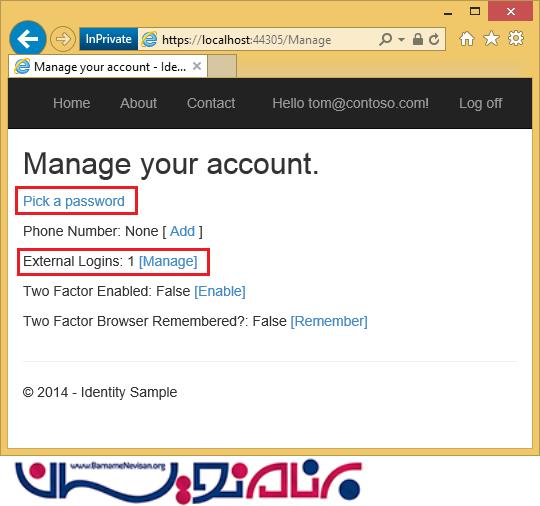
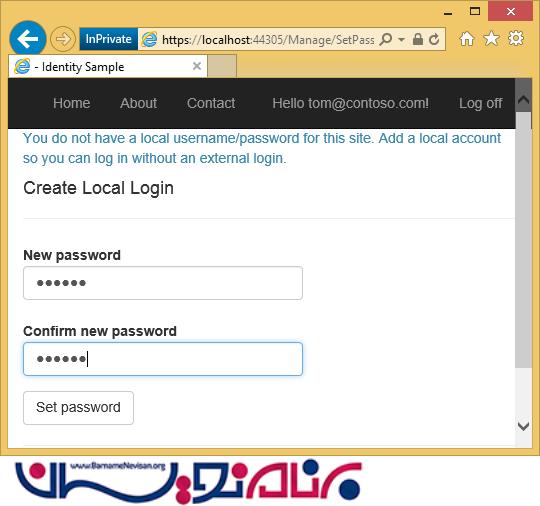
گزینه Pick a password به شما اجازه می دهد که به صورت لوکال به همان اکانت وارد شوید.

- ASP.net MVC
- 4k بازدید
- 7 تشکر