ایجاد ویندوز سرویس در #C
سه شنبه 14 مهر 1394در این مقاله به ایجاد یک ویندوز سرویس به دو زبان سی شارپ و VB.net خواهیم پرداخت . سرویس ما کار ساده چاپ Hello World را انجام می دهد .

Interval ویندوز سرویس کار خاصی که به آن محول شده است را در بازه های زمانی مشخص(interval )انجام میدهد
Daily در ساعت مشخصی در روز کار خاصی توسط ویندوز سرویس انجام میشود.
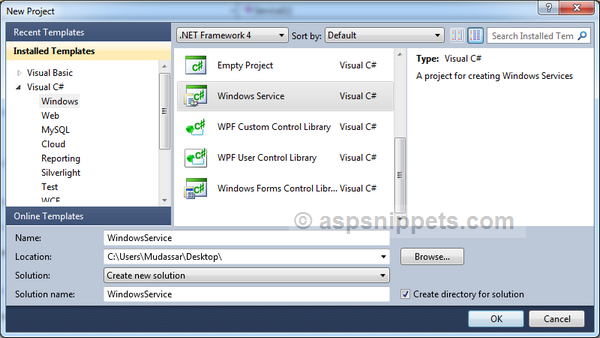
مرحله 1 – یک پروژه از نوع ویندوز سرویس بسازید.شکل زیر شما را راهنمایی می کند
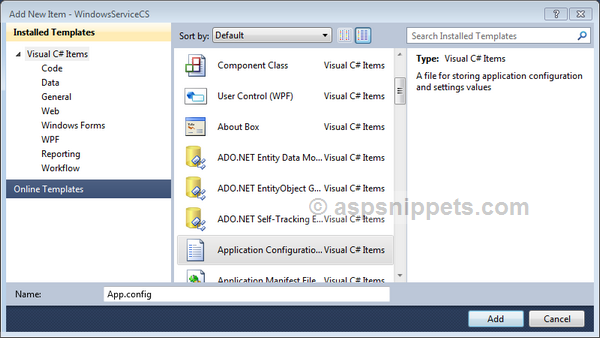
مرحله 2 – اضافه کردن App.confige
یک فایل App.confige مانند شکل زیر به پروژه خود بیافزایید. این فایل ، ویندوز سرویس را کنترل می کند تا در حالت (Mode) مورد نظر به درستی کار کند
بعد از افزودن App.confige نیاز دارید که App setting را به آن بیافزایید. مانند شکل زیر
<?xmlversion="1.0"encoding="utf-8" ?>
<configuration>
    <appSettings>
        <add key ="Mode" value ="Daily"/>
        <!-- <add key ="Mode" value ="Interval"/>-->
        <add key ="IntervalMinutes" value ="1"/>
        <add key ="ScheduledTime" value ="18:41"/>
    </appSettings>
</configuration>
Mode: این آیتم برای تنظیم حالت سرویس مورد استفاده قرار می گیرد که دارای دو مقدار است . Interval و Daily
Interval Minutes : این آیتم زمانی که Mode را بر روی Interval تنظیم کرده ایم مورد استفاده قرار می گیرد.دوره زمانی اجرای سرویس را در این آیتم تنظیم می کنیم.
Schaduled Time : اگر Mode بر روی Daily تنظیم شود این آیتم مورد استفاده قرار خواهد گرفت .این آیتم زمانی در روز که سرویس شروع به کار کند را نشان میدهد.
تنظیمات Timer
تنظیمات مربوط به تایمر در کلاس سرویس انجام می گیرد.کلاس تایمر متعلق به System.Threading است .این تایمر برای زمان بندی سرویس به کار می آید.تایمر یک متد Callback ایی دارد که زمانی که elapsed می شود (به پایان می رسد) متدی را اجرا می کند.
Namespace زیر را به پروژه خود اضافه کنید.
در سی شارپ
using System.IO;
using System.Threading;
using System.Configuration;
در VB
mports System.IO
Imports System.Threading
Imports System.Configuration
بعد از این کار در کلاس Service1 متدها Handler مربوط به رویدادهای Onstart و Onstop را می نویسیم.وقتی سرویس شروع می شود متد Onstart تابع ScheduleService را فراخوانی می کند.تابع ScheduleService ابتدا از فایل App.confige مقدار Mode را فراخوانی می کند. اگر Mode به صورت Daily تنظیم شده باشد آنگاه ScheduleService از App.confige این مقدار را می خواند اگر این زمان گذشته باشد برای روز بعد و همین زمان سرویس اجرا خواهد شد.
اگر Mode بر روی Interval تنظیم شده باشد، آنگاه مقدار IntervalMinutes را به زمان کنونی می افزاید تا در دوره بعد از گذر این زمان، سرویس را اجرا کند.در آخر تایمر ست می شود و پس از اجرای سرویس متد Callback تایمر زمان اجرای شدن را log می گیرد.
در سی شارپ
public partial class Service1 : ServiceBase
{
    public Service1()
    {
        InitializeComponent();
    }

    protected override void OnStart(string[] args)
    {
        this.WriteToFile("Simple Service started {0}");
        this.ScheduleService();
    }

    protected override void OnStop()
    {
        this.WriteToFile("Simple Service stopped {0}");
        this.Schedular.Dispose();
    }

    private Timer Schedular;

    public void ScheduleService()
    {
        try
        {
            Schedular = new Timer(new TimerCallback(SchedularCallback));
            string mode = ConfigurationManager.AppSettings["Mode"].ToUpper();
            this.WriteToFile("Simple Service Mode: " + mode + " {0}");

            //Set the Default Time.
            DateTime scheduledTime = DateTime.MinValue;

            if (mode == "DAILY")
            {
                //Get the Scheduled Time from AppSettings.
                scheduledTime = DateTime.Parse(System.Configuration.ConfigurationManager.AppSettings["ScheduledTime"]);
                if (DateTime.Now > scheduledTime)
                {
                    //If Scheduled Time is passed set Schedule for the next day.
                    scheduledTime = scheduledTime.AddDays(1);
                }
            }

            if (mode.ToUpper() == "INTERVAL")
            {
                //Get the Interval in Minutes from AppSettings.
                int intervalMinutes = Convert.ToInt32(ConfigurationManager.AppSettings["IntervalMinutes"]);

                //Set the Scheduled Time by adding the Interval to Current Time.
                scheduledTime = DateTime.Now.AddMinutes(intervalMinutes);
                if (DateTime.Now > scheduledTime)
                {
                    //If Scheduled Time is passed set Schedule for the next Interval.
                    scheduledTime = scheduledTime.AddMinutes(intervalMinutes);
                }
            }

            TimeSpan timeSpan = scheduledTime.Subtract(DateTime.Now);
            string schedule = string.Format("{0} day(s) {1} hour(s) {2} minute(s) {3} seconds(s)", timeSpan.Days, timeSpan.Hours, timeSpan.Minutes, timeSpan.Seconds);

            this.WriteToFile("Simple Service scheduled to run after: " + schedule + " {0}");

            //Get the difference in Minutes between the Scheduled and Current Time.
            int dueTime = Convert.ToInt32(timeSpan.TotalMilliseconds);

            //Change the Timer's Due Time.
            Schedular.Change(dueTime, Timeout.Infinite);
        }
        catch(Exception ex)
        {
            WriteToFile("Simple Service Error on: {0} " + ex.Message + ex.StackTrace);

            //Stop the Windows Service.
            using (System.ServiceProcess.ServiceController serviceController = new System.ServiceProcess.ServiceController("SimpleService"))
            {
                serviceController.Stop();
            }
        }
    }

    private void SchedularCallback(object e)
    {
        this.WriteToFile("Simple Service Log: {0}");
        this.ScheduleService();
    }

    private void WriteToFile(string text)
    {
        string path = "C:\\ServiceLog.txt";
        using (StreamWriter writer = new StreamWriter(path, true))
        {
            writer.WriteLine(string.Format(text, DateTime.Now.ToString("dd/MM/yyyy hh:mm:ss tt")));
            writer.Close();
        }
    }
}
در VB
Public Class Service1

    Protected Overrides Sub OnStart(ByVal args() As String)
        Me.WriteToFile("Simple Service started at " + DateTime.Now.ToString("dd/MM/yyyy hh:mm:ss tt"))
        Me.ScheduleService()
    End Sub

    Protected Overrides Sub OnStop()
        Me.WriteToFile("Simple Service stopped at " + DateTime.Now.ToString("dd/MM/yyyy hh:mm:ss tt"))
        Me.Schedular.Dispose()
    End Sub

    Private Schedular As Timer

    Public Sub ScheduleService()
        Try
            Schedular = New Timer(New TimerCallback(AddressOf SchedularCallback))
            Dim mode As String = ConfigurationManager.AppSettings("Mode").ToUpper()
            Me.WriteToFile((Convert.ToString("Simple Service Mode: ") & mode) + " {0}")

            'Set the Default Time.
            Dim scheduledTime As DateTime = DateTime.MinValue

            If mode = "DAILY" Then
                'Get the Scheduled Time from AppSettings.
                scheduledTime = DateTime.Parse(System.Configuration.ConfigurationManager.AppSettings("ScheduledTime"))
                If DateTime.Now > scheduledTime Then
                    'If Scheduled Time is passed set Schedule for the next day.
                    scheduledTime = scheduledTime.AddDays(1)
                End If
            End If

            If mode.ToUpper() = "INTERVAL" Then
                'Get the Interval in Minutes from AppSettings.
                Dim intervalMinutes As Integer = Convert.ToInt32(ConfigurationManager.AppSettings("IntervalMinutes"))

                'Set the Scheduled Time by adding the Interval to Current Time.
                scheduledTime = DateTime.Now.AddMinutes(intervalMinutes)
                If DateTime.Now > scheduledTime Then
                    'If Scheduled Time is passed set Schedule for the next Interval.
                    scheduledTime = scheduledTime.AddMinutes(intervalMinutes)
                End If
            End If

            Dim timeSpan As TimeSpan = scheduledTime.Subtract(DateTime.Now)
            Dim schedule As String = String.Format("{0} day(s) {1} hour(s) {2} minute(s) {3} seconds(s)", timeSpan.Days, timeSpan.Hours, timeSpan.Minutes, timeSpan.Seconds)

            Me.WriteToFile((Convert.ToString("Simple Service scheduled to run after: ") & schedule) + " {0}")

            'Get the difference in Minutes between the Scheduled and Current Time.
            Dim dueTime As Integer = Convert.ToInt32(timeSpan.TotalMilliseconds)

            'Change the Timer's Due Time.
            Schedular.Change(dueTime, Timeout.Infinite)
        Catch ex As Exception
            WriteToFile("Simple Service Error on: {0} " + ex.Message + ex.StackTrace)

            'Stop the Windows Service.
            Using serviceController As New System.ServiceProcess.ServiceController("SimpleService")
                serviceController.[Stop]()
            End Using
        End Try
    End Sub

    Private Sub SchedularCallback(e As Object)
        Me.WriteToFile("Simple Service Log: " + DateTime.Now.ToString("dd/MM/yyyy hh:mm:ss tt"))
        Me.ScheduleService()
    End Sub

    Private Sub WriteToFile(text As String)
        Dim path As String = "C:\ServiceLog.txt"
        Using writer As New StreamWriter(path, True)
            writer.WriteLine(String.Format(text, DateTime.Now.ToString("dd/MM/yyyy hh:mm:ss tt")))
            writer.Close()
        End Using
    End Sub
End Class
افزودن Installer به ویندوز سرویسبرای اجرا شدن ویندوز سرویس نیاز داریم که یک Installer برای آن بنویسیم .بر روی کلاس Service1.cs کلیک راست کنید و گزینه Add installer را بزنید و نام انرا project installer بگذارید.در قسمت Codebehind این کلاس و در InitializeComponent ما نام سرویس را ست کرده ایم . و همچنین StartType را بر روی Aotomatic تنظیم کرده ایم.
در سی شارپ
private void InitializeComponent()
{
    this.serviceProcessInstaller1 = new System.ServiceProcess.ServiceProcessInstaller();
    this.serviceInstaller1 = new System.ServiceProcess.ServiceInstaller();
    //
    // serviceProcessInstaller1
    //
    this.serviceProcessInstaller1.Password = null;
    this.serviceProcessInstaller1.Username = null;
    //
    // serviceInstaller1
    //

    //Set the ServiceName of the Windows Service.
    this.serviceInstaller1.ServiceName = "SimpleService";

    //Set its StartType to Automatic.
    this.serviceInstaller1.StartType = System.ServiceProcess.ServiceStartMode.Automatic;

    //
    // ProjectInstaller
    //
    this.Installers.AddRange(new System.Configuration.Install.Installer[] {
    this.serviceProcessInstaller1,
    this.serviceInstaller1});
}
در VB
Private Sub InitializeComponent()
    Me.ServiceProcessInstaller1 = New System.ServiceProcess.ServiceProcessInstaller()
    Me.ServiceInstaller1 = New System.ServiceProcess.ServiceInstaller()
    '
    'ServiceProcessInstaller1
    '
    Me.ServiceProcessInstaller1.Password = Nothing
    Me.ServiceProcessInstaller1.Username = Nothing
    '
    'ServiceInstaller1
    '
    'Set the ServiceName of the Windows Service.
    Me.ServiceInstaller1.ServiceName = "SimpleService"

    'Set its StartType to Automatic.
    Me.ServiceInstaller1.StartType = System.ServiceProcess.ServiceStartMode.Automatic

    '
    'ProjectInstaller
    '
    Me.Installers.AddRange(New System.Configuration.Install.Installer() {Me.ServiceProcessInstaller1, Me.ServiceInstaller1})
End Sub
اتوماتیک ساختن ویندوز سرویس بعد از نصب
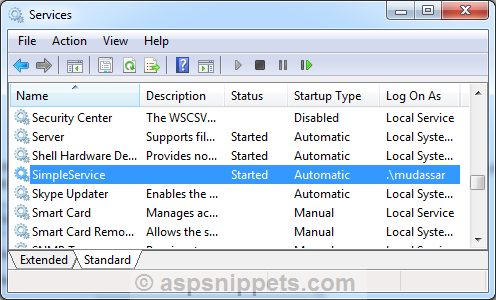
بعد از نصب سرویس مورد نظر ما در قسمت سرویس های ویندوز در Computer Management. دیده میشود.
بعد از انجام مراحل قبل یک ویندوز سرور ساخته ایم ولی هنوز کارمان تمام نشده است.
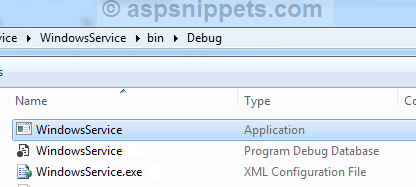
بر روی پروژه کلیک راست کنید و Open folder in file explorer را بزنید حال به debug- > Run بروید . در این قسمت یک Exe میبینید مسیر این فایل را کپی کنید
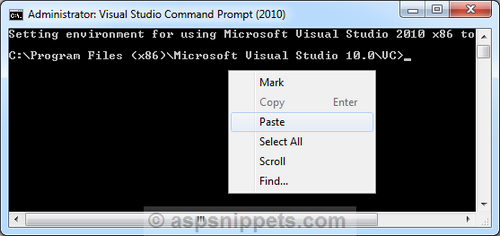
حال Programs => Microsoft Visual Studio 2010 => Visual Studio Tools => Visual Studio Command Prompt را اجرا کنید و در درون آن کد زیر را تایپ کنید.
InstallUtil /i <Path of Windows Service EXE file>
و به جای <Path of Windows Service EXE file> مسیر فایل اجرایی قبل را Past کنید.
بعد از اجرا شدن این کد پنجره ای مانند زیر باز می شود

در این پنجره نام کاربری کامپیوتر و رمز را وارد کنید
بعد از انجام مراحل بالا سرویس مورد نظر ما یعنی Simple Service در قسمت سرویس های سیستم قابل مشاهده است .
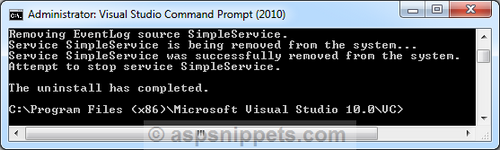
برای Uninstall کردن سرویس مورد نظر به صورت زیر عمل می کنیم
باز هم Programs => Microsoft Visual Studio 2010 => Visual Studio Tools => Visual Studio Command Prompt را اجرا می کنیم و کدهای زیر را در آن کپی می کنیم
InstallUtil /u <Path of Windows Service EXE file> و به جای <Path of Windows Service EXE file> مسیر فایل اجرایی را Past می کنیم .بعد از اینکه عمل ما موفقیت آمیز باشد پنجره ای مانند زیر نمایش داده خواهد شد

- C#.net
- 8k بازدید
- 10 تشکر