ساخت Windows Service برای ارسال ایمیل روزانه در #C
یکشنبه 26 مهر 1394در این مقاله قصد داریم در مورد Windows Service ها و نحوه ی نصب و اینکه چگونه می شود یک ایمیل را به یک شخص به صورت روزانه ارسال کرد صحبت کنیم.

قبل از هر چیز برای به دست اوردن اطلاعات در مورد Windows Service به این مقاله مراجعه کنید.
قدم اول: یک پروژه در Visual Studio می سازید و اسم آن را WindowsServiceProject1 می گذارید.
قدم دوم:داخل فایل App.Config تغییرات زیر را می دهید.
<configuration>
    <appSettings>
        <add key="StartTime" value="03:50 PM " />
        <add key="callDuration" value="2" />
        <add key="CallType" value="1" />
        <add key="FromMail" value="your_from_email_id@gmail.com" />
        <add key="Password" value="your_email_id_password" />
        <add key="Host" value="smtp.gmail.com" />
    </appSettings>
    <system.net>
        <mailSettings>
            <smtp from="your_from_email_id@gmail.com">
                <network host="smtp.gmail.com" userName="your_from_email_id@gmail.com" password="your_email_id_password" enableSsl="true" port="587" />
            </smtp>
        </mailSettings>
    </system.net>
</configuration>
در این تنظیمات ایمیل مورد نظر را وارد می کنید و smtp.gmail.com و شماره پورت مورد نظر یعنی 587 را وارد می کنید.
قدم سوم:یک کلاس به نام SendMailService.cs را به پروژه ی خود اضافه کنید و و فضای نام و متد ها را به آن ها اضافه نمایید.
using System;
using System.Collections.Generic;
using System.Configuration;
using System.IO;
using System.Linq;
using System.Net;
using System.Net.Mail;
using System.Text;

namespace WindowsServiceProject1
{
    class SendMailService
    {
        // This function write log to LogFile.text when some error occurs.
        public static void WriteErrorLog(Exception ex)
        {
            StreamWriter sw = null;
            try
            {
                sw = new StreamWriter(AppDomain.CurrentDomain.BaseDirectory + "\\LogFile.txt", true);
                sw.WriteLine(DateTime.Now.ToString() + ": " + ex.Source.ToString().Trim() + "; " + ex.Message.ToString().Trim());
                sw.Flush();
                sw.Close();
            }
            catch
            {
            }
        }
        // This function write Message to log file.
        public static void WriteErrorLog(string Message)
        {
            StreamWriter sw = null;
            try
            {
                sw = new StreamWriter(AppDomain.CurrentDomain.BaseDirectory + "\\LogFile.txt", true);
                sw.WriteLine(DateTime.Now.ToString() + ": " + Message);
                sw.Flush();
                sw.Close();
            }
            catch
            {
            }
        }
        // This function contains the logic to send mail.
        public static void SendEmail(String ToEmail, String Subj, string Message)
        {
            try
            {
                System.Net.Mail.SmtpClient smtpClient = new System.Net.Mail.SmtpClient();
                smtpClient.EnableSsl = true;
                smtpClient.Timeout = 200000;
                MailMessage MailMsg = new MailMessage();
                System.Net.Mime.ContentType HTMLType = new System.Net.Mime.ContentType("text/html");

                string strBody = "This is a test mail.";

                MailMsg.BodyEncoding = System.Text.Encoding.Default;
                MailMsg.To.Add(ToEmail);
                MailMsg.Priority = System.Net.Mail.MailPriority.High;
                MailMsg.Subject = "Subject - Window Service";
                MailMsg.Body = strBody;
                MailMsg.IsBodyHtml = true;
                System.Net.Mail.AlternateView HTMLView = System.Net.Mail.AlternateView.CreateAlternateViewFromString(strBody, HTMLType);

                smtpClient.Send(MailMsg);
                WriteErrorLog("Mail sent successfully!");
            }
            catch (Exception ex)
            {
                WriteErrorLog(ex.InnerException.Message);
                throw;
            }
        }
    }
}
قدم چهارم:داخل کلاس TestService می شوید فضای نام ومتد های زیر را داخل آن می نویسید.
using System;
using System.Collections.Generic;
using System.ComponentModel;
using System.Data;
using System.Diagnostics;
using System.Linq;
using System.ServiceProcess;
using System.Text;
using System.Configuration;
using System.Timers;

namespace WindowsServiceProject1
{
    public partial class TestService : ServiceBase
    {
        private System.Timers.Timer timer1;
        private string timeString;
        public int getCallType;

        /////////////////////////////////////////////////////////////////////
        public TestService()
        {
            InitializeComponent();
            int strTime = Convert.ToInt32(ConfigurationSettings.AppSettings["callDuration"]);
            getCallType = Convert.ToInt32(ConfigurationSettings.AppSettings["CallType"]);
            if (getCallType == 1)
            {
                timer1 = new System.Timers.Timer();
                double inter = (double)GetNextInterval();
                timer1.Interval = inter;
                timer1.Elapsed += new ElapsedEventHandler(ServiceTimer_Tick);
            }
            else
            {
                timer1 = new System.Timers.Timer();
                timer1.Interval = strTime * 1000;
                timer1.Elapsed += new ElapsedEventHandler(ServiceTimer_Tick);
            }
        }

        /////////////////////////////////////////////////////////////////////
        protected override void OnStart(string[] args)
        {
            timer1.AutoReset = true;
            timer1.Enabled = true;
            SendMailService.WriteErrorLog("Service started");
        }

        /////////////////////////////////////////////////////////////////////
        protected override void OnStop()
        {
            timer1.AutoReset = false;
            timer1.Enabled = false;
            SendMailService.WriteErrorLog("Service stopped");
        }

        /////////////////////////////////////////////////////////////////////
        private double GetNextInterval()
        {
            timeString = ConfigurationSettings.AppSettings["StartTime"];
            DateTime t = DateTime.Parse(timeString);
            TimeSpan ts = new TimeSpan();
            int x;
            ts = t - System.DateTime.Now;
            if (ts.TotalMilliseconds < 0)
            {
                ts = t.AddDays(1) - System.DateTime.Now;//Here you can increase the timer interval based on your requirments.
            }
            return ts.TotalMilliseconds;
        }

        /////////////////////////////////////////////////////////////////////
        private void SetTimer()
        {
            try
            {
                double inter = (double)GetNextInterval();
                timer1.Interval = inter;
                timer1.Start();
            }
            catch (Exception ex)
            {
            }
        }

        /////////////////////////////////////////////////////////////////////
        private void ServiceTimer_Tick(object sender, System.Timers.ElapsedEventArgs e)
        {
            string Msg = "Hi ! This is DailyMailSchedulerService mail.";//whatever msg u want to send write here.

            SendMailService.SendEmail("to_email_address@dmain.com", "Subject", Msg);

            if (getCallType == 1)
            {
                timer1.Stop();
                System.Threading.Thread.Sleep(1000000);
                SetTimer();
            }
        }
    }
}
قدم پنجم:Windows Service شما ساخته شده است حالا هنوز کار تمام نشده است، حالا ما نیاز داریم ProjectInstaller
به پروژه ی خود اضافه کنید، روی پروژه ی خود کلیک راست کنید و گزینه ی Installer انتخاب کنید.
روی servicenstaller کلیک راست کرده و برای serviceName اسم Test Service را می گذارید.
حال پروژه ی را Build کنید و یک exe در پوشه ی پروژه ی خود ایجاد خواهید کرد.
حالا ویندوز سرویس شما آماده است که در هر مسیری قرار بگیرد و نصب شود.
ولی قبل از آن باید روی سیستم شما تنظیماتی انجام شود که به صورت زیر می باشد.
داخل Microsoft Visual Studio 2012 و به پوشه ی Visual Studio Tools بروید و Developer Command Prompt for VS2012 را انتخاب کنید.
و بعد آدرس پروژه ی خود را که exe شما آنجا قرار دارد کپی کنید و مثل آدرس زیر:
C:\Users\USER1\Documents\Visual Studio 2012\Projects\WindowsServiceProject1\bin\Debug\").
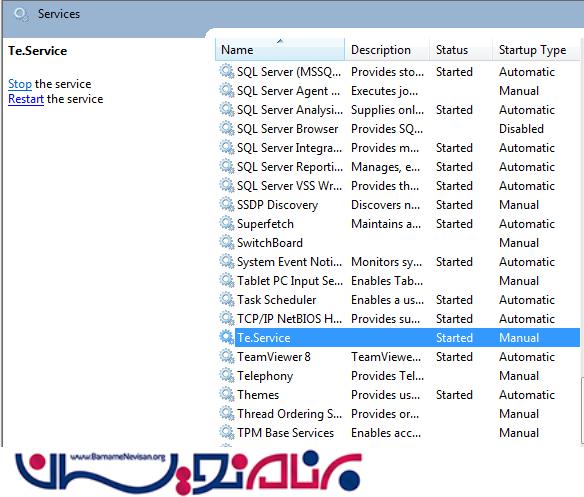
وقتی با موفقیت انجام شد حالا داخل Control Panel در قسمت Services سرویس نصب شده خود را می توانید Start بزنید.
برای شما به صورت روزانه ایمیل ارسال می شود اگر خواستی تنظیمات را تغییر دهید داخل app.config هر تنظیمات دلخواه
به آن اضافه کنید و به روز رسانی نمایید.

- C#.net
- 3k بازدید
- 6 تشکر