ساخت جدول Dynamic در اندروید
دوشنبه 4 آبان 1394در این مقاله می خواهیم در مورد ساخت یک جدول داینامیک در اندروید صحبت کنیم این که چگونه می توان یک جدول پویا ساخت ، واینکه چگونه می شود در آن اطلاعات را نمایش داد.

یک پروژه ی جدید ایجاد کرده، و داخل Layout آن یک activity ایجاد نمایید(به صورت پیش فرض یک activity وجود دارد)
حالا داخل xml قطعه کد زیر را بنویسید:
<?xml version="1.0" encoding="utf-8"?>
<LinearLayout xmlns:android="http://schemas.android.com/apk/res/android"
              android:layout_width="fill_parent"
              android:layout_height="fill_parent"
              android:orientation="vertical" >

    <LinearLayout
            android:layout_width="match_parent"
            android:layout_height="wrap_content" >

        <TextView
                android:id="@+id/textView1"
                android:layout_width="wrap_content"
                android:layout_height="wrap_content"
                android:text="تعدادسطر"
                android:textAppearance="?android:attr/textAppearanceLarge" />

        <EditText
                android:id="@+id/editText1"
                android:layout_width="wrap_content"
                android:layout_height="wrap_content"
                android:layout_weight="1"
                android:ems="10" >

            <requestFocus />
        </EditText>

    </LinearLayout>

    <LinearLayout
            android:layout_width="match_parent"
            android:layout_height="wrap_content" >

        <TextView
                android:id="@+id/textView2"
                android:layout_width="wrap_content"
                android:layout_height="wrap_content"
                android:text="تعداد ستون"
                android:textAppearance="?android:attr/textAppearanceLarge" />

        <EditText
                android:id="@+id/editText2"
                android:layout_width="wrap_content"
                android:layout_height="wrap_content"
                android:layout_weight="1"
                android:ems="10" />

    </LinearLayout>

    <ScrollView
            android:id="@+id/scrollView1"
            android:layout_width="match_parent"
            android:layout_height="wrap_content" >

        <LinearLayout
                android:layout_width="match_parent"
                android:layout_height="match_parent"
                android:orientation="vertical" >

            <Button
                    android:id="@+id/button1"
                    android:layout_width="wrap_content"
                    android:layout_height="wrap_content"
                    android:text="ساخت جدول" />

            <TableLayout
                    android:id="@+id/TableLayout"
                    android:layout_width="200dp"
                    android:layout_height="wrap_content"
                    android:layout_alignParentLeft="true"
                    android:layout_alignParentTop="true"
                    android:layout_marginLeft="49dp"
                    android:layout_marginTop="22dp" >


            </TableLayout>

            <Button
                    android:id="@+id/Show"
                    android:layout_width="wrap_content"
                    android:layout_height="wrap_content"
                    android:text="نمایش اطلاعات" />


            <TableLayout
                    android:id="@+id/TableLayout2"
                    android:layout_width="200dp"
                    android:layout_height="wrap_content"
                    android:layout_alignParentLeft="true"
                    android:layout_alignParentTop="true"
                    android:layout_marginLeft="49dp"
                    android:layout_marginTop="22dp" >


            </TableLayout>
        </LinearLayout>
    </ScrollView>


</LinearLayout>
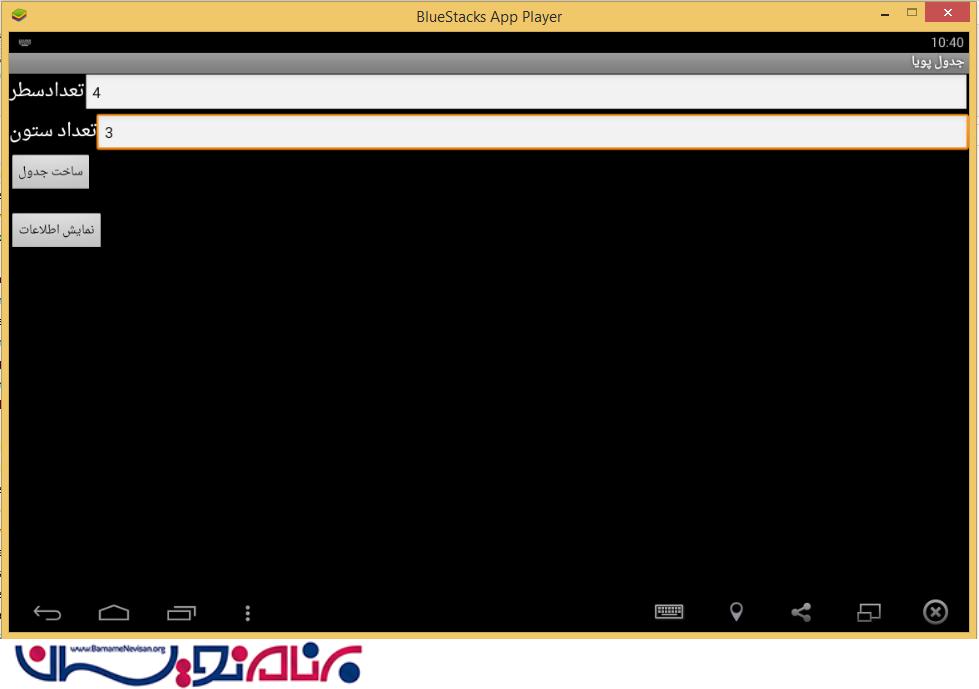
بعد از ساختن activity به صورت زیر خواهد بود:

در کد بالا یک لایه ی LinearLayout وجود دارد، که TextView و EditView را در داخل آن قرار می گیرد برای دومین TextView هم همین کار را انجام می دهیم.
دکمه ی نمایش جدول و دکمه ی نمایش اطلاعات جدول و خود جداول داخل یک ScrollView قرار می گیرد.که زمانی که اطلاعات بیش از اندازه ی گوشی بود با یک اسکرول کاربر بتواند اطلاعات را ببیند.
Table Layout از سطر وستون تشکیل شده که هر بار با زدن تعداد سطر وستون به جدول مورد نظر اضافه خواهد شد.
حالا به داخل کلاس جاوا activity خود بروید و قطعه کد زیر را بنویسید:
    EditText txt1;
    EditText txt2;
    int Row;
    int Col;
    int count, i, j;
    String str;
    String stm;
    Button Create;
    TableLayout TabLayout_Create;
    TableLayout TabLayout_Show;
    Button Show;
    protected void onCreate(Bundle savedInstanceState) {
        super.onCreate(savedInstanceState);
        setContentView(R.layout.activity_main);

        txt1 = (EditText) findViewById(R.id.editText1);
        txt2 = (EditText) findViewById(R.id.editText2);
        Create = (Button) findViewById(R.id.button1);
        Show = (Button) findViewById(R.id.Show);
        TabLayout_Create = (TableLayout) findViewById(R.id.TableLayout);
        TabLayout_Show = (TableLayout) findViewById(R.id.TableLayout2);
        Create.setOnClickListener(new View.OnClickListener() {

            @Override
            public void onClick(View arg0) {
                // TODO Auto-generated method stub


                /*
    Row= Integer.parseInt(txt1.getText().toString());
    Col= Integer.parseInt(txt2.getText().toString());
    */
                str = txt1.getText().toString();
                stm = txt2.getText().toString();

                Row = Integer.parseInt(str);
                Col = Row = Integer.parseInt(stm);

                Toast.makeText(MainActivity.this,
                str, Toast.LENGTH_SHORT).show();
                Toast.makeText(MainActivity.this,
                stm, Toast.LENGTH_SHORT).show();


                // TextView[] txt;

                for (i = 1; i <= Row; i++) {
                    final TableRow row = new TableRow(MainActivity.this);
                    if (i % 2 == 0) {
                        row.setBackgroundColor(Color.MAGENTA);
                    } else {
                        row.setBackgroundColor(Color.GRAY);
                    }

                    for (j = 1; j <= Col; j++) {

                        final EditText txt = new EditText(MainActivity.this);
                        txt.setTextColor(Color.GREEN);
                        txt.setTextSize(TypedValue.COMPLEX_UNIT_PT, 8);
                        txt.setTypeface(Typeface.SERIF, Typeface.BOLD);
                        txt.setGravity(Gravity.LEFT);
                        txt.setText("C" + i + j + " ");

                        row.addView(txt);
                    }
                    TabLayout_Create.addView(row);

                }


            }
        });

        Show.setOnClickListener(new View.OnClickListener() {

            @Override
            public void onClick(View arg0) {
                // TODO Auto-generated method stub

                for (i = 0; i < Row; i++) {
                    final TableRow row = (TableRow) TabLayout_Create.getChildAt(i);
                    final TableRow row1 = new TableRow(MainActivity.this);

                    if (i % 2 == 0) {
                        row1.setBackgroundColor(Color.YELLOW);
                    } else {
                        row1.setBackgroundColor(Color.RED);
                    }
                    for (j = 0; j < Col; j++) {
                        final EditText etxt = (EditText) row.getChildAt(j);

                        final TextView txt = new TextView(MainActivity.this);
                        txt.setTextColor(Color.GREEN);
                        txt.setTextSize(TypedValue.COMPLEX_UNIT_PT, 8);
                        txt.setTypeface(Typeface.SERIF, Typeface.BOLD);
                        txt.setGravity(Gravity.LEFT);
                        txt.setText(etxt.getText());

                        row1.addView(txt);
                    }
                    TabLayout_Show.addView(row1);
                }

            }
        });

    }

    };
حالا به توضیح قطعه کد میپردازیم:
    EditText txt1;
    EditText txt2;
    Button Create;
    TableLayout TabLayout_Create;
    TableLayout TabLayout_Show;
    Button Show;
    txt1=(EditText)findViewById(R.id.editText1);
    txt2=(EditText)findViewById(R.id.editText2);
    Create =(Button)findViewById(R.id.button1);
    Show=(Button)findViewById(R.id.Show);
    TabLayout_Create =(TableLayout) findViewById(R.id.TableLayout);
    TabLayout_Show=(TableLayout) findViewById(R.id.TableLayout2);
این قطعه کد به تعریف ابزار هایی است که در لایه activity ما قرار دارد، به هر کدام از ابزار ها باید یک id بدهید و بعد توسط findviewById آن را تعریف کنید که برای هر کدام بتوانید رویداد بنویسید
قسمت دوم کد:
    Create.setOnClickListener(new View.OnClickListener() {

        @Override
        public void onClick(View arg0) {
            // TODO Auto-generated method stub
            str = txt1.getText().toString();
            stm = txt2.getText().toString();

            Row = Integer.parseInt(str);
            Col = Row = Integer.parseInt(stm);

            for (i = 1; i <= Row; i++) {
                final TableRow row = new TableRow(MainActivity.this);
                if (i % 2 == 0) {
                    row.setBackgroundColor(Color.MAGENTA);
                } else {
                    row.setBackgroundColor(Color.GRAY);
                }

                for (j = 1; j <= Col; j++) {

                    final EditText txt = new EditText(MainActivity.this);
                    txt.setTextColor(Color.GREEN);
                    txt.setTextSize(TypedValue.COMPLEX_UNIT_PT, 8);
                    txt.setTypeface(Typeface.SERIF, Typeface.BOLD);
                    txt.setGravity(Gravity.LEFT);
                    txt.setText("C" + i + j + " ");

                    row.addView(txt);


                }
                TabLayout_Create.addView(row);

            }


        }
    });
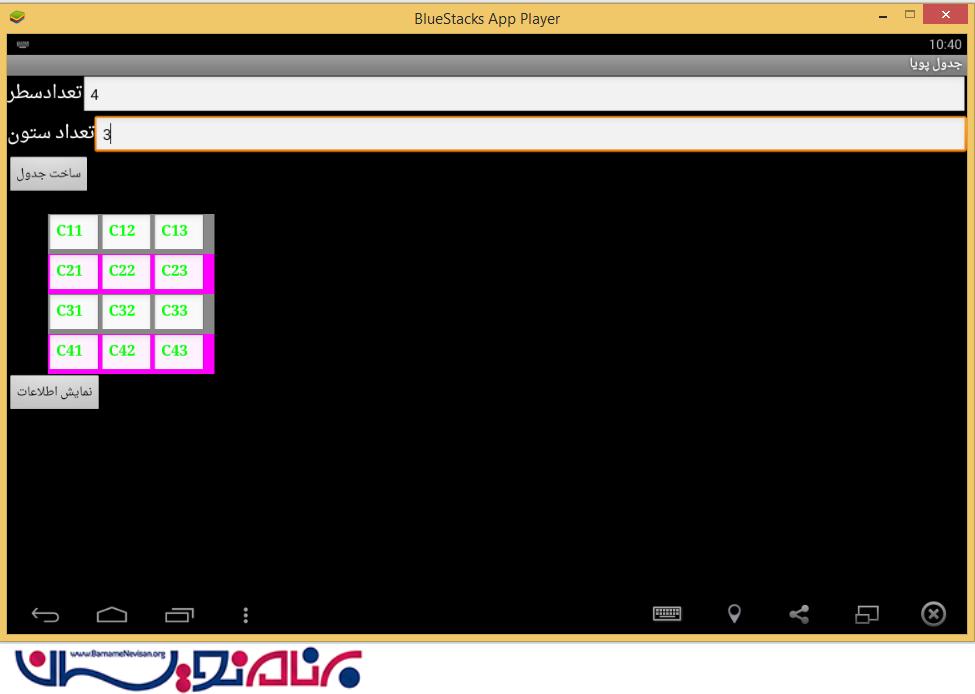
برای دکمه ی Create یک رویداد به نام ClickOnLIstner تعریف می کنید ابتدا به صورت رشته می گیرد و بعد مقدار وارد شده تبدیل به عدد صحیح می شود، از یک حلقه ی for استفاده می کند، که هر عددی که وارد شد اگر حلقه درست بود به سر یکی اضافه شود و یک رنگ به آن اختصاص دهد برای ستون هم از همین حلقه استفاده می شود
وقتی کاربر یک عددی را وارد می کند سطر و ستون اضافه می شود و در نهایت یک جدول ساخته می شود.

نکته ی مهم این است که هر کدام از سلول های جدول به صورت EditText است و شما می توانید داخل سلول ها را با مقادیر دلخواه خود به صورت دستی پر نمایید.
قسمت سوم کد برای نمایش اطلاعاتی است که داخل سلول های جدول نوشته شده است:
    Show.setOnClickListener(new View.OnClickListener() {

        @Override
        public void onClick(View arg0) {
            // TODO Auto-generated method stub

            for (i = 0; i < Row; i++) {
                final TableRow row = (TableRow) TabLayout_Create.getChildAt(i);
                final TableRow row1 = new TableRow(MainActivity.this);

                if (i % 2 == 0) {
                    row1.setBackgroundColor(Color.YELLOW);
                } else {
                    row1.setBackgroundColor(Color.RED);
                }
                for (j = 0; j < Col; j++) {
                    final EditText etxt = (EditText) row.getChildAt(j);

                    final TextView txt = new TextView(MainActivity.this);
                    txt.setTextColor(Color.GREEN);
                    txt.setTextSize(TypedValue.COMPLEX_UNIT_PT, 8);
                    txt.setTypeface(Typeface.SERIF, Typeface.BOLD);
                    txt.setGravity(Gravity.LEFT);
                    txt.setText(etxt.getText());

                    row1.addView(txt);
                }
                TabLayout_Show.addView(row1);
            }

        }
    });
در کد بالا از متد getChildeat استفاده شده است که یک کنترل است که از کنترل پدر خود استفاده می کند و داخل سلول ها اطلاعات را نمایش می دهد.
txt.setTextColor(Color.GREEN);
                txt.setTextSize(TypedValue.COMPLEX_UNIT_PT, 8);
                txt.setTypeface(Typeface.SERIF, Typeface.BOLD);
                txt.setGravity(Gravity.LEFT);
                txt.setText(etxt.getText());
کد بالا برای تغییر داده اندازه و فونت و قرار گرفتن در کدام قسمت صفحه و تنظیم کردن متن است
که به دلخواه خودتان است که قرار دهید.
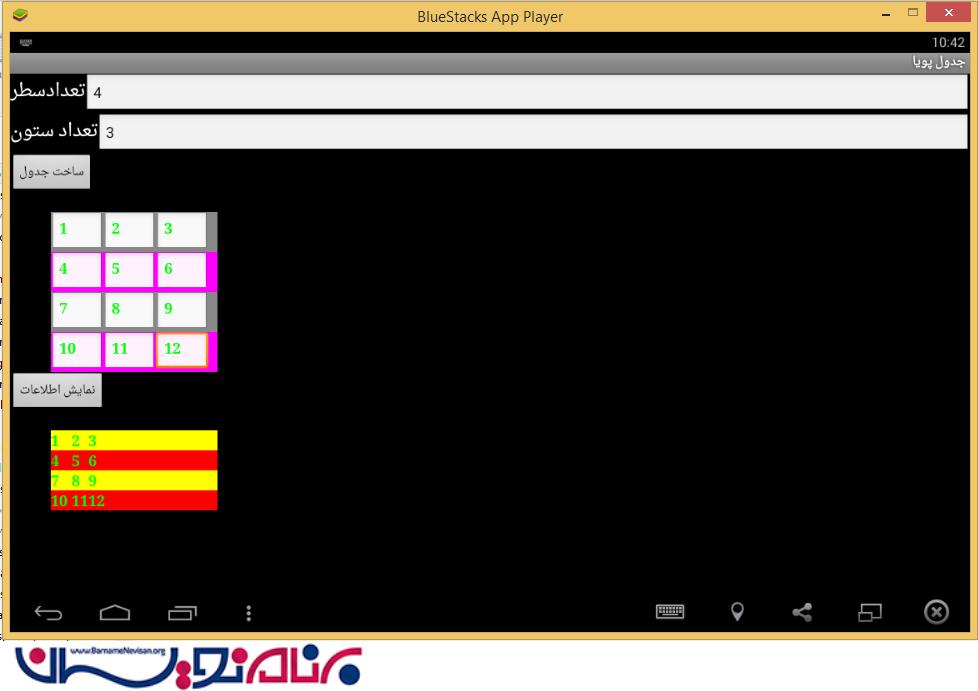
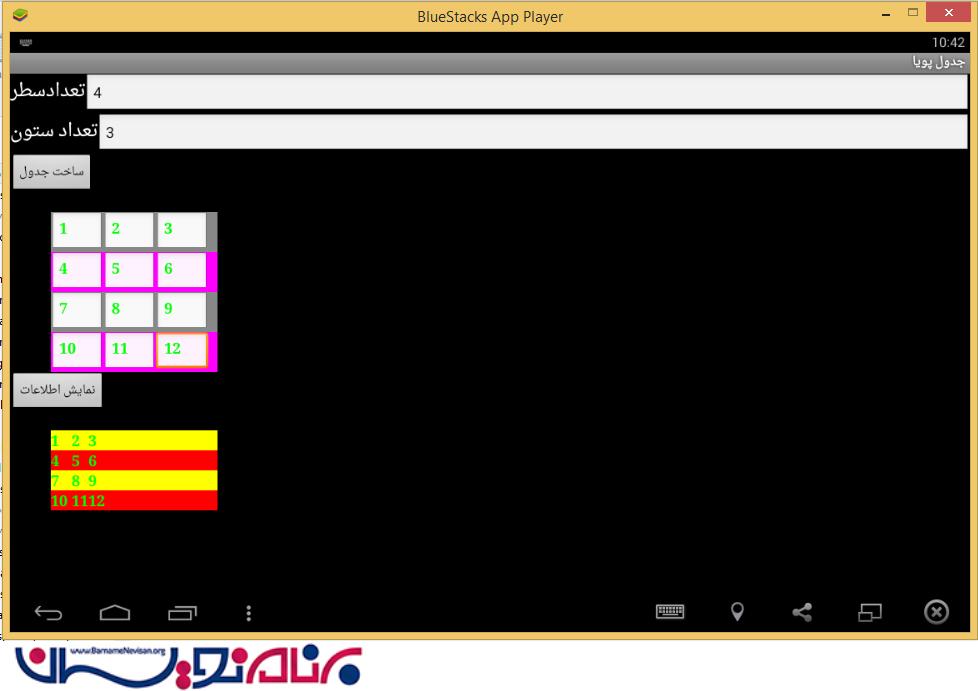
در پایان خروجی کار به صورت زیر است.

- Android
- 6k بازدید
- 2 تشکر
