ساخت یک فرم ارسال ایمیل با استفاده از ASP.NET MVC
پنجشنبه 20 آبان 1395در این مقاله قصد داریم شما را با نحوه ی ارسال ایمیل با استفاده از SMTP آشنا کنیم که برای شما در زیر توضیح خواهیم داد.

اولین چیزی که نیاز به دانستن آن داریم این است که چگونه میتوانیم پارامتر های سرور SMTP را دریافت کنیم.
که لینک های زیر به شما این کمک را میکنند.
Knowing what port number you should use
نمونه هایی از تنظیمات SMTP :
• Office365 : ا Address: smtp.office365.com, Port: 587, SSL: true
• Gmail : ا Address: smtp.gmail.com, Port: 587, SSL: true
• Yahoo : ا Address: smtp.mail.yahoo.com, Port: 587, SSL: true
کد مرجع (Source Code)
1- کد سرور
کلاس ConfigurationSMTP :
public class ConfigurationSMTP
{
    //SMTP parameters
    public static string smtpAdress  = "smtp.mail.yahoo.com";
    public static int    portNumber  = 587;
    public static bool   enableSSL   = true;
    //need it for the secured connection
    public static string from = "sender email";
    public static string password = "password of the above email";
}
متد SendNewMessage :
این متد شامل کد اصلی است که به آدرس مشخص شده پیام جدید را ارسال میکند.
چگونه عمل میکند ؟
1-ساخت یک پیام با استفاده از کلاس MailMessage() با استفاده از اطلاعات دریافت شده از درخواست HTTP ، مانند :
'Destination Email' 'Subject' 'Message Body'
2-ساخت و پیکربندی SMTP client با استفاده از کلاس SmtpClient().
3- هنگامی که در تلاش ایجاد اتصال SMTP میباشد با استفاده از متد smtp.Credentials یک پارامتر اعتبار ضمیمه آن میکنیم .
[HttpPost]
      public ActionResult SendNewMessage()
      {
          try
          {
              Response.StatusCode = 200;
              //getting useful configuration
              string smtpAddress = ConfigurationSMTP.smtpAdress;
              //it can be a "smtp.office365.com" or whatever,
              //it depends on smtp server of your sender email.
              int portNumber = ConfigurationSMTP.portNumber;   //Smtp port
              bool enableSSL = ConfigurationSMTP.enableSSL;  //SSL enable

              string emailTo = Request.Params["to"];
              string subject = Request.Params["subject"];

              StringBuilder body = new StringBuilder();

              //building the body of our email
              body.Append("<html><head> </head><body>");
              body.Append("<div style=' font-family: Arial;
              font-size: 14px; color: black;'>Hi,<br><br>");
              body.Append(Request.Params["message"]);
              body.Append("</div><br>");
              //Mail signature
              body.Append(string.Format("<span style='font-size:11px;font-family:
              Arial;color:#40411E;'>{0} - {1} {2}</span><br>",
              MessageModel.adress, MessageModel.zip, MessageModel.city));
              body.Append(string.Format("<span style='font-size:11px;font-family:
              Arial;color:#40411E;'>Mail: <a href=\"mailto:{0}\">{0}</a>
              </span><br>", ConfigurationSMTP.from));
              body.Append(string.Format("<span style='font-size:11px;font-family:
              Arial;color:#40411E;'>Tel: {0}</span><br>",
              MessageModel.phone));
              body.Append(string.Format("<span style='font-size:11px;font-family:
              Arial;'><a href=\"web site\">{0}</a>
              </span><br><br>", MessageModel.link));
              body.Append(string.Format("<span style='font-size:11px; font-family:
              Arial;color:#40411E;'>{0}</span><br>", MessageModel.details));
              body.Append( "</body></html>");

              using (MailMessage mail = new MailMessage())
              {
                  mail.From = new MailAddress(ConfigurationSMTP.from);
                  //destination adress
                  mail.To.Add(emailTo);
                  mail.Subject = subject;
                  mail.Body = body.ToString();
                  //set to true, to specify that we are sending html text.
                  mail.IsBodyHtml = true;
                  // Can set to false, if you are sending pure text.

                  string localFileName = "~/Content/TestAttachement.txt";
                  //to send a file in attachment.
                  mail.Attachments.Add(new Attachment
                  (Server.MapPath(localFileName), "application/pdf"));

                  //Specify the smtp Server and port number to create a new instance of SmtpClient.
                  using (SmtpClient smtp = new SmtpClient(smtpAddress, portNumber))
                  {
                      //passing the credentials for authentication
                      smtp.Credentials = new NetworkCredential
                      (ConfigurationSMTP.from, ConfigurationSMTP.password);
                      //Authentication required
                      smtp.EnableSsl = enableSSL;
                      //sending email.
                      smtp.Send(mail);
                  }
              }
           }
          catch (Exception ex)
          {
              //Error response
              Response.StatusCode = 400;
          }
          return null;
      }
2) کد سمت کلاینت
Index.cshtml
این فایل شامل موارد زیر است :
• کد های html , CSS : که برای طراحی و ساخت فرم ارسال استفاده شده اند.
• کد های javaScript : که برای رویداد دکمه ی ارسال استفاده شده اند.
<script type="text/javascript">

   $(document).ready(function () {
        $("#idFormContact").on("submit", function (e) {
            e.preventDefault();
            //call external service
            var url = "/Home/SendNewMessage";
            var formdata = (window.FormData) ? new FormData(this) : null;
            var fdata = (formdata !== null) ? formdata : $form.serialize();
            $("#idSubmitMvt").attr("disabled", true);

            $("#idNotifSuccess").hide();
            $("#idNotifError").hide();
            //get authorization keys.
            $.ajax({
                type: "POST",
                url: url,
                data: fdata,
                processData: false,
                contentType: false,
                success: function (data) {
                    $("#idNotifSuccess").show();
                },
                error: function (xhr, ajaxOptions, thrownError) {
                    console.log("Error");
                    $("#idNotifError").show();
                }
            });

        });
    });

</script>
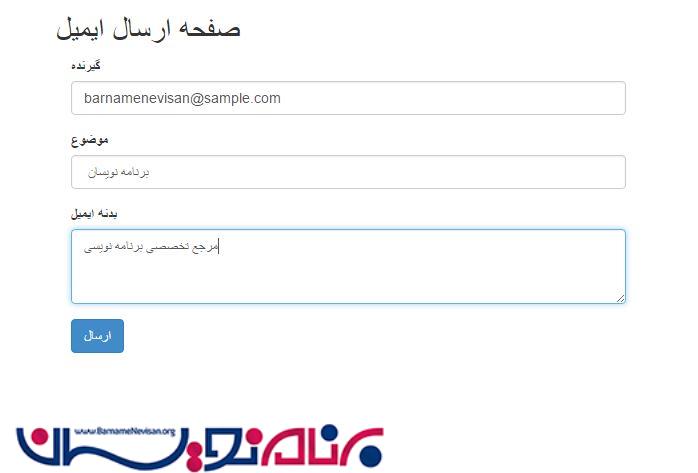
خروجی :
داده ها را وارد و فرم را ارسال کنید.
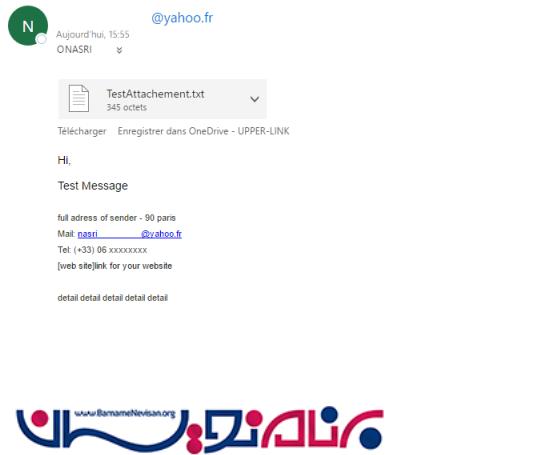
جزییات ارسال :
آموزش asp.net mvc

- ASP.net MVC
- 4k بازدید
- 11 تشکر