AutoComplate Text View در Xamarin
شنبه 19 دی 1394در این مقاله می خواهیم یک autocomplatetextview را در xamarin یک نمونه مثال بزنیم، که وقتی کاربر یک مقداری در textview نوشت به صورت لیستی نمایش بدهد.
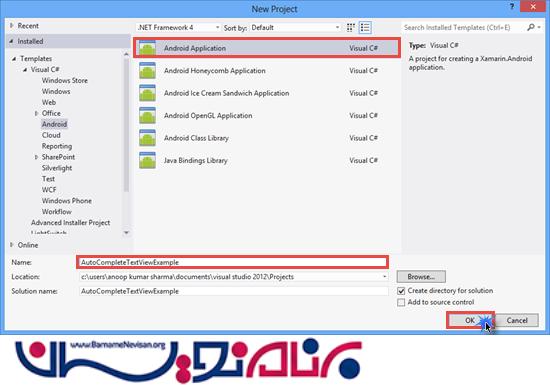
ابتدا یک پروژه ی جدید AndroidApplication ایجاد نمایید، به صورت زیر:
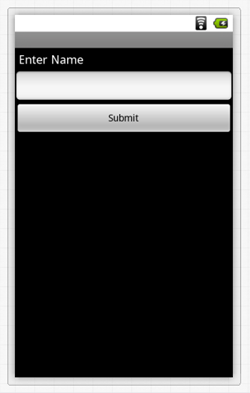
3 ابزار textview , autocomplatetextview,button را در صفحه ی خود قرار دهید به صورت زیر:
داخل Main.xaml قطعه کد زیر را بنویسید:
<LinearLayout xmlns:android="http://schemas.android.com/apk/res/android"
    android:orientation="vertical"
    android:layout_width="fill_parent"
    android:layout_height="fill_parent">
    <TextView
        android:text="Enter Name"
        android:textAppearance="?android:attr/textAppearanceMedium"
        android:layout_width="fill_parent"
        android:layout_height="wrap_content"
        android:id="@+id/textView1"
        android:padding="5dp" />
    <AutoCompleteTextView
        android:layout_width="fill_parent"
        android:layout_height="wrap_content"
        android:id="@+id/autoComplete1" />
    <Button
        android:text="Submit"
        android:layout_width="fill_parent"
        android:layout_height="wrap_content"
        android:id="@+id/btn_Submit" />
</LinearLayout>
یک آرایه ای از نوع رشته تعریف می نماییم و یک سری کلمه پیش فرض وارد می کنیم، و Autocomplatetextview را با استفاده از arrayadapter پر می نماییم.از یک دکمه بر روی صفحه استفاده می کنیم و با استفاده از رویداد یک پیغام toast ایجاد می کنیم که این پیغام به کاربر اطلاع می دهد که آیا autocomplatetextview پر شده است یا نه، و برای پر شدن یا نشدن آن پیغام نمایش داده می شود.
در کلاس activity قطعه کد زیر را می نویسیم:
using System;

using Android.App;
using Android.Content;
using Android.Runtime;
using Android.Views;
using Android.Widget;
using Android.OS;

namespace textviewcomplate
{
    [Activity(Label = "textviewcomplate", MainLauncher = true, Icon = "@drawable/icon")]
    public class Activity1 : Activity
    {
        AutoCompleteTextView tv;
        Button btn;

        protected override void OnCreate(Bundle bundle)
        {
            base.OnCreate(bundle);

            // Set our view from the "main" layout resource
            SetContentView(Resource.Layout.Main);

            tv = FindViewById<AutoCompleteTextView>(Resource.Id.autoCompleteTextView1);
            btn = FindViewById<Button>(Resource.Id.btnsubmit);
            var names = new string[] { "Anoop", "Arjit", "Akshay", "Ankit", "Rakesh" };
            ArrayAdapter adapter = new ArrayAdapter<string>(this, Android.Resource.Layout.SimpleSpinnerItem, names);
            tv.Adapter = adapter;
            btn.Click += btn_Click;

            // Get our button from the layout resource,
            // and attach an event to it

        }

        private void btn_Click(object sender, EventArgs e)
        {
            if(tv.Text!="")
            {
                Toast.MakeText(this, "نام وارد شده:"+tv.Text, ToastLength.Short).Show();
            }
            else
            {
                Toast.MakeText(this, "لطفا نام را وارد نمایید:" + tv.Text, ToastLength.Short).Show();
            }
        }
    }
}
خروجی به صورت زیر می باشد:


در مثال قبل ما از SimpleSpinnerItem برای نمایش لیست Autocomplatetextview استفاده کرده ایم، ولی می توان از textview استفاده نمایید و می توانید یک لایه ی دیگر اضافه نمایید و textview مورد نظر را در آن قرار دهید به صورت زیر:
    <?xml version="1.0" encoding="utf-8"?>
    <TextView xmlns:android="http://schemas.android.com/apk/res/android"
        android:text="Text"
        android:layout_width="fill_parent"
        android:layout_height="wrap_content"
        android:id="@+id/textView1"
        android:padding="5dp"
        android:textSize="20dp"
        android:textColor="@android:color/black" />
به کلاس activity بروید و arrayadapter مورد نظر را به صورت زیر تعریف نمایید:
ArrayAdapter adapter = new ArrayAdapter<string>(this, Resource.Layout.ListName, names);
دوره های آموزشی زامارین
دوره برنامه نویسی اندروید با سی شارپ ( Xamarin )
آموزش متریال دیزاین در زامارین
آموزش Xamarin Forms
دوره Xamarin Form پیشرفته
- Xamarin
- 2k بازدید
- 2 تشکر
