انتخاب و حذف چند آیتم از listview در اندروید
یکشنبه 11 بهمن 1394در این مقاله قصد داریم یک لیستی از اطلاعات را نمایش دهیم، که کاربر بتواند با انتخاب چندین لیست انتخاب شده آن را حذف نماید، برای این کار از یک عنوان متنی که اصطلاحا به آن cab می گویند، در بالای لیست ویو قرار دارداستفاده می نماییم.

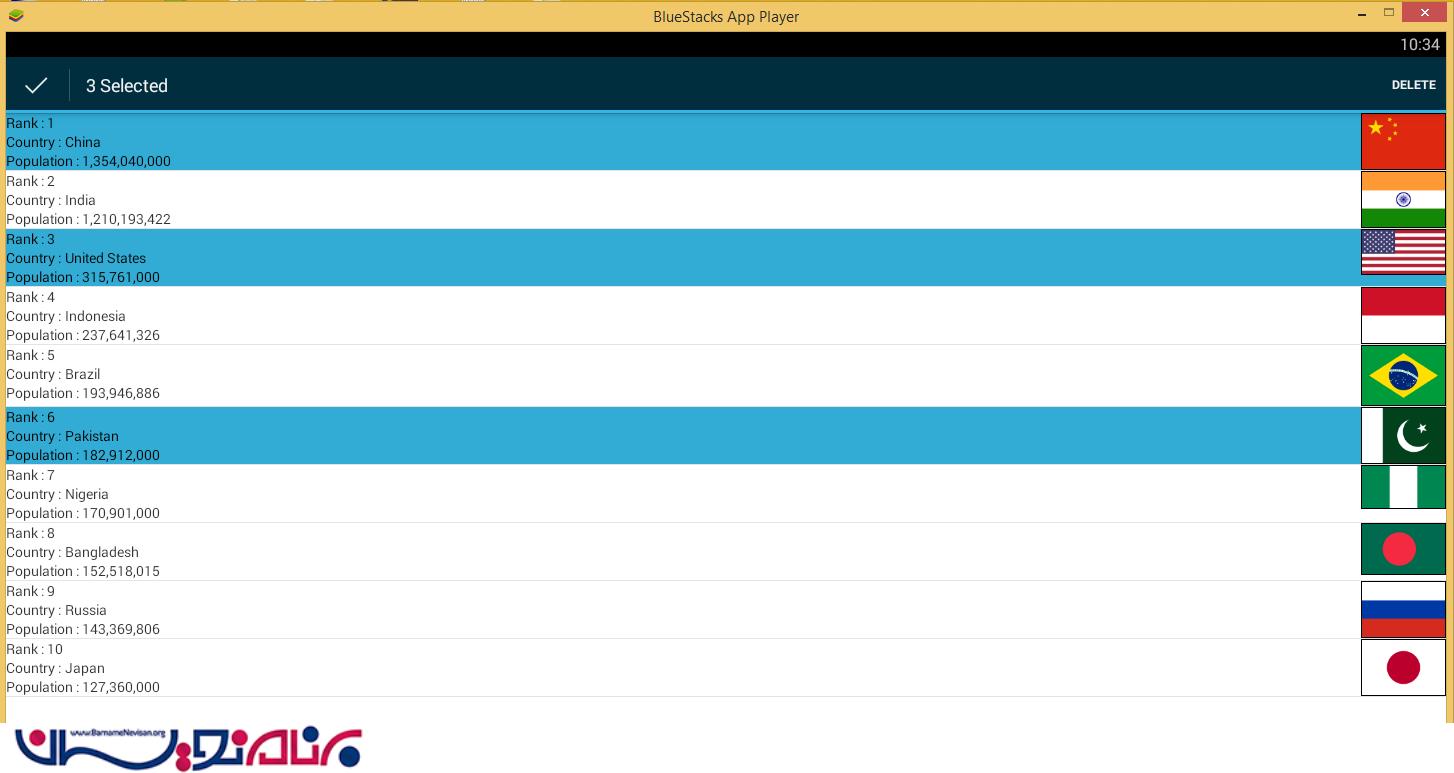
در این نمونه کاربر با کلیک کردن به مدت چند ثانیه با انتخاب آیتم مورد نظر می تواند اطلاعات آن ردیف لیست ویو را حذف نماید که ممکن است شامل عکس و یا متن بوده باشد.
برای ادامه ی مقاله لطفا مقاله ی ایجاد listview سفارشی در اندروید را مطالعه نمایید.
ابتدا یک پروژه ی جدید ایجاد نمایید، نام و package مورد نظر را بنویسید.
برای نمایش لیست ها از activity زیر استفاده نمایید:
<RelativeLayout xmlns:android="http://schemas.android.com/apk/res/android"
    android:layout_width="fill_parent"
    android:layout_height="fill_parent" >

    <ListView
        android:id="@+id/listview"
        android:layout_width="fill_parent"
        android:layout_height="fill_parent" />

</RelativeLayout>
برای ایجاد action bar ای که قرار است بالای لیست ویو قرار بگیرد و عنوان حذف را داشته باشد باید داخل پوشه ی menu از یک فایل xml استفاده نمایید و داخل آن آیتم های مورد نظر را بنویسید:
<menu xmlns:android="http://schemas.android.com/apk/res/android" >
    <item
        android:id="@+id/delete"
        android:title="حذف"/>
</menu>
حالا یک کلاس ایجاد نمایید داخل کلاس مورد نظر اطلاعات مورد نیاز که می خواهید داخل لیست ویو قرار بگیرد را با استفاده از get و set صدا می زنید کد به صورت زیر خواهد بود:
public class WorldPopulation {
	private String rank;
	private String country;
	private String population;
	private int flag;
	public WorldPopulation(int flag, String rank, String country,
			String population) {
		this.rank = rank;
		this.country = country;
		this.population = population;
		this.flag = flag;
	}
	public String getRank() {
		return rank;
	}
	public void setRank(String rank) {
		this.rank = rank;
	}
	public String getCountry() {
		return country;
	}
	public void setCountry(String country) {
		this.country = country;
	}
	public String getPopulation() {
		return population;
	}
	public void setPopulation(String population) {
		this.population = population;
	}
	public int getFlag() {
		return flag;
	}
	public void setFlag(int flag) {
		this.flag = flag;
	}

}
حالا برای نمایش لیست ویوها باید از کلاس ای استفاده نمایید که از کلاس Listview ارث بری نماید و باید از کلاسی که لیستی از اطلاعات را تعریف کرده ایم ارث برده شود.کلاس به صورت زیر خواهد بود:
import android.util.SparseBooleanArray;
import android.view.LayoutInflater;
import android.view.View;
import android.view.ViewGroup;
import android.widget.TextView;
import java.util.List;
import android.content.Context;
import android.widget.ArrayAdapter;
import android.widget.ImageView;
public class ListViewAdapter extends ArrayAdapter<WorldPopulation> {
	// Declare Variables
	Context context;
	LayoutInflater inflater;
	List<WorldPopulation> worldpopulationlist;
	private SparseBooleanArray mSelectedItemsIds;
	public ListViewAdapter(Context context, int resourceId,
			List<WorldPopulation> worldpopulationlist) {
		super(context, resourceId, worldpopulationlist);
		mSelectedItemsIds = new SparseBooleanArray();
		this.context = context;
		this.worldpopulationlist = worldpopulationlist;
		inflater = LayoutInflater.from(context);
	}
	private class ViewHolder {
		TextView rank;
		TextView country;
		TextView population;
		ImageView flag;
	}
	public View getView(int position, View view, ViewGroup parent) {
		final ViewHolder holder;
		if (view == null) {
			holder = new ViewHolder();
			view = inflater.inflate(R.layout.listview_item, null);
			// Locate the TextViews in listview_item.xml
			holder.rank = (TextView) view.findViewById(R.id.rank);
			holder.country = (TextView) view.findViewById(R.id.country);
			holder.population = (TextView) view.findViewById(R.id.population);
			// Locate the ImageView in listview_item.xml
			holder.flag = (ImageView) view.findViewById(R.id.flag);
			view.setTag(holder);
		} else {
			holder = (ViewHolder) view.getTag();
		}
		// Capture position and set to the TextViews
		holder.rank.setText(worldpopulationlist.get(position).getRank());
		holder.country.setText(worldpopulationlist.get(position).getCountry());
		holder.population.setText(worldpopulationlist.get(position)
				.getPopulation());
		// Capture position and set to the ImageView
		holder.flag.setImageResource(worldpopulationlist.get(position)
				.getFlag());
		return view;
	}
	@Override
	public void remove(WorldPopulation object) {
		worldpopulationlist.remove(object);
		notifyDataSetChanged();
	}
	public List<WorldPopulation> getWorldPopulation() {
		return worldpopulationlist;
	}
	public void toggleSelection(int position) {
		selectView(position, !mSelectedItemsIds.get(position));
	}
	public void removeSelection() {
		mSelectedItemsIds = new SparseBooleanArray();
		notifyDataSetChanged();
	}
	public void selectView(int position, boolean value) {
		if (value)
			mSelectedItemsIds.put(position, value);
		else
			mSelectedItemsIds.delete(position);
		notifyDataSetChanged();
	}
	public int getSelectedCount() {
		return mSelectedItemsIds.size();
	}
	public SparseBooleanArray getSelectedIds() {
		return mSelectedItemsIds;
	}
}
در کلاس بالا یک لیستی از رشته ها قرار است نمایش داده شود، و متن و تصویر مورد نظر داخل یک textview و Imageview تنظیم شود.
برای نمایش متن و تصویر مورد نظر باید داخل لایه ی xml قطعه کد زیر را بنویسیم:
<RelativeLayout xmlns:android="http://schemas.android.com/apk/res/android"
    android:layout_width="fill_parent"
    android:layout_height="fill_parent"
    android:background="?android:attr/activatedBackgroundIndicator" >

    <TextView
        android:id="@+id/ranklabel"
        android:layout_width="wrap_content"
        android:layout_height="wrap_content"
        android:text="@string/ranklabel" />

    <TextView
        android:id="@+id/rank"
        android:layout_width="wrap_content"
        android:layout_height="wrap_content"
        android:layout_toRightOf="@+id/ranklabel" />

    <TextView
        android:id="@+id/countrylabel"
        android:layout_width="wrap_content"
        android:layout_height="wrap_content"
        android:layout_below="@+id/ranklabel"
        android:text="@string/countrylabel" />

    <TextView
        android:id="@+id/country"
        android:layout_width="wrap_content"
        android:layout_height="wrap_content"
        android:layout_below="@+id/rank"
        android:layout_toRightOf="@+id/countrylabel" />

    <TextView
        android:id="@+id/populationlabel"
        android:layout_width="wrap_content"
        android:layout_height="wrap_content"
        android:layout_below="@+id/countrylabel"
        android:text="@string/populationlabel" />

    <TextView
        android:id="@+id/population"
        android:layout_width="wrap_content"
        android:layout_height="wrap_content"
        android:layout_below="@+id/country"
        android:layout_toRightOf="@+id/populationlabel" />

    <ImageView
        android:id="@+id/flag"
        android:layout_width="wrap_content"
        android:layout_height="wrap_content"
        android:layout_alignParentRight="true"
        android:background="#000000"
        android:padding="1dp" />

</RelativeLayout>
داخل فایل string هم می توانید نام مقادیر و نام پروژه را داخل آن عوض نمایید.
<resources>
    <string name="app_name">Multiple Selection ListView</string>
    <string name="hello_world">Hello world!</string>
    <string name="ranklabel">"Rank : "</string>
    <string name="countrylabel">"Country : "</string>
    <string name="populationlabel">"Population : "</string>
    <string name="delete">Delete</string>
</resources>
در آخر برای پر کردن اطلاعات و نمایش آن داخل لیست ویو ی مورد نظر باید از کلاس زیر استفاده نمایید:
import android.os.Bundle;
import android.app.Activity;
import android.widget.ListView;
import android.util.SparseBooleanArray;
import android.view.ActionMode;
import android.view.Menu;
import android.view.MenuItem;
import java.util.ArrayList;
import java.util.List;

import android.widget.AbsListView.MultiChoiceModeListener;
public class MainActivity extends Activity {
	// Declare Variables
	ListView list;
	ListViewAdapter listviewadapter;
	List<WorldPopulation> worldpopulationlist = new ArrayList<WorldPopulation>();
	String[] rank;
	String[] country;
	String[] population;
	int[] flag;
	@Override
	protected void onCreate(Bundle savedInstanceState) {
		super.onCreate(savedInstanceState);
		// Get the view from listview_main.xml
		setContentView(R.layout.listview_main);
		// Generate sample data into string arrays
		rank = new String[] { "1", "2", "3", "4", "5", "6", "7", "8", "9", "10" };

		country = new String[] { "China", "India", "United States",
				"Indonesia", "Brazil", "Pakistan", "Nigeria", "Bangladesh",
				"Russia", "Japan" };
		population = new String[] { "1,354,040,000", "1,210,193,422",
				"315,761,000", "237,641,326", "193,946,886", "182,912,000",
				"170,901,000", "152,518,015", "143,369,806", "127,360,000" };
		flag = new int[] { R.drawable.china, R.drawable.india,
				R.drawable.unitedstates, R.drawable.indonesia,
				R.drawable.brazil, R.drawable.pakistan, R.drawable.nigeria,
				R.drawable.bangladesh, R.drawable.russia, R.drawable.japan };
		for (int i = 0; i < rank.length; i++) {
			WorldPopulation worldpopulation = new WorldPopulation(flag[i],
					rank[i], country[i], population[i]);
			worldpopulationlist.add(worldpopulation);
		}
		// Locate the ListView in listview_main.xml
		list = (ListView) findViewById(R.id.listview);

		// Pass results to ListViewAdapter Class
		listviewadapter = new ListViewAdapter(this, R.layout.listview_item,
				worldpopulationlist);
		// Binds the Adapter to the ListView
		list.setAdapter(listviewadapter);
		list.setChoiceMode(ListView.CHOICE_MODE_MULTIPLE_MODAL);
		// Capture ListView item click
		list.setMultiChoiceModeListener(new MultiChoiceModeListener() {
			@Override
			public void onItemCheckedStateChanged(ActionMode mode,
					int position, long id, boolean checked) {
				// Capture total checked items
				final int checkedCount = list.getCheckedItemCount();
				// Set the CAB title according to total checked items
				mode.setTitle(checkedCount + " Selected");
				// Calls toggleSelection method from ListViewAdapter Class
				listviewadapter.toggleSelection(position);
			}
			@Override
			public boolean onActionItemClicked(ActionMode mode, MenuItem item) {
				switch (item.getItemId()) {
				case R.id.delete:
					// Calls getSelectedIds method from ListViewAdapter Class
					SparseBooleanArray selected = listviewadapter
							.getSelectedIds();
					// Captures all selected ids with a loop
					for (int i = (selected.size() - 1); i >= 0; i--) {
						if (selected.valueAt(i)) {
							WorldPopulation selecteditem = listviewadapter
									.getItem(selected.keyAt(i));
							// Remove selected items following the ids
							listviewadapter.remove(selecteditem);
						}
					}
					// Close CAB
					mode.finish();
					return true;
				default:
					return false;
				}
			}
			@Override
			public boolean onCreateActionMode(ActionMode mode, Menu menu) {
				mode.getMenuInflater().inflate(R.menu.activity_main, menu);
				return true;
			}
			@Override
			public void onDestroyActionMode(ActionMode mode) {
				// TODO Auto-generated method stub
				listviewadapter.removeSelection();
			}
			@Override
			public boolean onPrepareActionMode(ActionMode mode, Menu menu) {
				// TODO Auto-generated method stub
				return false;
			}
		});
	}
}
در فایل androidmanifest هم کم ترین api مورد نظر باید 11 باشد.
در آخر خروجی به صورت زیر خواهد بود:

- Android
- 4k بازدید
- 2 تشکر